🇳🇿 New Zealand's Home Improvement Magazine Sponsored by NZ Homeware — Premium Bathroom & Kitchen →
The New Zealand Kitchen & Bathroom Renovation Guide A Practical Homeowner’s Handbook for DIY Decisions, Product Planning and Licensed Installation
Free E-Book
The New Zealand Kitchen & Bathroom Renovation Guide A Practical Homeowner’s Handbook for DIY Decisions, Product Planning and Licensed Installation

A practical NZ kitchen and bathroom renovation guide covering costs, consent, waterproofing, product selection, tradie checks, DIY limits and homeowner checklists.

Contents
Introduction
Why New Zealand renovations need a different mindset About the Author Who Should Read This Before Spending Money
Part 1 — The New Zealand Renovation Reality
Part Introduction Chapter 1. Why renovating in New Zealand is different Chapter 2. The legal framework homeowners must understand Chapter 3. The traffic-light rule: DIY, caution and licensed-only work
Part 2 — Before You Spend Money
Part Introduction Chapter 4. Understanding your house before renovation Chapter 5. Location-based renovation risks Chapter 6. Hidden risks: asbestos, lead paint, old wiring and old pipes Chapter 7. Budget planning and quote comparison
Part 3 — Product and Material Selection
Part Introduction Chapter 8. Choosing compliant products Chapter 9. Choosing bathroom products correctly Chapter 10. Choosing kitchen and laundry products correctly
Part 4 — Kitchen Renovation Planning
Part Introduction Chapter 11. Kitchen layout and workflow Chapter 12. Kitchen installation checkpoints
Part 5 — Bathroom Renovation Planning
Part Introduction Chapter 13. Bathroom layout and pre-installation planning Chapter 14. Waterproofing explained for homeowners Chapter 15. Bathroom ventilation and moisture control Chapter 16. Bathroom product installation checkpoints
Part 6 — Working with Professionals
Part Introduction Chapter 17. How to choose and check tradies Chapter 18. Managing the renovation process Chapter 19. Handover, maintenance and dispute preparation
Part 7 — NZHomeware Practical Support System
Part Introduction Chapter 20. Before-you-buy support workflow Chapter 21. Installation support workflow Chapter 22. After-sales and troubleshooting workflow
Appendices
Appendix A. DIY traffic-light checklist Appendix B. Pre-renovation home inspection checklist Appendix C. Bathroom measurement sheet Appendix D. Kitchen sink and tapware measurement sheet Appendix E. Quote comparison template Appendix F. Tradie interview questions Appendix G. Handover document checklist Appendix H. Maintenance calendar Appendix I. Customer service scripts Appendix J. Official reference links
Read Online ↓ Download PDF

Introduction

Why New Zealand renovations need a different mindset

Why Kitchen and Bathroom Renovations in New Zealand Need a Different Mindset

Renovating a kitchen or bathroom in New Zealand is not the same as replacing furniture, repainting a bedroom, or following a weekend DIY video online.

A kitchen or bathroom renovation usually involves water, waste pipes, electricity, ventilation, waterproofing, fixed fixtures, structural surfaces, and sometimes building consent. These are not just design decisions. They affect safety, compliance, insurance, long-term property value, and the comfort of daily living.

Many homeowners start with a simple idea: replace an old vanity, install a new toilet, upgrade a kitchen sink, change the tapware, or refresh a tired bathroom. But once the work begins, hidden issues can appear quickly: old pipes, poor waterproofing, non-compliant electrical work, asbestos-containing materials, uneven walls, missing framing support, or previous renovations that were never properly consented.

This is why New Zealand renovations require a different mindset.

The question is not simply, “Can I do this myself?”
A better question is:

“What can I safely do myself, what should I check first, and what must be handled by a licensed professional?”

This guide is designed to help you make that decision with more confidence.

It does not try to turn every homeowner into a builder, plumber or electrician. Instead, it helps you understand the boundaries: where DIY can save money, where professional help is worth the cost, and where the law, safety or insurance risk means you should not take shortcuts.

A good renovation is not only about how the space looks when it is finished. It is about what sits behind the walls, under the floor, inside the cabinet, around the drain, behind the mirror and beneath the silicone line. The best kitchen or bathroom is one that looks good, works properly, complies with local requirements, and keeps performing long after the project is complete.

That is the mindset behind this guide.

Who This Guide Is For

This guide has been written for New Zealand homeowners, renovators, landlords, first-home buyers and property owners who are planning a kitchen, bathroom or laundry upgrade.

It is especially useful if you are:

  • planning a bathroom or kitchen renovation for the first time;

  • unsure whether a job is suitable for DIY;

  • trying to understand when a plumber, electrician, gasfitter, drainlayer, LBP or other licensed professional is required;

  • comparing quotes from tradies;

  • choosing tapware, toilets, vanities, basins, mirrors, sinks, laundry tubs or bathroom accessories;

  • preparing for a renovation in an older home;

  • trying to avoid hidden costs, delays, failed waterproofing or insurance problems;

  • helping a customer, tenant or family member make product and installation decisions.

This guide is also useful for customer service teams, sales teams and showroom staff who need to explain product suitability, installation limitations and pre-purchase checks in a clear and responsible way.

It is not written for one type of reader only. Some people will use it to plan a full renovation. Others may only need one section before buying a toilet, vanity, mirror, tap or kitchen sink. You do not need to read it from cover to cover. Use it as a practical reference whenever a renovation decision needs to be checked.

How to Use This Guide

This guide is designed to be used in three ways.

First, use it as a planning tool before you spend money. Before ordering products, accepting a quote or booking a tradie, read the relevant chapters on compliance, measurements, hidden risks and installation planning. Many renovation problems can be prevented before the first product is purchased.

Second, use it as a decision-making tool during the project. When you are unsure whether a task is DIY-friendly, risky or licensed-only, refer to the traffic-light rule. When you receive a quote, use our Quote and Scope Comparison Sheet to ensure you are comparing like-for-like services and identifying any excluded costs. When a product is about to be installed, use the pre-installation checklist.

Third, use it as a handover and maintenance tool after the work is complete. A renovation does not end when the last tile is cleaned. You still need product manuals, warranties, compliance documents, photos of hidden work, maintenance routines and a clear record of who did what.

For easier reading, this guide separates renovation decisions into four levels:

Understand — Learn the basic rule or risk.
Check — Confirm the measurements, product requirements or compliance issue.
Decide — Choose whether to DIY, ask for advice or hire a licensed professional.
Record — Keep photos, invoices, manuals, certificates and written communication.

If you are reading this guide as a homeowner, focus first on the chapters about DIY boundaries, house risks, budgeting, product selection and tradie management.

If you are reading it as a customer service or sales team member, focus on the product selection chapters, pre-installation checklists, support workflows and customer scripts.

If you are reading it before starting a major renovation, begin with the traffic-light rule and the hidden-risk chapters before looking at products. In New Zealand, the safest renovation decisions are often made before anything is purchased.

Important Disclaimer

This guide is provided for general information and practical education only.

It is not legal advice, building advice, plumbing advice, gasfitting advice, drainlaying advice, electrical advice, engineering advice or insurance advice. It should not be relied on as a substitute for advice from a qualified professional, licensed practitioner, registered tradesperson, council officer, insurer, lawyer or other relevant specialist.

Building, plumbing, gasfitting, drainlaying and electrical requirements may change over time. Requirements can also vary depending on the type of property, location, scope of work, council interpretation, product type and the condition of the existing building.

Before starting any renovation work, you should confirm the current requirements with the relevant official authority or qualified professional. This may include your local council, a Licensed Building Practitioner, a licensed plumber, licensed gasfitter, licensed drainlayer, registered electrician, structural engineer, waterproofing specialist, insurer or legal adviser.

Any examples, checklists, cost ranges or workflows in this guide are intended to support better planning and communication. They do not guarantee that a project is compliant, consent-exempt, safe, insurable or suitable for DIY.

For work involving fixed wiring, sanitary plumbing, gasfitting, drainage, structural elements, waterproofing, consented building work, restricted building work, asbestos, lead paint or other hazardous materials, always seek appropriate professional advice before proceeding.

When in doubt, stop and check first.

A renovation delay is usually cheaper than a compliance failure, a leak, an unsafe installation or a rejected insurance claim.
Note: Always verify a professional’s credentials before work begins. Use the LBP Register for builders and designers, or the EWRB Public Register for electricians to ensure they are properly licensed for your project.

Quick Decision Map

DIY, Ask First, or Hire Licensed Help

Before starting any kitchen or bathroom task, ask these five questions and record your findings in your Existing Home Inspection Notes to identify hidden risks before they become costs.

1. Does the work involve fixed electrical wiring?

If the work involves installing, moving, altering or connecting fixed wiring, a new power point, a new light circuit, a heated towel rail, a hard-wired mirror, an oven, a cooktop or a switchboard, do not treat it as normal DIY.

Likely answer: hire a registered electrician.

Simple plug-in appliances are different, but fixed wiring should always be checked by a registered electrician.


2. Does the work involve plumbing, drainage or gas?

If the work involves moving, altering or installing water pipes, waste pipes, toilets, showers, baths, gas appliances or drainage, assume it needs a licensed professional unless you have confirmed otherwise.

Likely answer: hire a licensed plumber, gasfitter or drainlayer.

Replacing a tap or shower head without changing the pipework may be simpler, but moving pipes or changing the system is not a casual DIY task.


3. Does the work affect waterproofing or a wet area?

If the work affects a shower, bathroom floor, tiled wet area, membrane, floor waste, wall penetration or waterproof junction, treat it as high risk.

Likely answer: ask first, and strongly consider a qualified waterproofing professional.

Waterproofing failure may not appear immediately. It can take months or years before signs of damage become visible.


4. Does the work affect structure, external weatherproofing or consented work?

If the work affects framing, load-bearing walls, exterior cladding, roofing, windows, structural floors, fire separations or an area covered by a building consent, do not proceed without professional advice.

Likely answer: ask your council, designer or LBP before work starts.

Even if a job looks small, it may affect structural performance or weather tightness.


5. Is the home older, altered or potentially hazardous?

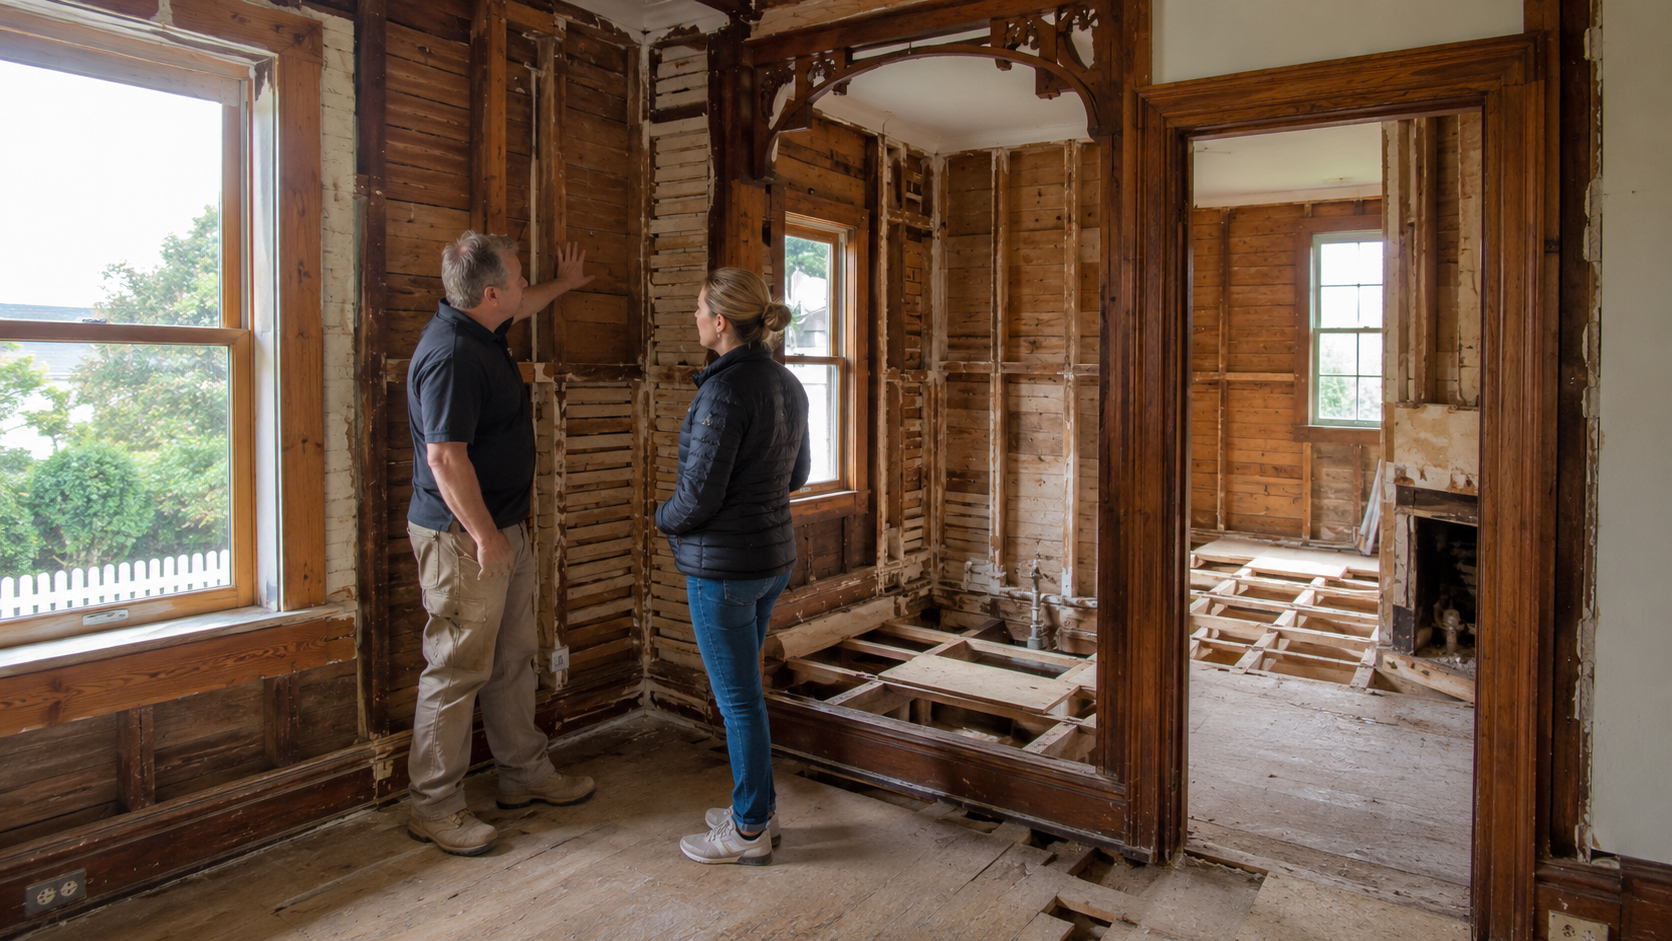
If the home was built before 2000, has unknown previous renovations, suspicious wall or floor materials, old wiring, old pipes, moisture damage, mould, or signs of unconsented work, pause before demolition or drilling.

Likely answer: inspect first. Test if needed. Do not disturb suspicious materials.

Hidden risks are often cheaper to investigate than to repair after damage has been done.

The Simple Rule

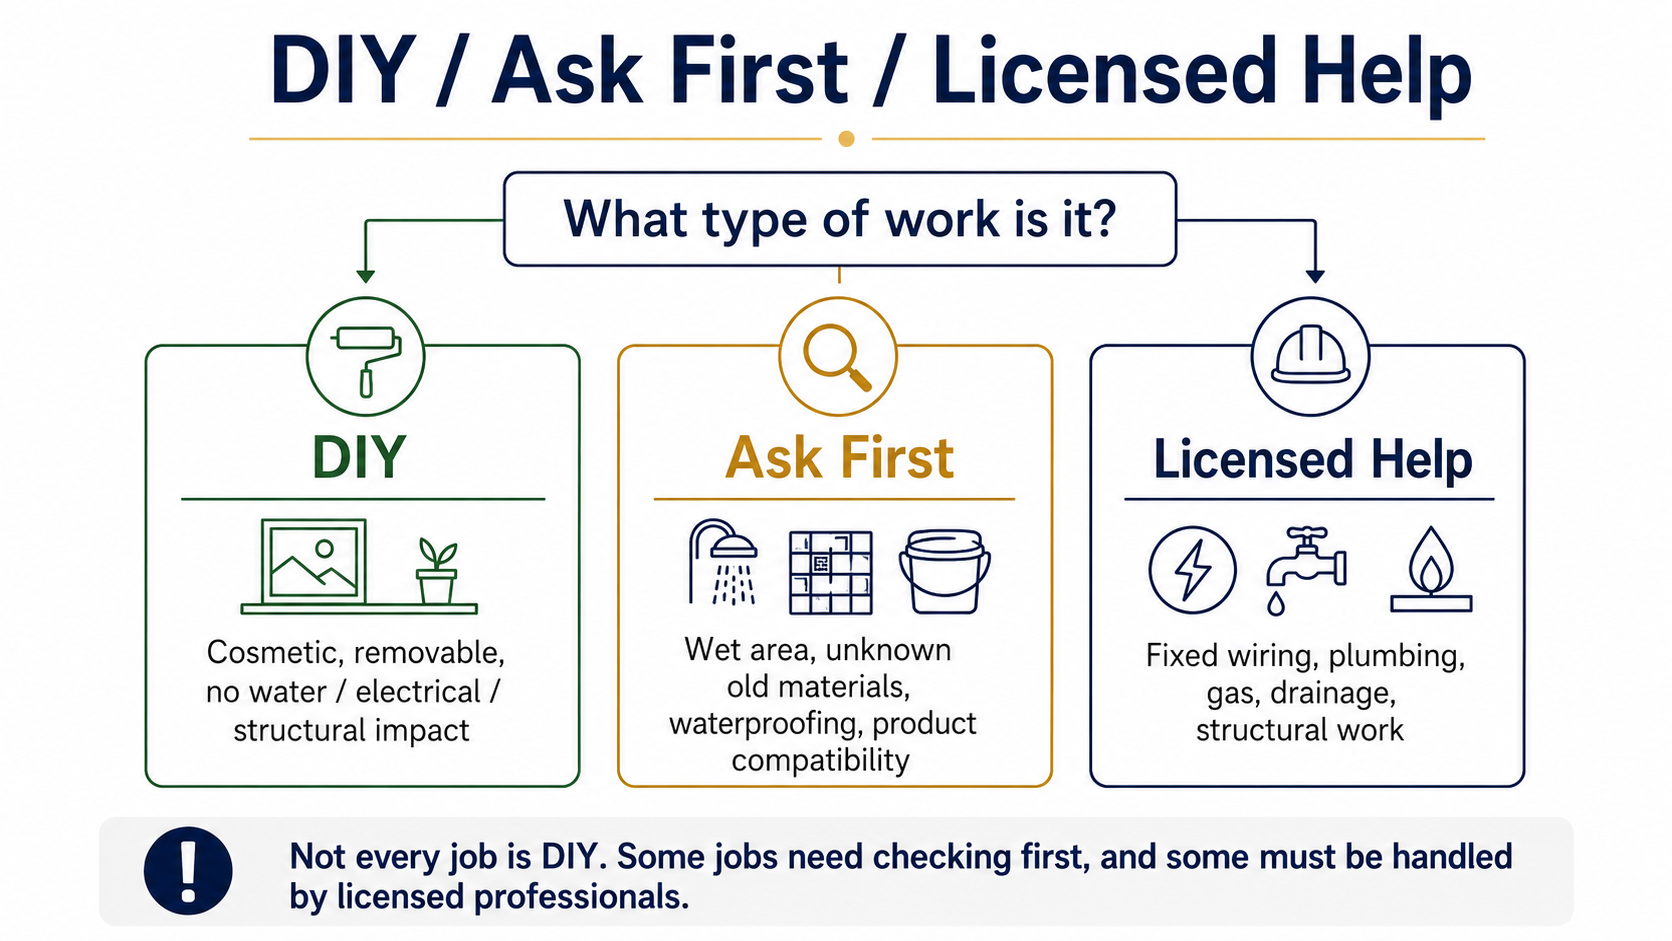
If the job is cosmetic, removable and does not affect water, waste, gas, fixed wiring, structure, waterproofing or consented work, it may be suitable for DIY.

If the job affects a wet area, hidden pipe, electrical connection, structure, waterproof layer or legal compliance, check first.

If the job involves licensed plumbing, gasfitting, drainlaying, prescribed electrical work, restricted building work, structural change, hazardous materials or building consent conditions, hire the right professional.You can confirm whether your specific project requires consent by consulting the official MBIE Building Consent Guidance.


Decision Snapshot

Task

Typical Decision

Repainting a bathroom wall

DIY, if surface is safe and dry

Replacing cabinet handles

DIY

Replacing a shower head

Usually DIY if no pipework changes

Replacing a tap like-for-like

Check product compatibility first

Moving a toilet

Licensed plumber

Adding a new power point

Registered electrician

Installing a hard-wired LED mirror

Registered electrician

Waterproofing a shower

High risk; use qualified professional

Cutting into unknown old wall lining

Stop and inspect first

Removing suspected asbestos material

Specialist advice required


Closing Note for the Reader

The best renovation decisions are usually made before work begins.

Measure twice. Check first. Keep records. Ask the right professional early. Choose products that suit the home, not just the showroom display. And remember: in kitchens and bathrooms, the parts you cannot see are often the parts that matter most.

About the Author

Yanlin Liu is a kitchen, bathroom and homeware industry practitioner with over five years of hands-on experience in product selection, customer support, installation coordination and after-sales problem solving.

Through daily work with homeowners, installers and renovation-related product issues, Yanlin has seen how many renovation problems begin before the work starts: unclear measurements, unsuitable products, missing documentation, poor communication with trades, or underestimating the risks hidden behind wet areas.

This guide was written to help New Zealand homeowners make better decisions before spending money. It does not replace licensed building, plumbing, electrical or legal advice. Instead, it gives homeowners a practical framework for understanding when to DIY, when to ask questions, when to involve professionals, and how to choose kitchen and bathroom products with more confidence.

Yanlin’s approach is practical, product-aware and homeowner-focused: plan before buying, respect compliance, keep records, and never judge a renovation only by how it looks on the day it is finished.

Who Should Read This Before Spending Money

Who Should Read This Before Spending Money

This guide is written for New Zealand homeowners who are planning, pricing or preparing for a kitchen, bathroom or laundry renovation.

It is especially useful if you are:

  • replacing a bathroom vanity, toilet, basin, shower, mirror or tapware;

  • planning a kitchen sink, tapware, benchtop or appliance upgrade;

  • comparing renovation quotes and unsure why prices vary so much;

  • deciding what can be DIY and what needs a licensed professional;

  • renovating an older home, apartment, townhouse, rural property or coastal home;

  • unsure whether building consent, electrical certification or plumbing records may matter;

  • trying to avoid buying products that look good online but do not suit your site;

  • preparing to speak with a builder, plumber, electrician, designer, tiler or installer;

  • worried about waterproofing, ventilation, leaks, condensation or mould;

  • wanting a clearer handover checklist before making final payment.

This guide is not written to replace qualified professional advice. It is written to help you ask better questions before money is spent, products are ordered or trades are booked.

If you are still at the planning stage, this is the best time to read it.

The earlier you understand the risks, the more choices you still have.

Part 1 — The New Zealand Renovation Reality

Part Introduction

Most renovation mistakes do not begin on site. They begin much earlier, when a homeowner misunderstands the type of project they are actually starting.

A kitchen or bathroom renovation in New Zealand is not simply a design exercise. It sits inside a small market, a high-labour-cost environment, a strict compliance framework, a damp and varied climate, and a housing stock that often hides old materials, previous alterations and site-specific risks.

Before choosing tiles, tapware, vanities or benchtops, homeowners need to understand the reality around the renovation: what makes New Zealand different, which rules may apply, where DIY ends, and why the house itself often has a stronger opinion than the mood board.

This part gives homeowners the foundation. It explains the mindset, legal framework and practical risk boundaries that should be understood before a renovation is treated as “simple”.

The aim is not to make renovation frightening. It is to make the hidden rules visible early enough for better decisions.

Chapter 1. Why renovating in New Zealand is different

Why Renovating in New Zealand Is Different

A kitchen or bathroom renovation in New Zealand is rarely just a design project.

It may begin with a mood board, a product wishlist, a few saved photos and a hopeful budget. But very quickly, it becomes something more practical: a conversation with the house, the trades, the weather, the local market, the Building Code, product availability, hidden materials and the long-term reality of moisture.

This is the first surprise for many homeowners.

They think they are choosing a vanity.
The house asks whether the wall can support it.

They think they are choosing a toilet.
The plumber asks about the waste position.

They think they are choosing a kitchen sink.
The benchtop fabricator asks for the exact cut-out template.

They think they are adding an LED mirror.
The electrician asks where the cable is and whether the circuit is suitable.

They think they are saving money by keeping things simple.
The old house opens a wall and reveals a problem nobody priced.

This is why New Zealand renovations need a different mindset.

The goal is not to make every project more complicated than it needs to be. A simple renovation should stay simple where it safely can. But kitchens, bathrooms and laundries are not ordinary rooms. They contain water, drainage, ventilation, electricity, wet-area surfaces, cabinetry, appliances, hidden services and daily use. A small mistake in these rooms does not always stay small.

In a bedroom, a poor product choice may look awkward.
In a bathroom, a poor product choice may leak.
In a kitchen, a poor sequence may damage cabinetry.
In a laundry, a small connection failure may become a floor or wall problem.

A successful New Zealand renovation is not only about what looks good when the job is finished.

It is about whether the space still works after six months, whether the products were suitable, whether the work was done by the right people, whether moisture was controlled, whether documents were kept, and whether the homeowner can maintain the room without constantly fighting problems.

This chapter explains the renovation reality behind the finished photos.


A Small Market Leaves Less Room for Last-Minute Fixes

New Zealand’s small market changes renovation planning in a very practical way.

It affects what products are available, how quickly parts can arrive, how soon trades can be booked and how painful a wrong decision becomes.

In a larger market, a missing part may be replaced quickly. A different size may be available the next day. Another installer may be found at short notice. A specialist product may have several local alternatives.

In New Zealand, that is not always the reality.

A certain vanity colour may be out of stock.
A tapware finish may need to be ordered.
A replacement cartridge may not be sitting on a local shelf.
A benchtop fabricator may be booked out.
A plumber may not be available again next week.
A delayed shower screen may push back the whole bathroom.

This means the cost of a wrong product is not only the product price.

It can become waiting time.
It can become rescheduling.
It can become extra labour.
It can become a temporary unusable bathroom or kitchen.
It can become pressure on the homeowner to accept a poor workaround.

A homeowner may choose a wall-hung vanity because it looks clean and modern. The product arrives, but the installer finds there is no suitable wall support at the fixing points. Now the question is no longer whether the vanity is beautiful. The question is whether the wall must be opened, framing added, lining repaired, waterproofing reviewed and the installation rescheduled.

The vanity was not necessarily a bad product.

The missing pre-installation check was the problem.

In New Zealand, planning early is not a luxury. It is risk control.

Before money is spent, confirm:

  • measurements;

  • product compatibility;

  • lead times;

  • installation requirements;

  • compliance information;

  • who is responsible for each stage;

  • what happens if something does not fit.

A small market does not mean you cannot renovate well.

It means the project should carry fewer guesses.


Skilled Labour Is Expensive Because the Risk Is Real

Many homeowners are surprised by the cost of licensed trades in New Zealand.

A plumber, electrician, gasfitter, drainlayer, waterproofing specialist, tiler, cabinetmaker or Licensed Building Practitioner is not only charging for the visible hours on site. Their price also reflects training, tools, insurance, travel, licensing, experience, compliance responsibility, problem-solving and the risk of being accountable when something goes wrong.

That matters most in kitchens and bathrooms because mistakes here are rarely isolated.

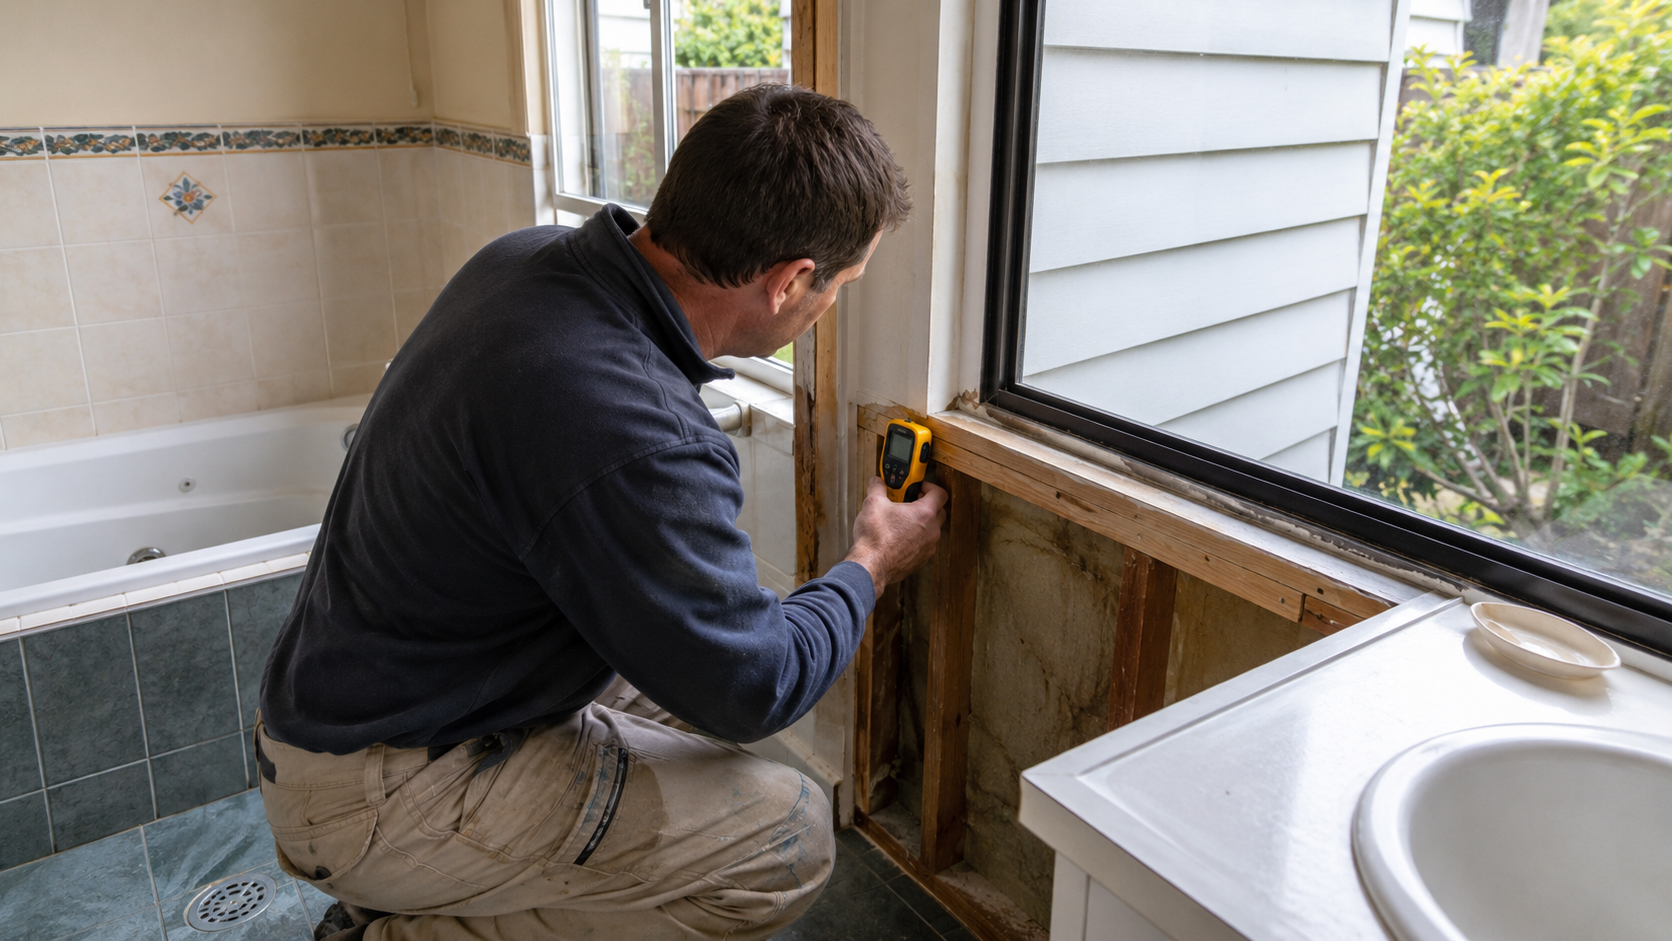
A poorly sealed shower can affect framing, flooring and the ceiling below.
An incorrect waste connection can create leaks, odours or hidden cabinet damage.
A rushed waterproofing detail can fail slowly and expensively.
A fixed electrical shortcut near a wet area can become a safety issue.
A product installed without correct documentation may create future warranty, insurance or resale questions.

This is why the cheapest labour is not always the lowest-cost option.

A higher quote may include preparation, licensed work, proper materials, sequencing, testing, insurance, documentation and accountability. A cheaper quote may be cheaper because some of those things are missing.

The difference may not show in the finished photo.

It may show after the first winter.
After the first leak.
After the first insurance question.
After the first time a buyer asks for records.
After the first time a tradie refuses to work on something undocumented.

Good labour does not guarantee a perfect project. But poor or unsuitable labour can turn manageable work into long-term damage.

The better question is not:

“Why is this tradie so expensive?”

The better question is:

“What risk is this price including, and what risk is a cheaper quote excluding?”

That question changes the way you compare quotes.


Lead Times Can Shape the Whole Project

Renovation schedules are often more fragile than homeowners expect.

A kitchen or bathroom project is not a single booking. It is a chain.

Demolition depends on access.
Investigation depends on what is found.
Plumbing rough-in depends on the layout.
Electrical rough-in depends on product choices.
Waterproofing depends on substrate preparation.
Tiling depends on waterproofing.
Cabinetry depends on measurements.
Benchtops depend on cabinets being fixed.
Sink cut-outs depend on exact product models.
Final fit-off depends on products being present.
Handover depends on testing and documents.

When one link is delayed, the next trade may not simply wait. They may move to another job, and your project goes back into the queue.

This is why lead times matter.

A delayed tap can hold up plumbing.
A missing waste fitting can stop the sink install.
A late LED mirror can expose an electrical-location mistake too late.
A delayed benchtop can pause the whole kitchen.
A wrong shower screen size can delay handover by weeks.

The solution is not to panic-buy everything.

The solution is to confirm what must be chosen early and what can safely wait.

Early decisions usually include:

  • toilet model and set-out;

  • vanity size and fixing type;

  • shower mixer and in-wall components;

  • kitchen sink model;

  • tapware model;

  • LED mirror or heated towel rail electrical requirements;

  • appliance sizes;

  • benchtop material and sink mounting method;

  • ventilation requirements.

Late design changes are not automatically wrong. But they become more expensive when they affect work already completed.

A good renovation schedule is not optimistic.

It is sequenced.


Wet Areas Are High-Risk Spaces

Bathrooms, laundries and kitchens are not ordinary rooms.

They are moisture-prone rooms. They contain water supply, drainage, surfaces that get wet, cabinets that can swell, electrical fittings that must be safe, and materials that must survive daily cleaning and repeated humidity.

New Zealand’s Building Code recognises internal moisture as a building-performance issue. Clause E3 — Internal Moisture is intended to help protect people and buildings from illness, injury and damage caused by fungal growth, excessive moisture and water overflow. MBIE guidance also discusses the need for wet-area surfaces to be impervious, easily cleaned and adequately ventilated.

Note: For a deeper understanding of how these requirements impact your project, refer to the official MBIE Building Performance Clause E3 (Internal Moisture) guidance.

This is one of the most important ideas in the whole guide:

wet areas fail as systems.

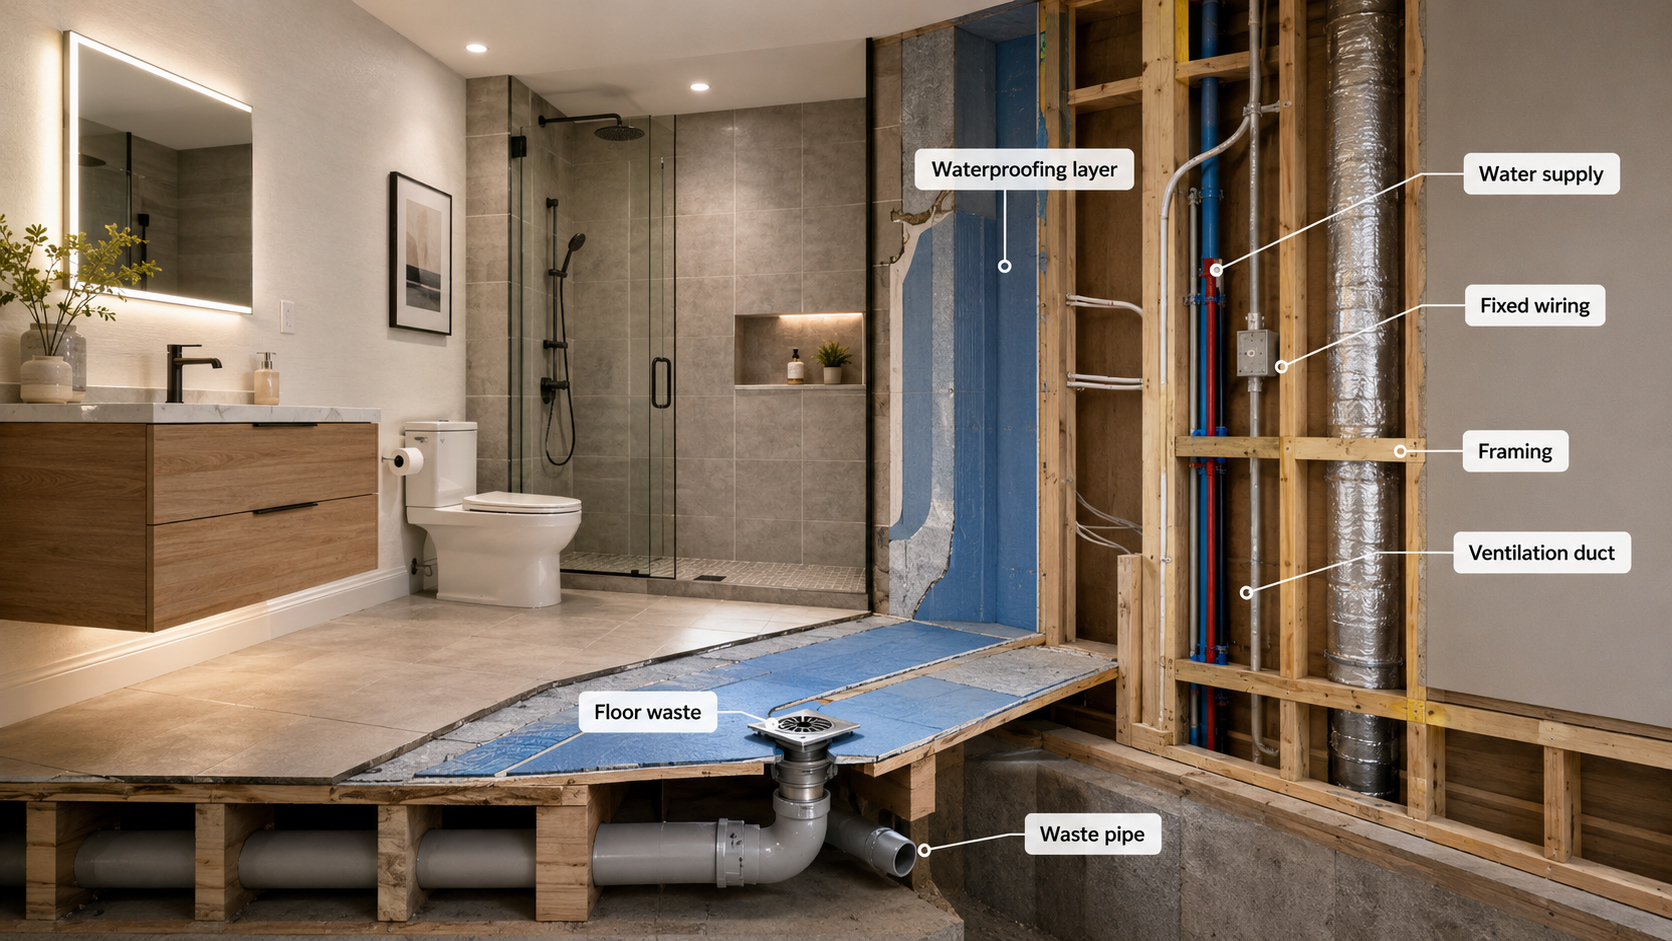
A bathroom is not just a toilet, vanity, shower, mirror and tiles. It is a system of water control, drainage, waterproofing, ventilation, electrical safety, surface durability and maintenance.

A kitchen is not just cabinets, a benchtop, a sink and tapware. It is a system of water connections, waste management, appliance integration, ventilation, heat, moisture, workflow and cleaning.

If the system is wrong, the products cannot save it.

A premium vanity will not fix poor ventilation.
A beautiful shower screen will not fix bad floor fall.
An expensive tap will not fix unsuitable water pressure.
A stylish mirror will not fix unsafe wiring.
A good sink will not protect a poorly sealed benchtop cut-out.

Wet-area failures often develop slowly. By the time visible signs appear, water may already have affected timber framing, flooring, wall linings, insulation, ceilings or adjoining rooms.

That is why a wet-area renovation should not be judged only on the finished surface.

Ask:

  • where will water go?

  • how will moisture leave?

  • what happens behind the surface?

  • how will the room dry?

  • who is responsible for waterproofing, plumbing and electrical work?

  • what evidence will be kept?

A wet area is successful when it controls water, not when it merely looks finished.


Why Cheap Renovation Often Becomes Expensive

A cheap renovation is not automatically bad.

There is nothing wrong with saving money. A clear, simple, well-planned project can be affordable and successful. Keeping the same layout, choosing cost-effective products, doing low-risk preparation, comparing quotes and avoiding unnecessary upgrades can all be sensible.

The problem is not saving money.

The problem is saving money in the wrong place.

In New Zealand kitchen and bathroom projects, “cheap” often becomes expensive for four reasons.

The first is unclear scope.

A homeowner thinks the quote includes demolition, rubbish removal, plumbing, electrical work, waterproofing, silicone, testing and handover documents. The quote may only include visible installation. The missing items do not disappear; they return later as extras.

The second is unsuitable products.

A toilet does not match the waste position. A vanity blocks the pipework. A basin splashes with the chosen tap. A mirror requires wiring that was not planned. A kitchen sink does not suit the cabinet or benchtop. The product price was cheap, but the installation correction is not.

The third is poor sequencing.

Products arrive after trades are booked. Waterproofing is rushed before the substrate is ready. Tiling starts before falls are confirmed. Electrical work is planned after walls are closed. Benchtop cut-outs are confirmed before the sink is on site.

The fourth is undocumented or unsuitable work.

Some work may not need building consent, but that does not mean no rules apply. Exempt work still needs to comply with relevant Building Code requirements. “No consent required” should never be confused with “do anything”.

The real danger of cheap renovation is that the saving is visible and the risk is hidden.

You see the lower quote today.
You may not see the missing waterproofing detail until next winter.
You may not see the poor pipe connection until the cabinet swells.
You may not see the lack of records until resale, insurance or dispute.

The better question is not:

“How do I make this as cheap as possible?”

The better question is:

“Where can I save safely, and where should I protect the project?”

That question leads to better decisions.


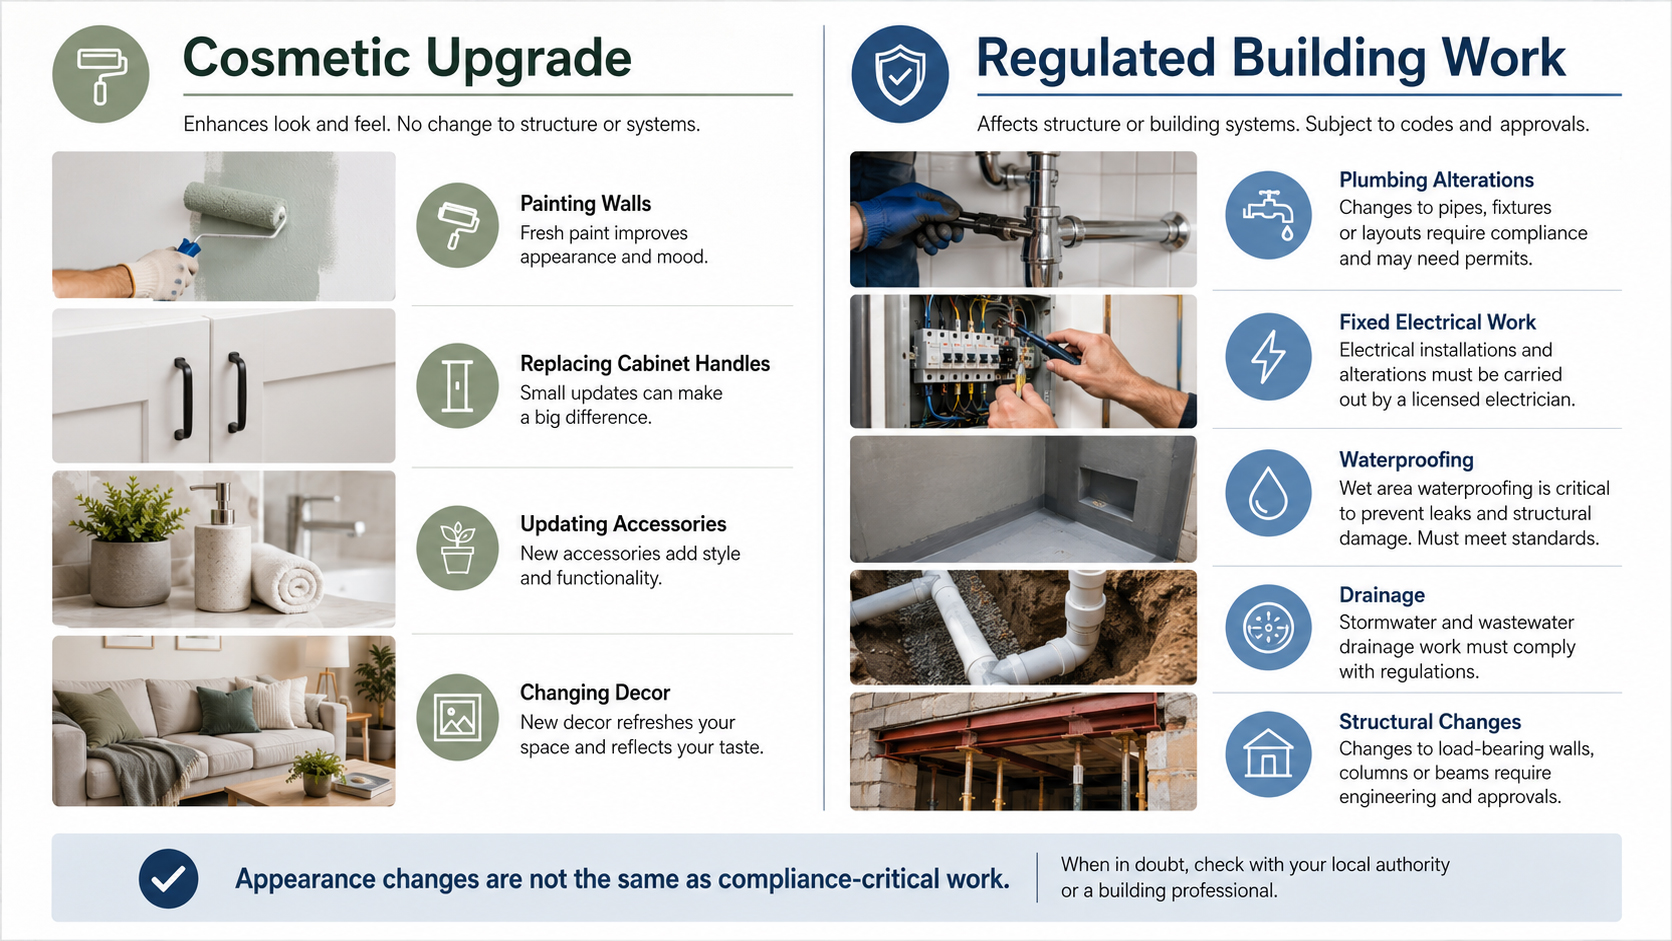
Cosmetic Upgrade or Regulated Work?

One of the most useful distinctions in New Zealand renovation is the difference between a cosmetic upgrade and work that affects building systems.

A cosmetic upgrade changes appearance or convenience without significantly affecting the systems that protect the building.

Examples may include:

  • repainting a dry interior wall;

  • changing cabinet handles;

  • replacing freestanding storage;

  • updating décor;

  • adding removable accessories;

  • choosing new soft furnishings.

These tasks still require care, especially in older homes where sanding or drilling may disturb hazardous materials, but they are usually lower risk.

Regulated or higher-risk work is different.

It affects water, drainage, electricity, gas, structure, waterproofing, fire safety, moisture control, exterior envelope or consent-related systems.

Examples may include:

  • moving plumbing;

  • altering drainage;

  • fixed electrical wiring;

  • gasfitting;

  • waterproofing a shower;

  • structural wall changes;

  • exterior penetrations;

  • installing hard-wired electrical bathroom products;

  • work connected to a building consent;

  • Restricted Building Work.

The confusing part is that kitchen and bathroom projects often contain both.

Replacing a vanity may look cosmetic, but it can involve plumbing, waste alignment, wall fixing, sealing and moisture protection.
Replacing a mirror may look simple, but a hard-wired LED mirror involves electrical work.
Replacing a shower screen may look like a product swap, but it can reveal waterproofing, wall alignment and floor-fall issues.
Replacing a kitchen sink may look straightforward, but it may involve benchtop cut-outs, waste connections and dishwasher integration.

That is why this guide uses the traffic-light approach.

Green-light work is generally suitable for capable DIYers when the surface and materials are safe.

Yellow-light work may be possible, but site conditions, product type or hidden systems must be checked first.

Red-light work should be handled by the correct licensed or qualified professional.

This approach is not anti-DIY.

It is anti-guesswork.


The New Zealand Renovation Mindset

A successful New Zealand kitchen or bathroom renovation is not measured only by the finished photos.

It is measured by whether the room works safely, drains properly, resists moisture, ventilates well, can be maintained, has the right documentation and remains trouble-free over time.

That requires three habits.

Plan before you buy

Measure the room. Understand the house. Confirm product requirements. Check lead times. Identify licensed work. Ask what documents will be needed. Decide what can safely remain simple and what must be handled professionally.

Do not let the shopping cart lead the renovation.

Build carefully

Do not rush wet areas, waterproofing, plumbing, electrical work, drainage, ventilation or hidden preparation.

The hidden stages often matter more than the visible finish.

A shower looks finished after tiling. But its success may have been decided before the tiles went on.
A kitchen looks finished after the benchtop is installed. But its success may have been decided when the cabinets were levelled and the sink cut-out confirmed.
A mirror looks finished when it lights up. But its safety may have been decided when the wiring was planned.

Keep records

Save quotes, invoices, product manuals, warranties, compliance documents, photos of hidden work, emails, variation approvals and handover notes.

Good records are not only for disputes.

They help with maintenance.
They help future tradies.
They help warranty claims.
They help insurance questions.
They help future buyers understand what was done.

In New Zealand, renovation confidence does not come from doing everything yourself.

It comes from knowing what should be done by whom, in what order, with what evidence.

That is the foundation of the rest of this guide.

Tip: Don't just save these files randomly. Use our Appendix D: Homeowner Project Folder Structure to organize your compliance documents, warranties, and site photos systematically.


Chapter Summary

Renovating in New Zealand requires a different mindset because kitchen, bathroom and laundry projects are not only design projects. They involve water, drainage, electricity, ventilation, moisture control, product suitability, skilled labour, lead times and documentation. New Zealand’s smaller market leaves less room for last-minute fixes, and skilled labour costs reflect real risk and responsibility. Wet areas fail as systems, not as isolated products. Cheap renovation becomes expensive when savings are made in the wrong places, especially around waterproofing, plumbing, electrical work, product compatibility and documentation. The safest approach is to separate cosmetic upgrades from higher-risk work, plan before buying, build carefully and keep records.

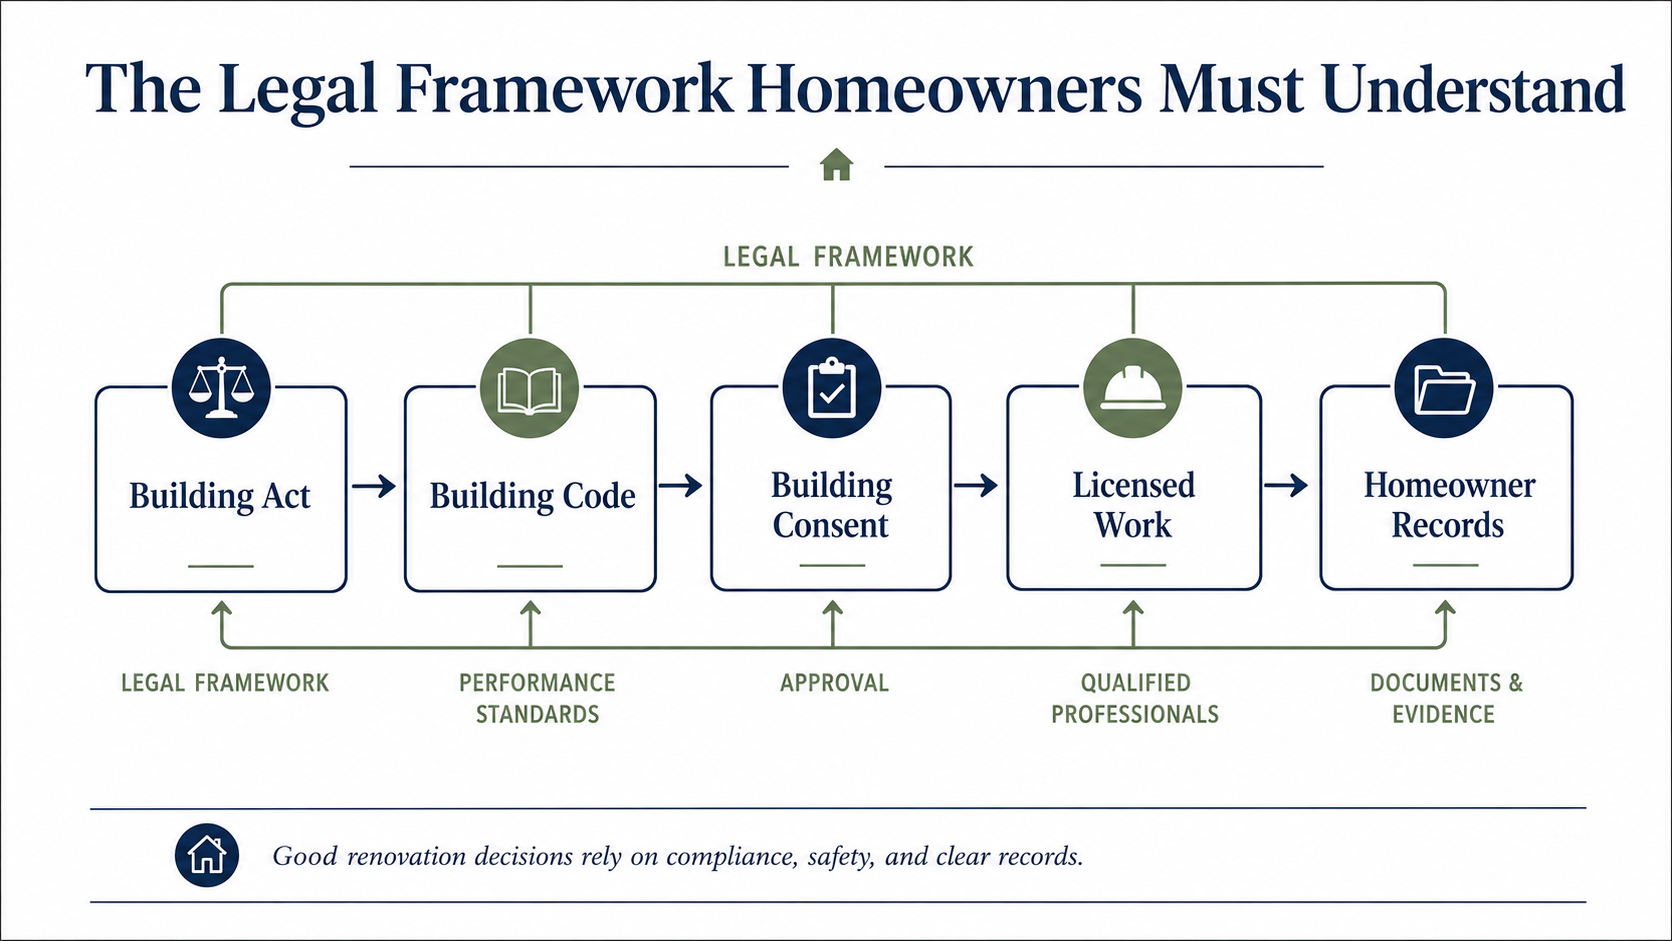
The Legal Framework Homeowners Must Understand

Most homeowners do not start a kitchen or bathroom renovation because they want to study building law.

They start because something in the home no longer works.

The bathroom feels old.
The kitchen storage is frustrating.
The shower leaks.
The vanity has swollen.
The toilet needs replacing.
The laundry is messy.
The home needs to feel more comfortable, more modern or more valuable.

That is where the renovation begins emotionally.

But in New Zealand, the project may quickly move from design into compliance.

The moment a renovation touches water, waste, fixed wiring, waterproofing, structure, external weatherproofing, gas, drainage or consented work, it enters a legal framework. That framework is not there to make life difficult. It exists because buildings are shared-risk objects. A mistake in one room can affect health, safety, property value, future owners, tenants, insurers, neighbours and tradespeople.

This is especially true in kitchens, bathrooms and laundries.

A poorly connected basin can damage a vanity.
A poorly waterproofed shower can damage framing.
A hidden electrical shortcut can create safety risk.
An unrecorded alteration can create problems when selling.
A missing certificate can become important years after the room looks finished.

For homeowners, the goal is not to become a lawyer, council officer, plumber, electrician or building inspector.

The goal is simpler:

know when a question is legal or compliance-related before the work begins.

A good homeowner does not need to know every technical answer.
But they do need to know when a technical answer is required.

This chapter explains the rules at the level a homeowner actually needs: what the Building Act and Building Code mean, when consent may matter, what “exempt” really means, when licensed people must be involved, why electrical and plumbing certificates should be kept, and why the homeowner still carries responsibility even after hiring professionals.


The Building Act and the Building Code: Law and Performance

Two terms appear again and again in New Zealand building work: Building Act and Building Code.

They are connected, but they are not the same thing.

The Building Act 2004 is the main law that governs building work in New Zealand. MBIE’s Building Performance guidance describes it as the primary legislation for the building industry, covering construction, alteration, demolition and maintenance of new and existing buildings.

The Building Code is different. It sets the minimum performance requirements buildings must meet. It is less about telling you the exact product to buy and more about the result the building work must achieve: safe, healthy, durable and suitable performance.

A simple way to remember it is:

The Building Act sets the legal system.
The Building Code sets the performance standard.

For kitchens and bathrooms, this matters because many renovation decisions affect building performance even when they look like product choices.

A shower is not only a shower. It affects internal moisture.
A bathroom fan is not only a fan. It affects ventilation.
A toilet is not only a toilet. It affects sanitary plumbing.
An LED mirror is not only a mirror. It may affect electrical safety.
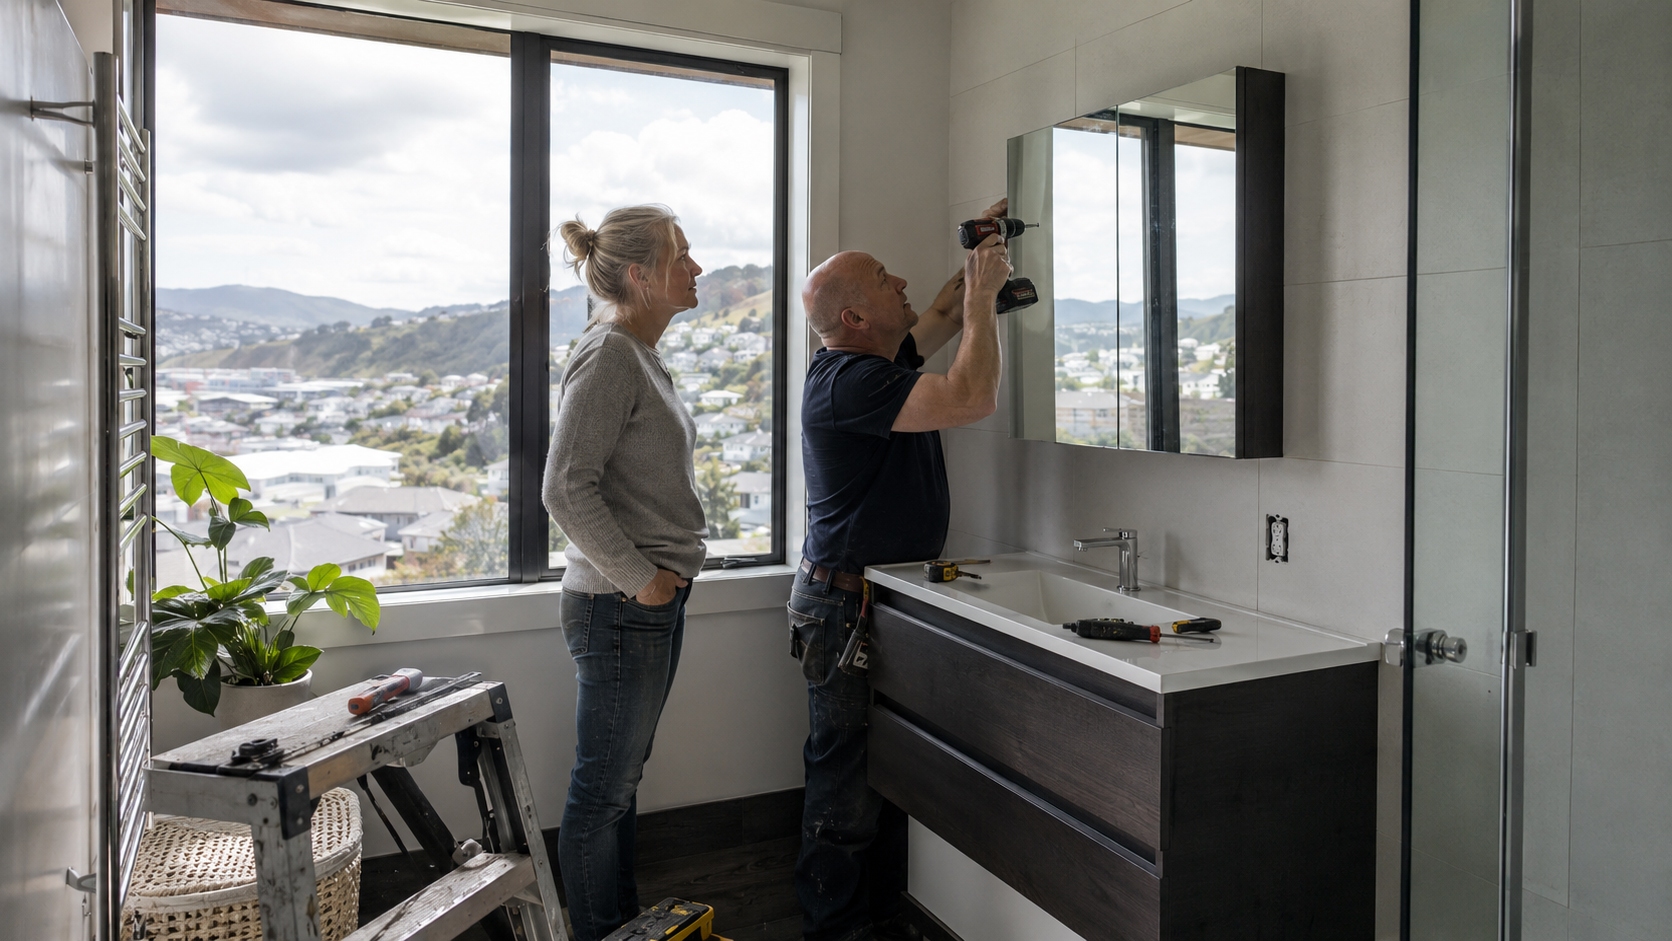
A wall-hung vanity is not only furniture. It may depend on wall structure and fixing.

One of the most important rules for homeowners is this:

All building work in New Zealand must comply with the Building Code, even if it does not require a building consent. MBIE states this directly in its Building Code compliance guidance.

That single idea prevents many mistakes.

“No building consent required” does not mean “no rules apply”.
It means formal council approval may not be needed before the work starts.
The work still needs to be done properly.


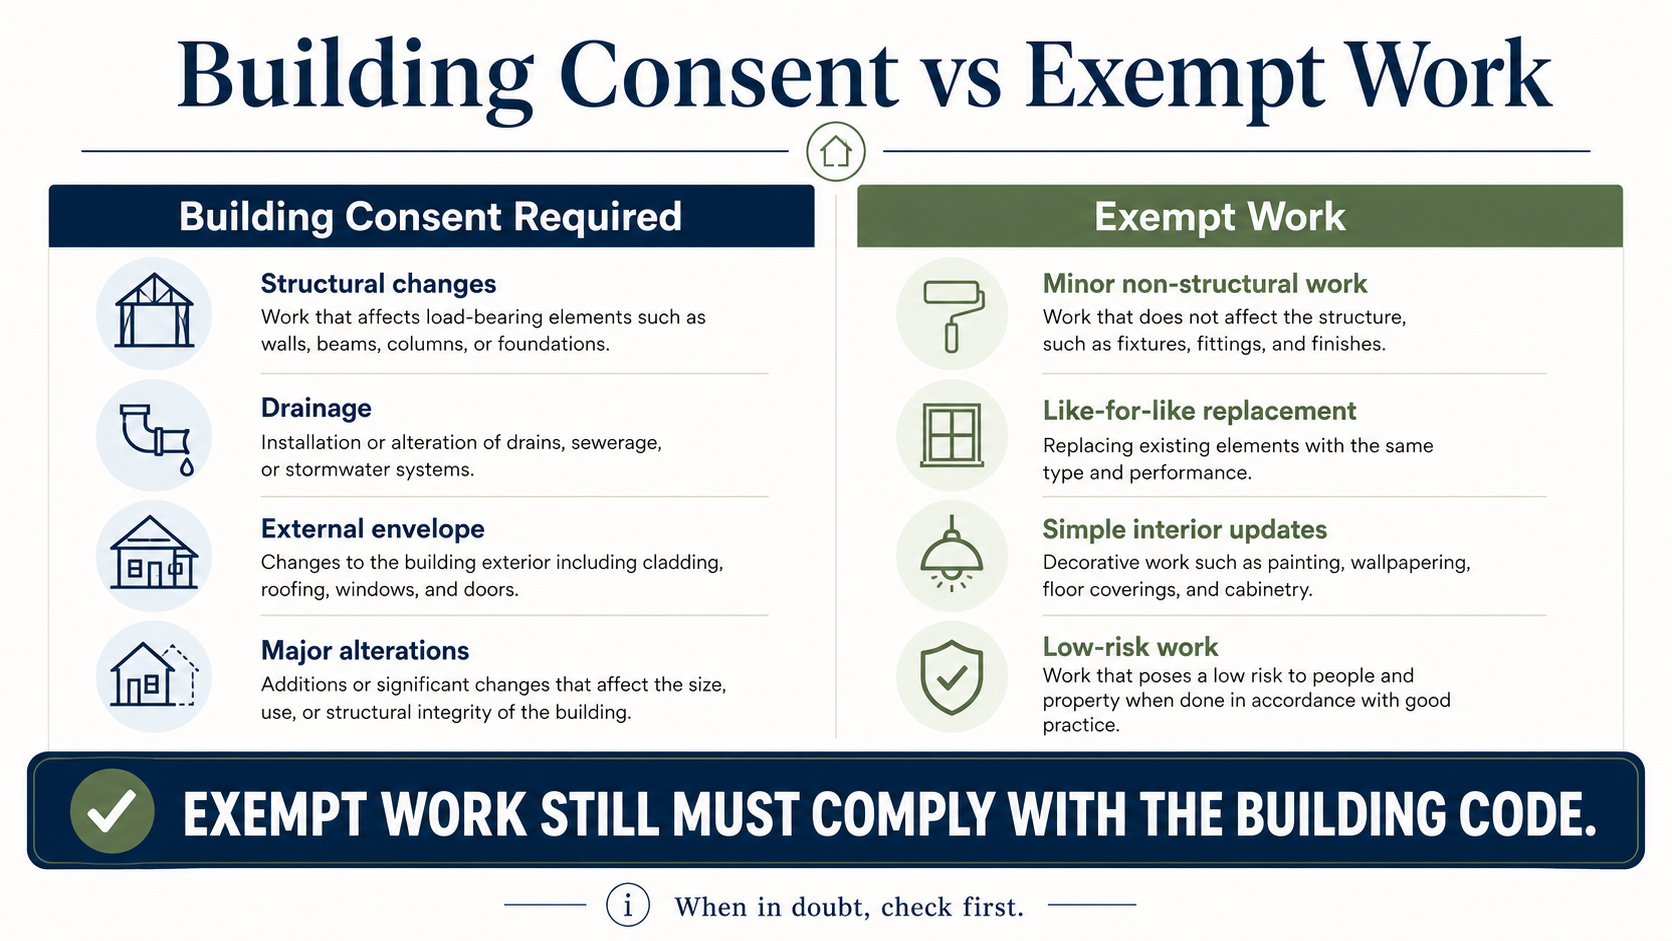
Building Consent: Approval Before Certain Work Begins

A building consent is formal approval from the local council for specific building work.

It means the council has reviewed the submitted plans and specifications and is satisfied that, if the work is carried out as proposed, it should comply with the Building Code.

For homeowners, the key words are:

specific building work.

A consent is not a general permission to renovate anything you like. It is approval for the work described in the application.

Kitchen and bathroom renovations may need building consent when the work affects things such as:

  • structural elements;

  • fire separations;

  • external weatherproofing;

  • new or altered sanitary facilities;

  • drainage;

  • certain wet-area or waterproofing details;

  • major layout changes;

  • apartments, unit titles or multi-unit buildings;

  • work forming part of a larger consented project.

The exact answer depends on the property, scope, council and details. That is why a casual answer from a friend, salesperson or online comment should not be treated as final.

MBIE provides the Can I Build It tool to help homeowners explore whether renovation or repair work may need a building consent. It is a useful early planning tool, but difficult or borderline projects should still be confirmed with council or a qualified professional.

The timing matters.

If consent is required, it should be sorted before the relevant work begins. Retrospective fixes are often slower, more expensive and less certain than getting the pathway right from the start.

The dangerous sentence is:

“Let’s just do it first and sort it out later.”

Sometimes “later” becomes very expensive.


Exempt Building Work: Less Process, Not Lower Standards

New Zealand allows some lower-risk building work to be carried out without building consent. This is often called exempt building work.

For homeowners, this can be helpful. It means not every small project needs a full council approval process.

But exemption is one of the most commonly misunderstood ideas in renovation.

Exempt building work does not mean:

  • the work can be careless;

  • the Building Code stops applying;

  • plumbing, gasfitting or electrical rules disappear;

  • product compliance can be ignored;

  • insurance will automatically cover poor work;

  • records no longer matter;

  • the homeowner has no responsibility.

MBIE’s Building Code compliance guidance is clear that building work must comply with the Building Code even if consent is not required.

This matters in kitchens and bathrooms because even “simple” work may touch important systems.

A like-for-like replacement may still need correct sealing.
A vanity replacement may still need proper waste connection.
A mirror replacement may still need safe fixing.
A kitchen sink replacement may still need correct edge sealing and drainage.
A shower fitting may still affect wet-area surfaces.

The safest way to think about exempt work is:

Exemption reduces the approval process.
It does not reduce the need for proper work.

A project can be exempt and still be badly done.
It can be exempt and still cause damage.
It can be exempt and still create insurance, maintenance or resale problems.

So the question is not only:

“Do I need consent?”

The better question is:

“Even if I do not need consent, what standards, trades and records still apply?”


Restricted Building Work: When the Work Affects the Building Itself

Restricted Building Work, often called RBW, is work that is critical to the structure or weathertightness of certain residential buildings. It must be carried out or supervised by an appropriately licensed Licensed Building Practitioner, usually called an LBP. MBIE’s guidance explains that LBPs must design or carry out restricted building work, or supervise it.

Many kitchen and bathroom projects do not involve RBW.

Changing cabinet handles is not RBW.
Painting a wall is not RBW.
Replacing a freestanding accessory is not RBW.

But a project can move into RBW territory when it affects:

  • structural framing;

  • load-bearing walls;

  • floors;

  • roof elements;

  • external walls;

  • windows;

  • cladding;

  • weathertightness details.

The risk is that a project begins as an interior renovation but uncovers or creates building-work issues.

A bathroom wall is opened and rotten framing is found.
A new bathroom window affects the external envelope.
A wall is removed to enlarge a kitchen.
A shower leak has damaged structural timber.
A townhouse renovation affects fire or acoustic systems.

At that point, the renovation is no longer just about product installation.

It may need design input, council involvement, LBP work, engineering advice or proper records.

For homeowners, the practical approach is:

If the work changes the building, not just the product, pause and confirm.

Also remember documentation. When LBP work is involved, records such as a Record of Work may become important for council sign-off, insurance, resale and future maintenance.

A beautiful renovation with missing records can become a future problem.


Plumbing, Gasfitting and Drainlaying: Not Handyman Work

Plumbing, gasfitting and drainlaying are tightly regulated in New Zealand because mistakes can affect public health, sanitation, water quality, gas safety and property damage.

The Plumbers, Gasfitters and Drainlayers Board says it regulates these trades in Aotearoa New Zealand and helps protect public health and safety by ensuring people carrying out restricted work are competent. The Board also advises consumers to make sure the person doing plumbing, gasfitting or drainlaying work is licensed, and provides a public register for checking tradespeople.

For kitchen, bathroom and laundry renovations, this matters whenever the work involves:

  • moving water supply pipes;

  • altering waste pipes;

  • installing or relocating toilets;

  • installing showers, baths or basins;

  • gas cooktops;

  • gas hot water systems;

  • drainage work;

  • backflow prevention;

  • new sanitary fixtures;

  • changes to laundry or dishwasher plumbing.

Some minor tasks may be suitable for homeowners, depending on the situation. But as soon as sanitary plumbing, gasfitting or drainlaying is involved, assume a licensed person is needed unless a qualified professional confirms otherwise.

Gas deserves special attention.

Gas work should never be treated as DIY or casual handyman work. Poor gasfitting can create fire, explosion and carbon monoxide risks.

The practical rule is simple:

If the work changes the plumbing, gas or drainage system, stop and check before proceeding.

A product supplier can provide product information.
A customer service team can provide manuals and specifications.
But the person deciding whether the plumbing, gas or drainage work is safe and compliant should be properly authorised.


Electrical Work and Certificates: Keep the Paper Trail

Electrical work in kitchens and bathrooms requires special care because these rooms combine moisture, metal fixtures, appliances and frequent use.

A plug-in appliance is not the same as fixed wiring.

A freestanding microwave plugged into an existing suitable outlet is one thing.
A hard-wired oven is another.
A plug-in mirror is one thing.
A hard-wired LED mirror is another.
A simple replacement fitting is different from adding a new circuit, switch, fan or power point.

In New Zealand, electricians must issue a Certificate of Compliance, often called a CoC, for fixed wiring work, including fitting new power points. WorkSafe explains that a CoC shows the work has been done electrically safely and in accordance with New Zealand electrical safety standards and codes. EWRB guidance also notes that certification must be issued as soon as possible after completing the installation or electrical work, and within 20 days.

For kitchen and bathroom renovations, electrical documentation may matter for:

  • hard-wired LED mirrors;

  • demister mirrors;

  • heated towel rails;

  • extractor fans;

  • new kitchen power points;

  • ovens and cooktops;

  • under-cabinet lighting;

  • switchboard upgrades;

  • appliance circuits;

  • relocated switches or outlets.

Before the work starts, ask the electrician:

  • Is this prescribed electrical work?

  • Will a CoC be issued?

  • Will an Electrical Safety Certificate be issued?

  • Is inspection required?

  • Will the work be documented for my records?

  • Where should I store the certificate?

The practical rule is:

If the work involves fixed wiring, do not guess. Use a registered electrician and keep the certificate.

A certificate may feel like paperwork today.
It may feel very valuable during a warranty issue, insurance question, resale process or future electrical upgrade.


Why the Homeowner Still Carries Responsibility

Many homeowners assume that once they hire a tradie, compliance becomes someone else’s problem.

That is only partly true.

Professionals are responsible for the work they carry out. Councils are responsible for their regulatory functions. Product suppliers are responsible for their product claims and legal obligations.

But the homeowner still has a central role because they own the property, approve the scope, choose the people, keep the records and often make or authorise key decisions.

The Building Act itself promotes accountability for owners, designers, builders and building consent authorities involved in ensuring building work complies with the Building Code.

The homeowner’s responsibility is not to personally perform licensed work.

It is to make responsible decisions.

That includes:

  • checking whether consent may be needed;

  • choosing appropriately licensed or registered tradespeople;

  • confirming who is responsible for each part of the work;

  • asking what certificates or records will be provided;

  • keeping invoices, manuals and written communication;

  • not pressuring tradespeople to cut corners;

  • stopping work if unexpected risk appears;

  • confirming unclear issues with council or a qualified professional.

This matters long after the renovation ends.

When selling, insuring or refinancing a property, missing consents, missing electrical certificates, unclear plumbing work, poor waterproofing records or undocumented alterations can create problems.

A renovation should leave behind more than a finished room.

It should leave behind a clear paper trail.


The Practical Compliance Mindset

Compliance should not be seen as paperwork that gets in the way of renovation.

It is a risk-management system.

For homeowners, a practical compliance mindset has five steps.

1. Define the scope clearly

Do not describe the project only as “bathroom refresh” or “kitchen upgrade”.

Write down what is actually changing:

  • Are products staying in the same position?

  • Are pipes moving?

  • Are walls changing?

  • Is fixed wiring involved?

  • Is waterproofing being touched?

  • Is ventilation changing?

  • Are new appliances being added?

  • Is the work part of a larger consented project?

A vague project name hides risk.

2. Identify the systems affected

Ask whether the work touches:

  • structure;

  • water;

  • drainage;

  • gas;

  • fixed wiring;

  • waterproofing;

  • ventilation;

  • fire separation;

  • external weatherproofing;

  • consented building work;

  • shared systems in apartments or townhouses.

Systems matter more than product categories.

3. Identify who is allowed to do the work

Some work may be DIY.
Some work needs checking.
Some work must be done by licensed or registered professionals.

Do not decide based on confidence alone. Decide based on risk and legal requirements.

4. Confirm the documentation

Before the work starts, ask:

  • What certificate will be provided?

  • What record will be provided?

  • What manual or warranty should be kept?

  • Who supplies product documents?

  • Who photographs hidden work?

  • Who signs off completion?

Documents are much easier to collect before final payment than months later.

5. Keep everything

Save:

  • quotes;

  • invoices;

  • product labels;

  • manuals;

  • warranties;

  • photos;

  • emails;

  • text messages;

  • variation approvals;

  • certificates;

  • inspection notes;

  • handover documents.

This mindset does not slow down the project.

It prevents the wrong kind of speed.

The fastest renovation is not the one that skips checks.
It is the one that avoids rework.


Compliance Decision Sheet

Question

If yes, what to do

Does the work affect structure, walls, floors, roof or external envelope?

Check consent/RBW/LBP requirements before starting

Does it involve water supply or sanitary plumbing?

Check with a licensed plumber

Does it involve gas?

Use an authorised gasfitter

Does it alter drainage?

Check with a licensed plumber or drainlayer

Does it involve fixed wiring?

Use a registered electrician and keep the CoC/ESC

Does it involve waterproofing or wet-area membranes?

Confirm installer, documentation and council requirements

Is the property an apartment, townhouse or unit title?

Check body corporate and shared-service rules

Is it part of a larger consented project?

Keep work aligned with the consent documents

Is the work exempt from consent?

Still confirm Building Code compliance

Are certificates, records or manuals missing?

Request them before final payment where possible


Chapter Summary

Homeowners do not need to become legal experts, but they must understand when renovation work enters a compliance framework. The Building Act sets the legal system for building work in New Zealand, while the Building Code sets minimum performance requirements. Some work may need building consent, and some work may be exempt, but all building work must still comply with the Building Code. Restricted Building Work may require a Licensed Building Practitioner. Plumbing, gasfitting, drainlaying and fixed electrical work require particular care and may need licensed or registered professionals. Even when professionals are hired, homeowners remain responsible for making good decisions, confirming responsibilities, asking for certificates and keeping records. A compliant renovation leaves behind both a finished room and a clear paper trail.

Chapter 3. The traffic-light rule: DIY, caution and licensed-only work

下面是优化重构版。


Chapter 3

The Traffic-Light Rule: DIY, Caution and Licensed-Only Work

A renovation mistake often begins with a sentence that sounds harmless:

“It should be easy.”

Replacing a tap should be easy.
Installing a vanity should be easy.
Moving a toilet “just a little bit” should be easy.
Adding a power point for a mirror should be easy.
Drilling a shower rail into a tiled wall should be easy.

Sometimes it is.

Sometimes it is not.

The problem with kitchen, bathroom and laundry renovation is that easy-looking tasks often sit on top of hidden systems. Behind a simple product may be water supply, waste pipes, waterproofing, electrical wiring, wall framing, old materials, tile layers, previous repairs or compliance requirements.

A job that looks like a weekend project can become a leak, a damaged cabinet, a broken tile, an unsafe electrical connection, a failed inspection, an insurance question or an expensive call-back.

This does not mean homeowners should never do anything themselves.

DIY is part of New Zealand home culture. Many homeowners are practical, careful and capable. There are plenty of tasks that can be done safely with patience, basic tools, good preparation and the right information.

The skill is knowing where DIY stops.

That is what the traffic-light rule is for.

Green-light jobs are generally suitable for capable DIY.
Yellow-light jobs may be possible, but only after checking the risks.
Red-light jobs should be handled by the right licensed, registered or qualified professional.

The traffic-light rule is not designed to make renovation frightening. It is designed to give homeowners a pause point before a small decision turns into a large problem.

The smartest homeowner is not the one who does everything alone.

It is the one who knows what can be safely done, what must be checked, and what should be handed to the right person.


The Five Questions Before You Pick Up a Tool

Before starting any kitchen, bathroom or laundry task, ask five questions.

Not after the first hole is drilled.
Not after the old fitting is removed.
Not after water is leaking into the cabinet.

Before.

1. Does the work affect water, waste, gas or drainage?

If the job changes pipes, wastes, traps, gas lines, drainage, toilet positions, shower positions or sanitary plumbing, the risk increases immediately.

A product may look simple from the front. The connection behind it may not be simple.

2. Does it involve fixed electrical wiring or a new electrical connection?

A plug-in product and a hard-wired product are not the same thing.

Changing a bulb is one thing. Adding a power point, moving a switch, hard-wiring an LED mirror or connecting a heated towel rail is another.

3. Does it affect waterproofing, wet-area surfaces or floor falls?

Wet areas fail slowly and expensively.

If a task involves drilling into tiles, disturbing shower walls, replacing silicone, altering a shower screen, changing a bath edge or affecting floor drainage, pause before starting.

4. Does it affect structure, external weatherproofing or consented building work?

If the work changes framing, load-bearing walls, external walls, windows, cladding, flooring structure or anything already covered by building consent, do not treat it as casual DIY.

5. Is the house old, altered, damaged or potentially hazardous?

A simple task in a modern dry room may not be simple in a pre-2000 home with old paint, unknown wall linings, previous DIY work, moisture damage, asbestos risk or brittle wiring.

If the answer to all five questions is clearly no, the job may be green-light.

If the answer is maybe, I’m not sure, or it depends, treat it as yellow-light.

If the answer is clearly yes and the work involves licensed or compliance-critical systems, treat it as red-light.

This method is simple on purpose.

It helps homeowners pause before confidence becomes damage.


Green-Light Jobs: Good Places to Save Money

Green-light jobs are usually cosmetic, visible, low-risk and reversible.

They are the best place for homeowners to save money through careful DIY.

A green-light task generally does not:

  • involve fixed wiring;

  • alter plumbing, gas or drainage;

  • affect waterproofing or wet-area membranes;

  • change structural elements;

  • disturb hazardous materials;

  • rely on hidden systems;

  • create serious damage if a small mistake occurs.

Common green-light jobs may include:

  • replacing cabinet handles;

  • assembling flat-pack furniture before installation;

  • installing removable storage accessories;

  • repainting dry, safe interior surfaces;

  • cleaning tap aerators;

  • replacing a shower head without altering pipework;

  • installing a non-electrical mirror on a suitable wall;

  • organising manuals and product documents before trades arrive;

  • measuring rooms and taking site photos;

  • preparing a renovation folder;

  • replacing loose accessories fixed to suitable dry-area surfaces.

Green-light does not mean careless.

A poorly fixed accessory can crack a tile.
A badly prepared wall can make paint fail.
A mirror can fall if the wall fixing is wrong.
A drill can still hit a pipe or cable if you do not check what is behind the surface.

Green-light means the task is generally suitable for a capable homeowner when the site is normal, the materials are safe and the work does not touch hidden systems.

It is permission to proceed carefully, not permission to stop thinking.


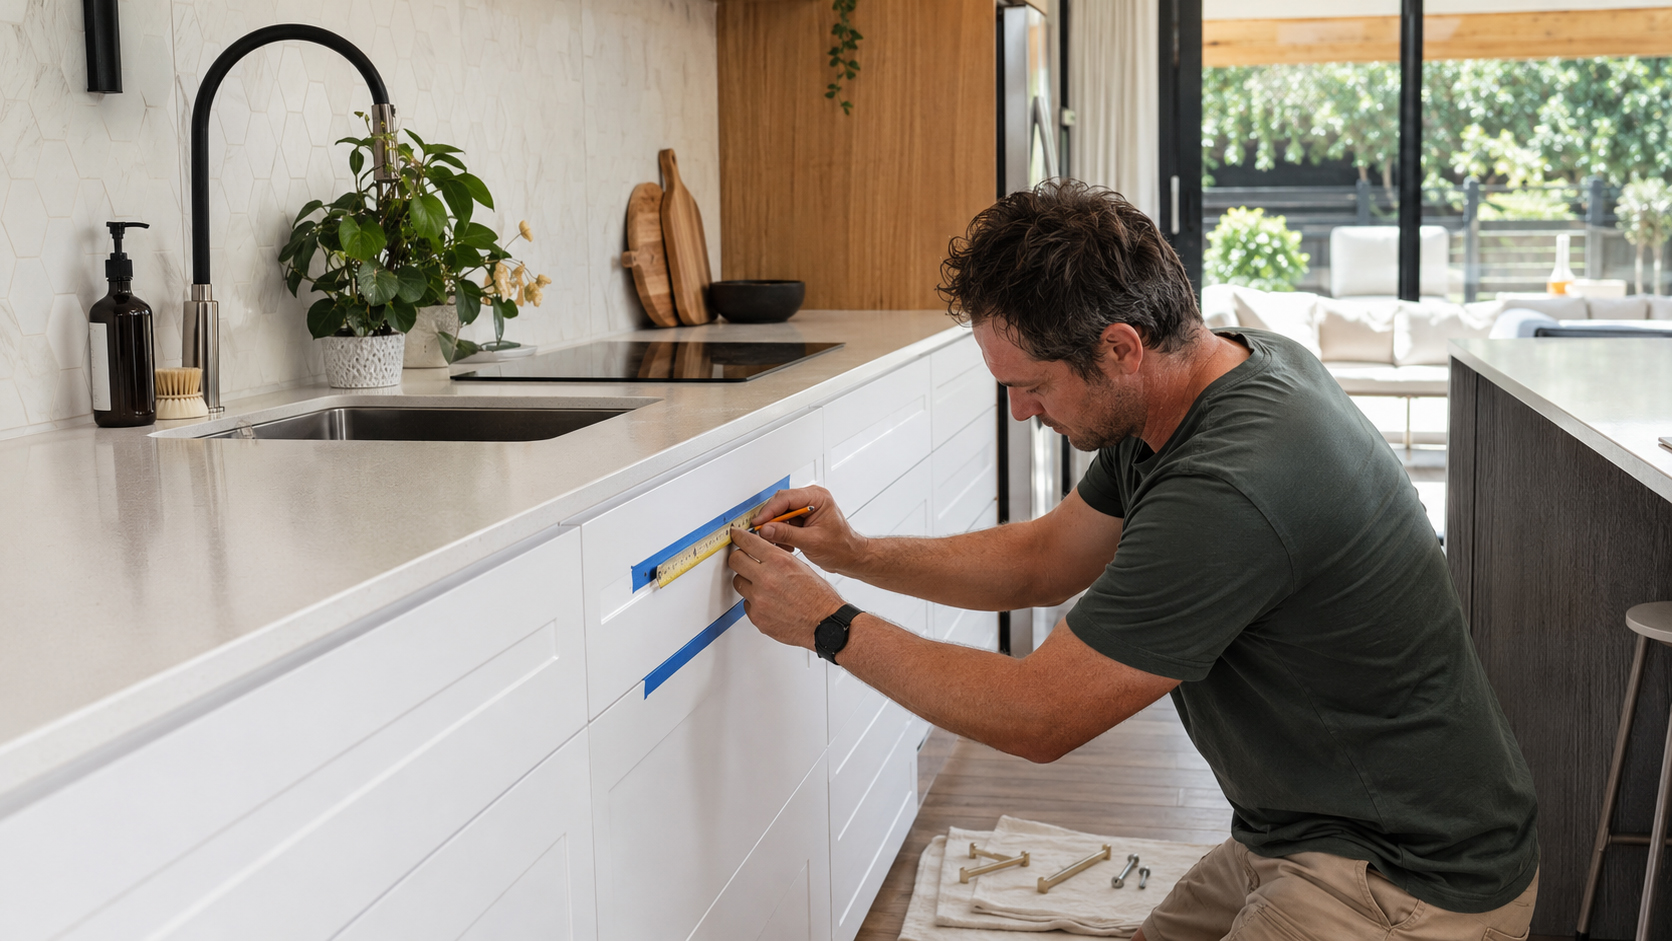
Green-Light Example: Replacing Cabinet Handles

Changing cabinet handles is one of the clearest green-light tasks.

It improves the look of a kitchen, bathroom or laundry without changing plumbing, electrical work, waterproofing or structure. The work is visible, testable and usually easy to correct.

A careful DIY approach would include:

  • measuring the existing hole spacing;

  • choosing handles with the same fixing centres where possible;

  • using painter’s tape to protect the surface;

  • marking new holes accurately if drilling is needed;

  • checking screw length before tightening;

  • avoiding over-tightening on thin doors;

  • opening and closing the door after installation;

  • checking that handles do not hit neighbouring doors, walls or appliances.

This is a good DIY job because the risk is controlled.

But even here, rushing can cause damage. A drill bit can splinter a cabinet front. A screw that is too long can push through the face. A handle placed too close to an appliance can become annoying every day.

Good DIY is not careless DIY.

It is slow enough to avoid creating a new problem.


Yellow-Light Jobs: The Dangerous Middle

Yellow-light jobs are the most misunderstood part of renovation.

They are the jobs that look simple enough to try, but carry enough hidden risk to punish assumptions.

They may not always be legally forbidden for a homeowner. They may not always require a full professional team. But they depend heavily on the specific house, the existing installation, the product, the materials behind the surface and the homeowner’s skill.

Yellow-light work often involves:

  • wet areas;

  • drilling;

  • existing plumbing connections;

  • product compatibility;

  • wall fixing strength;

  • tile or stone surfaces;

  • older homes;

  • uncertain previous renovations;

  • hidden services;

  • difficult access;

  • materials that may be damaged if disturbed.

Common yellow-light tasks include:

  • replacing a tap like-for-like;

  • installing a vanity in the same position;

  • replacing a toilet without moving the waste connection;

  • installing a shower screen;

  • drilling into tiled bathroom walls;

  • replacing silicone around a shower or bath;

  • installing a wall-hung cabinet;

  • cutting a benchtop for a sink;

  • removing old vinyl, wall lining or tile backing in a pre-2000 home;

  • connecting a dishwasher or washing machine to existing fittings.

The key question is not:

“Has someone online done this before?”

Someone online has done almost everything before.

The better question is:

“What could go wrong in this specific house?”

A yellow-light task should begin with checking, not tools.


Yellow-Light Example: Replacing a Tap Like-for-Like

Replacing a tap in the same position sounds straightforward.

The old tap comes out.
The new tap goes in.
The hoses connect.
Water comes back on.

That is the ideal version.

The real version may be different.

The isolation valve may not close.
The old fitting may be corroded.
The new inlet may not match the existing connection.
The basin hole may be too small.
The benchtop may be water-damaged around the tap.
The flexible hoses may kink.
The water pressure may not suit the new product.
A small leak may appear under the cabinet after the installer leaves.

Before starting, check:

  • can the water supply be isolated safely?

  • does the new tap have suitable compliance information?

  • does the inlet connection match?

  • does the product suit the water pressure?

  • does the basin or sink hole match?

  • is the surface around the tap sound?

  • is there enough space below?

  • are fittings corroded, leaking or difficult to access?

  • will a licensed plumber be needed if anything does not match?

If everything matches and no pipework is altered, the job may be manageable for a capable homeowner.

But if fittings do not match, corrosion is present, valves fail or pipework must change, the task moves out of ordinary DIY.

That is the nature of yellow-light work.

It may begin as DIY.

It may not stay there.


Yellow-Light Example: Installing a Vanity

A vanity looks like furniture.

In a bathroom, it is not.

It sits in a wet room. It often connects to water and waste. It may need to be fixed to the wall. It may hide pipes. It may carry a basin and tapware. It may need silicone sealing. Its drawers may collide with plumbing. Its edges may be exposed to splashing every day.

Before installing a vanity, check:

  • is it floor-standing or wall-hung?

  • does the wall have suitable framing or noggins?

  • do the waste and water points align?

  • will drawers clear the pipework?

  • does the basin suit the mixer?

  • is the floor level?

  • is the product designed for bathroom moisture exposure?

  • where does silicone need to be applied?

  • will installation disturb tiles or waterproofing?

  • is a plumber needed for final connection?

  • will future access to the trap and valves remain possible?

A floor-standing vanity in the same position may be relatively simple if pipework aligns and final plumbing is handled properly.

A wall-hung vanity is different. It depends on wall support. A tiled wall does not automatically mean a strong wall. If the framing behind the wall is unknown, the installer may need to confirm before fixing.

A drawer vanity is also different. Drawers are useful, but pipes and drawers often want the same space.

A vanity is yellow-light because the product is visible but the risk is behind it.


Red-Light Jobs: Do Not Turn Licensed Work Into Weekend Work

Red-light jobs should not be treated as casual DIY.

They involve systems where mistakes can affect safety, health, property damage, compliance, insurance, resale or other people in the building.

In New Zealand kitchen, bathroom and laundry renovations, red-light work commonly includes:

  • moving or installing sanitary plumbing;

  • moving toilets, showers, baths or basins to new positions;

  • altering waste pipes or drainage systems;

  • gasfitting work;

  • installing gas cooktops or gas hot water systems;

  • fixed electrical wiring;

  • installing new power points;

  • relocating switches or outlets;

  • hard-wiring ovens, cooktops, heated towel rails or LED mirrors;

  • switchboard work;

  • structural changes;

  • removing or altering load-bearing walls;

  • work affecting external weatherproofing;

  • restricted building work;

  • hazardous material removal, such as asbestos;

  • consented building work that requires inspection or documentation.

The safest rule is:

If the work affects a licensed system, use the licensed professional.

This is not just about following rules. It is about protecting the home and everyone who uses it.

The Plumbers, Gasfitters and Drainlayers Board regulates plumbing, gasfitting and drainlaying in Aotearoa New Zealand to help protect public health and safety, and consumers can use its public register to check whether a person is authorised.

For electrical work, WorkSafe advises consumers to use a licensed electrical worker for prescribed electrical work and explains that electrical certificates show work has been done safely and according to New Zealand electrical safety standards.

For building work, MBIE states that all building work must comply with the Building Code, even when building consent is not required.

These are not technical details for other people to worry about. They are part of the renovation boundary.

Red-light does not mean the homeowner has no role.

The homeowner can still choose products, compare layouts, prepare photos, keep records, ask questions, confirm documents and understand what is being done.

But the licensed system should be handled by the person legally and technically qualified to handle it.


Red-Light Example: Moving a Toilet

Moving a toilet is not the same as replacing a toilet.

Replacing a toilet may still require caution, but moving a toilet changes the system.

A toilet position is tied to sanitary plumbing, waste pipe alignment, pipe falls, floor penetrations, water supply, ventilation, clearances, flooring, waterproofing and sometimes consent considerations.

Moving it “just a little” may still require:

  • opening the floor;

  • altering waste pipes;

  • maintaining correct fall;

  • moving water supply;

  • repairing flooring;

  • reviewing waterproofing;

  • coordinating with tiling;

  • checking structure;

  • confirming council or consent requirements.

This work should be handled by a licensed plumber. Depending on the scope, it may also require council advice, building consent consideration or other building professionals.

The homeowner can still make design decisions:

  • where the toilet should ideally sit;

  • what style of pan is preferred;

  • whether the bathroom layout feels better;

  • what clearances are needed;

  • what product dimensions suit the room.

But the plumbing system itself is not a normal DIY task.

A toilet is not just an object on the floor.

It is the visible end of a sanitary system.


Red-Light Example: Adding a Power Point

Adding a new power point in a kitchen or bathroom may look small.

It is not small in risk.

It involves fixed electrical wiring. In wet or moisture-prone areas, location, circuit capacity, RCD protection, appliance load, cable route, switchboard condition, isolation and certification all matter.

A homeowner may see a missing power point.

An electrician sees a circuit.

That is the difference.

Adding power for an LED mirror, heated towel rail, extractor fan, dishwasher, oven, cooktop or under-cabinet lighting should be planned before walls, splashbacks or tiles are finished.

This work should be carried out by a registered electrical worker. The homeowner should ask what documentation will be provided and keep it with the renovation file.

A plug-in product is one thing.

Installing a new fixed power point is another.


Four Real-World Decisions

The traffic-light rule becomes most useful when applied to real decisions.

Example 1: Replacing a tap

Situation:
The homeowner wants to replace an old basin mixer with a new one in the same position.

Traffic-light rating:
Yellow-light.

Why:
The job may be manageable if the product is compatible with the existing basin, water pressure and connections, and no pipework is altered. But risk appears if isolation valves fail, fittings do not match, corrosion is present or the product is not suitable.

Best action:
Check compliance information, dimensions, pressure requirements and connection type before purchase. If anything does not match, use a licensed plumber.


Example 2: Moving a toilet

Situation:
The homeowner wants to move the toilet to the opposite wall to improve the layout.

Traffic-light rating:
Red-light.

Why:
This changes sanitary plumbing and waste pipe positions. It may affect floor penetrations, drainage falls, waterproofing and consent considerations.

Best action:
Speak with a licensed plumber before finalising the layout. If other building elements are affected, check with council or a designer.


Example 3: Installing a vanity

Situation:
The homeowner buys a new vanity to replace the old one in the same position.

Traffic-light rating:
Yellow-light.

Why:
Risk depends on product size, pipe alignment, wall fixing, moisture exposure, drawer clearance and whether plumbing connections need adjustment.

Best action:
Measure before ordering. Check pipe positions, waste alignment, wall support and product instructions. Use a plumber for final connections where needed.


Example 4: Adding power for an LED mirror

Situation:
The homeowner wants to install an LED mirror above the vanity and add power behind it.

Traffic-light rating:
Red-light.

Why:
Adding power involves fixed electrical wiring, and the location is in a bathroom. Moisture exposure, circuit protection and safe installation must be considered.

Best action:
Ask a registered electrician to assess the location and complete the work. Keep the electrical documentation after installation.


Quick Self-Assessment Checklist

Use this checklist before starting any kitchen, bathroom or laundry task.

Question

What it suggests

Does the task affect fixed wiring?

Red-light. Use a registered electrician.

Does it move or alter plumbing, gas or drainage?

Red-light. Use the relevant licensed professional.

Does it affect waterproofing or wet-area surfaces?

Yellow or red-light. Check before starting.

Does it involve drilling into a tiled wet-area wall?

Yellow-light. Check what is behind the wall.

Does it affect structure, framing or external weatherproofing?

Red-light or council check required.

Is the house pre-2000 or are materials unknown?

Yellow-light. Consider asbestos or lead risk.

Is the product hard-wired?

Red-light. Use a registered electrician.

Is the product wall-hung and load-bearing?

Yellow-light. Check framing and fixing.

Are existing fittings corroded or leaking?

Yellow or red-light. Stop and assess.

Are you unsure whether the work is allowed?

Ask first. Do not guess.


The Simple Rule for Homeowners

If the job is cosmetic, removable and does not affect hidden systems, it may be suitable for DIY.

If the job touches water, wet areas, drilling, old materials, product compatibility or hidden services, check first.

If the job involves fixed wiring, plumbing, gas, drainage, structure, hazardous materials or consented work, hire the right professional.

The point is not to give up control of your renovation.

It is to keep control by making better decisions.

A homeowner who calls a plumber before moving a toilet has not lost control.
They have protected the project.

A homeowner who asks an electrician before wiring a mirror has not made the project harder.
They have made the bathroom safer.

A homeowner who stops before drilling into an unknown tiled wall has not slowed the renovation.
They have prevented a possible leak.

The smartest DIY homeowners are not the people who do everything themselves.

They are the people who understand the boundary between confidence and risk.

Chapter Summary

The traffic-light rule helps homeowners decide whether a kitchen, bathroom or laundry task is suitable for DIY, requires caution or should be handled by a licensed professional. Green-light tasks are generally cosmetic, visible and reversible. Yellow-light tasks may be possible, but they depend on site conditions, product compatibility, hidden systems and the condition of the house. Red-light tasks involve licensed or compliance-critical systems such as plumbing, gas, drainage, fixed electrical work, structure, hazardous materials or consented work. The safest approach is to pause before starting, ask the five practical questions, check before using tools and keep records of decisions and work completed.

Part 2 — Before You Spend Money

Part Introduction

The most expensive renovation decisions are often made before anyone realises they are expensive.

A product is ordered before the wall is checked.
A layout is approved before the waste position is understood.
A quote is accepted before exclusions are read.
A bathroom is priced before the house age, moisture history or hidden materials are considered.

This part is about slowing down at the right moment.

Before money is spent, homeowners should understand the house they are renovating—which begins with a thorough site analysis using our Existing Home Inspection Notes to identify the hidden risks mentioned here. and the budget structure required to protect the project, as outlined in our Quote and Scope Comparison Sheet, which helps you clarify exclusions before you accept any quote. A renovation is easier to control before products are ordered, trades are booked and demolition begins.

Note: For comprehensive guidance on preparing for these stages, refer to the MBIE Building Performance "Planning a successful build" guide, which provides the official New Zealand framework for renovation preparation.

The goal is not to delay the project. The goal is to prevent avoidable surprises from becoming expensive variations.

A homeowner who checks first is not being difficult. They are protecting the renovation.

Chapter 4. Understanding your house before renovation

Understanding Your House Before Renovation

Before you choose a toilet, vanity, kitchen sink, tapware, mirror or tile, you need to understand the house those products will be installed into.

This sounds obvious, but it is one of the most commonly skipped steps in renovation planning.

Many homeowners begin with inspiration. They save photos, compare tapware finishes, choose a basin shape, imagine a wall-hung vanity, or decide that a black kitchen sink would make the room feel more modern. These choices are exciting. They make the project feel real.

But a renovation is not installed into a Pinterest board.
It is installed into an actual house.

That house has a history. It may have old pipes, uneven floors, previous alterations, tired wiring, hidden moisture, asbestos risk, poor ventilation, shared services, council records, or building-era problems that are not visible in product photos.

A product that is easy to install in a modern home may become complicated in a 1920s villa. A simple bathroom upgrade in a freestanding house may become a body-corporate approval issue in an apartment. A kitchen sink that fits beautifully into a new benchtop may not work with an old cabinet, an awkward waste pipe, or a wall that is not straight.

So the first renovation question is not:

“What do I want to install?”

The better first question is:

“What kind of house am I installing it into?”

This chapter helps you slow down before spending money. It explains how different New Zealand housing eras and property types can affect kitchens, bathrooms, laundries and product selection.


Start With the Building, Not the Product

A successful renovation begins with diagnosis.

Not a design board.
Not a shopping cart.
Not a quote.

Diagnosis.

Before ordering products or accepting a quote, gather a basic picture of the property. You do not need to know every technical detail on day one, but you do need enough information to avoid blind decisions.

Start with these questions:

  • roughly when was the house built?

  • is it a standalone house, townhouse, apartment or unit title property?

  • is the floor timber, concrete or unknown?

  • are the walls straight and solid enough for wall-hung products?

  • is there evidence of previous renovation?

  • do council records match what is actually on site?

  • are there signs of moisture, leaks or mould?

  • does the switchboard look modern enough for new electrical loads?

  • is the water pressure suitable for modern tapware?

  • are you changing layout, or replacing products in the same position?

These questions change the project.

If the house has old wiring, an LED mirror is not just a mirror.
If the floor is uneven, a shower screen is not just glass.
If the wall has no support, a wall-hung vanity is not just a style choice.
If the home is an apartment, a fan or pipe change may not be your decision alone.

A product mistake is usually visible quickly.
A house-condition mistake may stay hidden until demolition begins.

That is why the building comes first.


Older Villas and Bungalows: Beautiful, but Not Forgiving

Older New Zealand villas and bungalows can be wonderful homes to renovate. They often have generous rooms, high ceilings, timber details and a sense of character that newer homes try to imitate but rarely match.

But character comes with history.

In these homes, the problem is rarely one single thing. It is usually a mix of age, past repairs, hidden materials and surfaces that have moved over time.

A bathroom in an older villa may have been altered more than once. Pipes may not run where you expect. Floors may slope slightly. Walls may not be square. Previous owners may have patched, boxed in or worked around problems rather than properly resolving them.

This matters because modern products are often more precise.

A frameless shower screen needs walls and floors that behave.
A wall-hung vanity needs reliable wall support.
Large-format tiles reveal uneven surfaces.
A smart toilet needs water, power and service access.
A modern mixer may not perform well if the old plumbing system is tired.

Older homes may also involve hazardous materials. WorkSafe New Zealand states that homes built before 1 January 2000 may contain asbestos materials, and the risk is lower for homes built after that date. This does not mean every older home contains asbestos, but it does mean demolition should not begin blindly.

The same caution applies to older paint, old vinyl flooring, ceiling panels, wall linings and service boxing. What looks like “just removing the old bathroom” can become a health and compliance issue if the wrong material is disturbed.

For older villas and bungalows, the best renovation mindset is:

expect discovery.

Allow more time.
Allow more contingency.
Check before drilling or demolishing.
Choose products that allow adjustment and future access.

Older homes can renovate beautifully. They simply do not reward rushed assumptions.


Field notes for older homes

What to check

Why it matters

Old wall linings, vinyl, ceiling panels and paint

Possible asbestos or lead-paint risk

Switchboard and wiring age

New mirrors, fans and appliances may need electrical assessment

Pipe material and water pressure

Modern tapware may not perform well on poor supply

Floor and wall level

Affects vanities, tiles, benchtops and shower screens

Previous alterations

May hide poor repairs or undocumented work

Access for future maintenance

Older homes often benefit from serviceable, less over-integrated products


1940s–1970s Homes: Solid Does Not Mean Simple

Many New Zealand homes built between the 1940s and 1970s feel practical and solid. Brick-and-tile homes, weatherboard homes and state houses from this period can be good renovation candidates.

But “solid” should not be confused with “simple”.

These homes often sit in the middle zone: not as old as villas, not as modern as newer builds. That can make the risks easier to underestimate.

A kitchen may look serviceable, but the wiring may not have been designed for today’s appliances. A bathroom may have functioned for decades with only a window, but that does not mean it can handle modern shower habits without mechanical ventilation. A laundry may work with an old tub, but not with a new cabinet, washing machine layout and closed-up storage.

The most common issues in these homes are materials, services and moisture.

Some houses from this era may contain asbestos-containing materials, especially in older sheet products, textured coatings, vinyl flooring, pipe lagging or renovation materials added before 2000. WorkSafe’s guidance is clear that pre-2000 homes may contain asbestos, so disturbance should be approached carefully.

Electrical systems may also need assessment. A bathroom upgrade may add an extractor fan, heated towel rail, LED mirror or underfloor heating. A kitchen upgrade may add a dishwasher, rangehood, under-cabinet lighting, more outlets and heavier appliances. The old house may have coped with the old kitchen. That does not prove it is ready for the new one.

Plumbing can be mixed. Some pipes may have been replaced; others may be original. This creates surprises. A vanity replacement may expose awkward water points. A sink replacement may uncover corroded fittings. A shower upgrade may reveal low pressure or drainage limitations.

For these homes, the smartest approach is not fear. It is verification.

Check services before buying products.
Check materials before demolition.
Check ventilation before sealing the bathroom back up.


1980s to Mid-2000s Homes: Watch the Building Envelope

Homes built from the late 1980s through the mid-2000s need a different kind of caution.

This does not mean every home from this period is a problem. Many are perfectly sound. But in New Zealand, this era is strongly associated with leaky-building risk, especially where certain design and cladding features are present.

Settled.govt.nz explains that buildings with a higher risk of leaking were mostly built between the late 1980s and the mid-2000s, often using plaster-style monolithic cladding systems, with smooth or unbroken exterior walls. It also advises independent building inspection or weather-tightness expert advice for properties with these features because there may be no obvious signs.

This matters for kitchen and bathroom renovation because internal work can uncover external problems.

A bathroom wall may be opened for a new shower and reveal decayed framing.
A kitchen splashback may be removed and expose moisture staining that did not come from the sink.
A laundry upgrade may show swollen framing from a leak path that started outside the room.

If a building-envelope issue exists, a cosmetic interior renovation can become the wrong first investment. There is little value in installing a beautiful bathroom over framing that is wet, decaying or affected by external moisture.

Be especially cautious with homes that have:

  • monolithic plaster cladding;

  • little or no eaves;

  • flat or low-pitch roofs;

  • complex rooflines;

  • decks over living areas;

  • enclosed balconies;

  • visible cladding cracks;

  • staining around windows;

  • musty smells near exterior walls;

  • previous remediation work with unclear records.

If these signs appear, do not treat the project as a simple bathroom or kitchen upgrade. Get proper building advice before spending heavily on surface finishes.

The question changes from:

“Which vanity should I buy?”

to:

“Is the wall behind that vanity dry and sound?”

That question can save a project.

Post-2000 Homes: Newer Is Not Risk-Free

Post-2000 homes often feel easier to renovate. They may have more modern layouts, newer wiring, more standard plumbing and fewer obvious age-related problems.

But newer homes can still disappoint.

Some were built quickly.
Some used low-cost fixtures.
Some have weak bathroom extraction.
Some have poor silicone or sealing.
Some have cabinetry that looks modern but gives little service access.
Some have walls that were not prepared for wall-hung products.
Some have electrical layouts that do not match upgraded mirrors, fans or heated towel rails.

The biggest risk in newer homes is assumption.

Because the house looks modern, homeowners assume installation will be simple. But a modern-looking bathroom can still lack wall support for a floating vanity. A modern kitchen can still have a cabinet that is too small for a deeper sink. A newer laundry can still have awkward drainage. A stylish bathroom can still have a fan that vents poorly or does not control moisture.

For post-2000 homes, the question is less about hidden age and more about compatibility.

Does the new product fit the existing layout?
Does the wall support the product?
Does the electrical point exist where the mirror needs it?
Does the ventilation actually discharge outside?
Can the cabinet accept the new sink or tapware?
Is there enough access for future repairs?

Newer homes reduce some risks, but they do not remove the need to check.

A modern house can still punish a lazy assumption.

Apartments and Townhouses: You May Not Control the Whole System

Apartments and townhouses require a different renovation mindset from standalone houses.

In a standalone house, a kitchen or bathroom decision is often mostly between you, your tradies and council requirements. In an apartment or unit title property, the system may be shared.

Your bathroom floor may be another person’s ceiling.
Your kitchen waste may connect to a shared stack.
Your extractor fan may connect to a shared duct.
Your wall may contain fire-rated or acoustic systems.
Your flooring may affect noise transfer.
Your delivery route, working hours and rubbish removal may be controlled by building rules.

That changes renovation planning.

A product that is acceptable in a standalone house may not be acceptable in a unit-title building. A new fan outlet, floor penetration, plumbing relocation, tiled wet-area change or flooring upgrade may need approval before work begins.

Government unit title guidance explains that a body corporate has financial and record-keeping responsibilities, and must hold a principal insurance policy covering buildings and improvements in many cases. The Unit Titles Act framework also governs body corporate management and duties.

This matters because the renovation may affect more than your unit.

For apartments and townhouses, ask early:

  • do body corporate rules apply?

  • is approval required before work starts?

  • are there working-hour restrictions?

  • are plumbing or drainage services shared?

  • can the extraction system be changed?

  • are there fire or acoustic systems in the walls or ceilings?

  • are floor finishes restricted?

  • does the contractor need to provide insurance, licence details or a method statement?

  • are delivery, lift access and rubbish removal controlled?

A small mistake in an apartment can create a building-wide problem.

Before you choose the product, understand the building rules.


Property Files, LIMs and Council Records

A house can tell you a lot by looking at it.
Council records can tell you what the house is supposed to be.

Those two stories do not always match.

A property file may include building consents, permits, plans, inspection records, specifications, technical documents, Code Compliance Certificates, Certificates of Acceptance, reports and as-built drainage information, depending on council records. Tauranga City Council, for example, lists these types of documents as information that may be found on a property file.

A LIM is different. Settled.govt.nz explains that a LIM is prepared by the local council and provides a summary of current property information held by council departments at the time it is produced, but it may not contain all information about the property.

For renovation planning, these records may help answer questions such as:

  • was the bathroom original, or added later?

  • was a second bathroom consented?

  • do drainage plans match what is on site?

  • were structural alterations approved?

  • was a Code Compliance Certificate issued for previous consented work?

  • are there signs of unconsented alterations?

  • does the property have known hazards or flood-related information?

  • are there easements or consent notices affecting work?

Records do not remove the need for inspection. They are not perfect, and they may be incomplete. But they can reveal important questions before demolition begins.

A missing record does not automatically mean illegal work.
But it does mean you should ask more questions.


How the House Should Change Your Product Choices

Once you understand the house, product selection becomes more intelligent.

You stop asking only:

“Do I like this?”

You start asking:

“Will this work here?”

For older homes, choose products that allow adjustment, access and tolerance. A product with slightly more flexibility may be safer than one that only works in a perfectly square, modern room.

For mid-century homes, check wiring, plumbing, ventilation and hazardous-material risk before choosing products that require demolition, drilling or new services.

For leaky-building-risk homes, do not rush into expensive surface upgrades before moisture and cladding concerns are understood.

For post-2000 homes, do not assume modern means simple. Confirm wall support, electrical positions, fan ducting and cabinet compatibility.

For apartments and townhouses, confirm body corporate and shared-service requirements before changing anything connected to water, drainage, extraction, fire systems, flooring or external penetrations.

The best product is not always the most beautiful one.
It is the one that suits the house, can be installed properly, meets relevant requirements and can be maintained over time.

A renovation becomes safer when the house chooses with you.


Chapter Summary

Before spending money on products or trades, homeowners should understand the house they are renovating. Different building eras and property types carry different risks. Older villas and bungalows may involve hidden materials, outdated services and uneven structures. Homes from the 1940s to 1970s often require checks for asbestos risk, wiring, plumbing and ventilation. Homes from the late 1980s to the mid-2000s require awareness of leaky-building risk, especially where monolithic cladding, little eaves, complex roofs or moisture signs are present. Post-2000 homes are newer but not risk-free. Apartments and townhouses require extra attention to body corporate rules, shared services, fire systems, acoustics, access and approval requirements. The safest product choice is the one that suits the actual house, not just the design style.

Chapter 5. Location-based renovation risks

Location-Based Renovation Risks

New Zealand is small on the map, but it is not small in renovation differences.

A bathroom in Auckland does not age the same way as a bathroom in Queenstown.
A wall-hung vanity in Wellington does not carry exactly the same fixing concern as one in a calm inland suburb.
A tiled shower in Christchurch may need a different level of attention to floor levels and movement history.
A kitchen tap that works well on town supply may disappoint on a rural pressure system.
A beautiful metal finish that survives inland may corrode faster near salt air.

Location changes the renovation.

This is easy to forget because product websites make everything look universal. The same sink, tap, vanity, mirror or toilet appears on a clean white background. It looks as if the product will behave the same everywhere.

But products are not installed into white backgrounds.

They are installed into real houses, in real climates, with real services, local councils, local labour availability, delivery constraints, building history and maintenance expectations.

A good renovation plan should not only ask:

“What are we installing?”

It should also ask:

“Where is this property, and what does that location change?”

This chapter is not designed to make homeowners climate experts, engineers or council specialists. It is designed to help them ask better location-based questions before they spend money.

Because in renovation, the wrong product is not always wrong everywhere.

Sometimes it is wrong there.


Location Is a Design Constraint

Most homeowners think of design constraints as visible things.

Room size.
Budget.
Style.
Cabinet width.
Tile choice.
Product availability.

But location is also a design constraint.

It affects moisture, wind, ground movement, frost, corrosion, services, lead times, labour availability, access and approval pathways. These things may not appear in a product photo, but they can decide whether a renovation works.

For kitchens, bathrooms and laundries, location matters more because these rooms depend on systems.

They need water supply.
They need drainage.
They need ventilation.
They may need electrical work.
They may need waterproofing.
They contain cabinetry that can swell.
They use surfaces that must survive cleaning and humidity.
They are often small rooms with little tolerance for mistakes.

A location-aware renovation does not overcomplicate every choice. It simply asks the right question earlier.

In a humid city, the question may be:

“How will this room dry?”

In a windy, seismic city, the question may be:

“How is this fixed?”

In an earthquake-affected area, the question may be:

“Is the floor level and has anything moved?”

In an alpine area, the question may be:

“What happens in winter?”

In a rural property, the question may be:

“What water and wastewater system are we connecting to?”

In a coastal property, the question may be:

“Will this finish survive salt and moisture?”

A product decision becomes better when the site is allowed into the conversation.


Auckland: Moisture Is the Quiet Enemy

Auckland renovations often look easy from the outside.

The climate is mild. There is no alpine frost to worry about. Many homes are close to suppliers, showrooms and trades. Product delivery is usually more manageable than in remote regions.

But Auckland has its own renovation problem: moisture.

Auckland’s damp, humid conditions can quietly punish bathrooms, laundries and kitchens that do not dry well. The room may look new for a few months. Then mould returns around corners. Cabinet edges begin to swell. The mirror fogs heavily. The laundry smells damp. The fan runs, but the steam does not seem to leave. The paint above the shower starts to suffer.

This is why Auckland wet-area renovation should not treat ventilation as an accessory.

Ventilation is part of the design.

A bathroom can have new tiles, new tapware, a new vanity and still fail if moisture is trapped. A laundry can look tidy but still hold damp air behind closed cabinets. A kitchen can be beautiful but still suffer from condensation and lingering smells if extraction is poor.

New Zealand Building Code clause G4 concerns ventilation, and MBIE’s Acceptable Solution G4/AS1 includes mechanical extract ventilation figures for bathrooms and toilets. For homeowners, the technical takeaway is simple: wet rooms need a real path for stale, moist air to leave the building, not merely a fan that makes noise.

Before upgrading an Auckland bathroom, laundry or kitchen, ask:

  • does the fan actually work?

  • does it duct outside, or only into the roof space?

  • is the fan sized for the room?

  • is there make-up air under the door or through another path?

  • are windows actually opened in daily life?

  • is mould caused by condensation, leaks, cold surfaces or poor habits?

  • are cabinet edges already swollen?

  • does the room dry within a reasonable time after use?

Auckland projects may also involve council and documentation issues, especially with older homes, added bathrooms, apartments, drainage changes, structural work or tiled wet-area rebuilds. MBIE’s Can I Build It tool is designed to help homeowners explore whether renovation or repair work may need building consent, and MBIE’s consent guidance points homeowners to that tool as a starting point.

The Auckland mindset is:

Do not only waterproof the room. Help it dry.


Auckland renovation checks

Check

Why it matters

Existing mould or musty smell

May indicate ventilation, leak or cold-surface issues

Fan duct route

Extracted air should discharge appropriately, not create roof-space moisture

Make-up air

A fan cannot extract well if no air can replace what leaves

Cabinet swelling

May show long-term moisture exposure

Older homes

May involve hidden materials, poor ventilation or past alterations

Drainage or added bathrooms

May need council or professional confirmation

Product lead times

Delays can disrupt booked trades


Wellington: If It Is Heavy, Tall or Wall-Hung, Think Twice

Wellington changes renovation thinking through wind, slope, access and seismic awareness.

In many Wellington homes, the question is not only whether a product fits. It is whether it is fixed well enough for the building, the wall and the environment.

This matters most for products that are:

  • wall-hung;

  • heavy;

  • tall;

  • glass;

  • fixed to tiled surfaces;

  • installed on sloping or difficult-access sites;

  • connected to exterior penetrations.

A wall-hung vanity may look like a bathroom product. But in practice, it is a load on the wall. A large mirror cabinet may look like storage. But in an earthquake-prone region, fixing quality matters. A glass shower screen may look like a clean design feature. But if the floor, wall and fixing are not right, it may become a weak point.

The issue is not that Wellington homeowners should avoid these products.

They simply need to plan them properly.

Before choosing wall-hung or heavy products, ask:

  • where are the studs or noggins?

  • is additional blocking needed?

  • what does the product weigh?

  • will people pull, lean on or load it?

  • is the wall already tiled?

  • can fixing be verified before installation?

  • does the product need restraint?

  • does the installation affect waterproofing?

  • is the home on a slope or hard-to-access site?

Wellington also makes exterior ventilation details more important. A bathroom fan ducted through an external wall is not only a fan decision; it is also a weather-exposure decision. In a windy location, a poorly detailed external penetration can become a water-entry risk.

The Wellington mindset is:

Do not trust the surface. Confirm the fixing.


Wellington renovation checks

Check

Why it matters

Wall framing for wall-hung items

Prevents loosening, tile damage and unsafe fixing

Heavy mirrors and cabinets

May need stronger fixing or restraint

Glass screens

Need correct support, alignment and fixing

Sloped or difficult sites

Affect delivery, labour time and rubbish removal

Exterior vent outlets

Need detailing appropriate for wind and rain exposure

Structural changes

Should not be treated casually in a seismic region


Christchurch: A Level Floor Is Not a Small Detail

In Christchurch, renovation planning often needs to include ground movement and post-earthquake history.

This does not mean every kitchen or bathroom renovation is a foundation project. But it does mean homeowners should be more alert to floor levels, drainage falls, wall alignment, cracks, previous repairs and documentation.

After the Canterbury earthquakes, land in Christchurch was classified into technical categories to guide repair and rebuilding decisions. MBIE’s Canterbury technical guidance identifies TC1, TC2 and TC3 categories and explains that the technical category does not automatically determine whether foundation repair is required, but it helps guide assessment and repair approaches.

For interior renovation, the practical question is not usually:

“Do I need foundation design?”

The more immediate question is:

“Has movement affected the room I am about to renovate?”

Movement can affect:

  • floor levels;

  • shower falls;

  • tiled wet-area performance;

  • wall alignment;

  • benchtop level;

  • cabinet gaps;

  • door swing;

  • drainage falls;

  • pipe connections;

  • cracked tiles or grout;

  • previous waterproofing.

A level-entry shower is especially sensitive. It depends on floor falls, drainage, waterproofing and finished surface levels working together. If the floor is not behaving as expected, the shower may hold water, drain poorly or require more design input than a standard replacement.

A kitchen also cares about level. Cabinets need a stable base. Benchtops need support. Appliances need to sit correctly. A small floor variation may not matter in an empty room, but it becomes visible when long cabinet runs, stone benchtops and tight appliance gaps are installed.

Before spending heavily in Christchurch, ask:

  • what is the property’s earthquake repair history?

  • is there EQC, insurance or repair documentation?

  • were foundations assessed or repaired?

  • do floors show noticeable level differences?

  • are walls cracked, patched or out of square?

  • do doors stick?

  • does water drain as expected?

  • have previous tiles cracked?

  • has a builder, inspector or engineer reviewed concerns?

The Christchurch mindset is:

Before choosing the finish, understand what has moved.


Christchurch renovation checks

Check

Why it matters

TC or land-performance information where relevant

Helps understand whether ground history may matter

EQC or insurance repair records

Shows past repair scope and possible unresolved issues

Floor levels

Critical for showers, cabinetry and benchtops

Drainage falls

Affects wet-area performance

Cracks and patched areas

May indicate movement or previous repairs

Previous waterproofing failure

May show movement or poor detailing

Local professional assessment

Valuable where movement signs are visible


Queenstown and Wanaka: Winter Is Part of the Brief

In Queenstown, Wanaka and surrounding alpine or inland areas, renovation planning must include winter.

Cold is not a seasonal inconvenience. It is a design condition.

A bathroom or laundry that works in Auckland may not perform well in a colder home where pipes run near external walls, rooms are left vacant in winter, condensation forms quickly and trades are difficult to book during busy periods.

The first cold-climate question is pipe protection.

Ask:

  • are water pipes in external walls?

  • are any pipes exposed under the floor?

  • are pipes in garages, roof spaces or unheated service areas?

  • is the property left empty during winter?

  • are outdoor taps and pipe runs protected?

  • are hot water lines long or poorly insulated?

  • could a pipe freeze while no one is home?

This is especially important for holiday homes and short-stay accommodation. A full-time household may notice a plumbing issue quickly. An empty property may not.

The second question is condensation.

A hot shower in a cold bathroom creates moisture fast. If extraction is weak, insulation is poor or the room stays cold, condensation can settle on mirrors, windows, walls, ceilings and cabinets. Over time this may become mould, peeling paint, swollen joinery or surface damage.

For cold-region bathrooms and laundries, consider:

  • suitable extraction;

  • ducting to outside;

  • adequate heating;

  • heated towel rails where appropriate;

  • insulation around wet-area walls where feasible;

  • double glazing condition;

  • underfloor heating compatibility;

  • short-stay guest behaviour;

  • easy maintenance and robust finishes.

The third question is availability.

Popular alpine areas can have high demand for tradies, higher delivery costs and seasonal scheduling pressure. In these locations, late decisions cost more.

The Queenstown/Wanaka mindset is:

Design for the cold day, not only the showroom day.


Queenstown/Wanaka renovation checks

Check

Why it matters

Pipe location and insulation

Reduces freezing and burst-pipe risk

Winter vacancy

Empty homes may not reveal problems quickly

Heating and extraction

Controls condensation and drying time

External-wall plumbing

May increase freezing risk

Material tolerance

Cold and temperature swings can affect finishes

Tradie availability

Busy regions require earlier booking

Short-stay use

Needs tougher, easier-to-maintain products


Rural Properties: Start With the Services, Not the Products

Rural renovation has a different starting point.

In an urban home, homeowners often assume water pressure, drainage, emergency trades, delivery and replacement parts are reasonably available. In rural homes, those assumptions may be wrong.

A rural kitchen or bathroom renovation should begin with services.

Where does the water come from?
How is pressure created?
How is wastewater handled?
How quickly can a plumber get there?
Can the product be serviced later?
What happens if a fitting is missing on installation day?

Many rural properties rely on tank water, bore water, pumps, filters, private pressure systems, septic tanks or on-site wastewater treatment. These systems can affect tapware, showers, toilets, washing machines, dishwashers, filters and hot water systems.

Before choosing products, check:

  • water source;

  • water pressure;

  • pump performance;

  • filtration needs;

  • sediment or mineral content;

  • low-pressure or unequal-pressure systems;

  • hot water system type;

  • septic or wastewater limitations;

  • whether backflow protection is needed;

  • whether the chosen product suits the system.

A rural property also changes risk timing.

If a kitchen tap leaks in town, a plumber or replacement part may be available quickly. If the same leak happens rurally, the homeowner may need to isolate water, wait longer and manage temporary disruption.

That means rural renovations need stronger preparation:

  • know where shut-off valves are;

  • keep product manuals accessible;

  • use products with available parts;

  • confirm compatibility before ordering;

  • avoid overly specialised fittings where service support is weak;

  • plan freight and delivery carefully;

  • book experienced trades earlier.

The rural mindset is:

Do not assume town services exist at the gate.


Rural renovation checks

Check

Why it matters

Water source and pressure

Determines tap, shower, toilet and appliance suitability

Pump and filtration

Affects flow, maintenance and product life

Septic or wastewater system

May limit fixture changes or increased flow

Emergency shut-off valves

Important when help is far away

Local tradie availability

Affects scheduling and emergency response

Freight and access

Large products may be costly or difficult to deliver

Spare parts

Remote sites benefit from serviceable products


Coastal Properties: Salt Air Changes the Maintenance Contract

Coastal renovations need a more honest conversation about materials and maintenance.

Salt air, wind-driven rain, humidity and corrosion risk can affect both exterior and interior products. Even fittings inside the home may age faster if the property is close to the sea, poorly ventilated or regularly exposed to damp salty air.

Coastal risk is not only about rust.

It affects:

  • screws;

  • brackets;

  • hinges;

  • rails;

  • tapware finishes;

  • shower hardware;

  • mirror edges;

  • ventilation grilles;

  • exterior duct covers;

  • cabinet hardware;

  • outdoor or semi-exposed fixtures.

A product may not fail immediately. It may simply age faster than expected.

This is why coastal homeowners should ask more questions before choosing finishes:

  • what grade of stainless steel is used where relevant?

  • are fixings corrosion-resistant?

  • does the warranty have coastal exclusions?

  • what cleaning is required?

  • are exterior penetrations detailed for wind-driven rain?

  • are ventilation grilles suitable for exposure?

  • can parts be replaced later?

  • will the homeowner actually maintain the finish?

Coastal properties also need careful exterior vent detailing. A bathroom or kitchen fan may need to discharge outside, but the outlet must be installed with weather exposure in mind. A poorly detailed vent in a windy coastal location can become a leak path.

The coastal mindset is:

Choose the finish with its maintenance future in mind.

A coastal renovation can still be beautiful. It simply needs honest product selection, better hardware, clear care instructions and more realistic inspection habits.


Coastal renovation checks

Check

Why it matters

Salt-air exposure

Accelerates corrosion and finish wear

Stainless steel and hardware grade

Determines long-term durability

Warranty conditions

Coastal exclusions or care requirements may apply

Exterior vent detailing

Poor outlets can become leak paths

Cleaning routine

Salt residue needs more frequent care

Replaceable parts

Useful when fittings age faster

Semi-exposed fixtures

May need upgraded material choices


How Location Changes Product Selection

Location does not always change what you can buy.

It often changes what you should buy.

A standard product may still be technically available everywhere. But the better product choice depends on the local risk.

In Auckland, the better choice may be the vanity material that resists moisture better, the fan that actually moves enough air, or the mirror that will not become part of a condensation problem.

In Wellington, the better choice may be the cabinet that can be fixed properly, the mirror with suitable mounting, or the shower screen detail that accounts for wall and floor conditions.

In Christchurch, the better choice may be the system that tolerates slight movement, the tile layout that works with real floor levels, or the installation method that does not assume perfect square rooms.

In Queenstown and Wanaka, the better choice may be the pipe route that avoids freezing risk, the bathroom heating that supports drying, or the finish that handles temperature swings.

In rural properties, the better choice may be the tapware that suits the pressure system, the toilet that works with the water supply, or the appliance that can be serviced without waiting weeks for parts.

In coastal properties, the better choice may be the corrosion-resistant fixing, the easier-to-clean finish, or the ventilation outlet detailed for exposed weather.

The best renovation product is not the one that wins in a catalogue.

It is the one that survives the place where it is installed.


Location-Based Renovation Decision Sheet

Location condition

Main risk

What to check before buying

Auckland humidity

Moisture, mould, poor drying

Fan, ducting, make-up air, cabinet material

Wellington wind/seismic exposure

Fixing, restraint, exterior penetrations

Wall framing, heavy item fixing, vent detailing

Christchurch movement history

Floor levels, cracks, drainage falls

Repair records, floor levels, shower falls

Queenstown/Wanaka cold

Freezing pipes, condensation, vacancy

Pipe insulation, heating, extraction, winter use

Rural services

Water pressure, pumps, septic systems

Water source, pump, filters, wastewater limits

Coastal exposure

Corrosion and finish wear

Stainless grade, fixings, warranty, maintenance

Apartments/townhouses

Shared systems and approvals

Body corporate, shared drainage, access rules

Difficult access sites

Labour and delivery risk

Delivery route, parking, waste removal, lifting


Chapter Summary

Location changes renovation risk. Auckland projects often need stronger moisture and ventilation planning. Wellington requires more attention to fixing, heavy products, wind exposure and seismic awareness. Christchurch renovations should consider floor levels, movement history and post-earthquake documentation where relevant. Queenstown and Wanaka projects must plan for cold, condensation, pipe protection and seasonal availability. Rural properties should begin with water supply, pressure, pumps and wastewater systems before product selection. Coastal properties need corrosion-resistant materials, careful exterior detailing and realistic maintenance expectations. The best product choice is not universal; it is the one that suits the property’s location and conditions.

Chapter 6. Hidden risks: asbestos, lead paint, old wiring and old pipes

Hidden Risks: Asbestos, Lead Paint, Old Wiring and Old Pipes

The most dangerous part of a renovation is not always the part that looks damaged.

A cracked tile is obvious.
A leaking tap is annoying.
An old vanity looks tired.
A dated kitchen sink can be replaced.

But a sheet of asbestos-containing board behind old tiles does not announce itself. Lead-based paint may sit quietly under five newer paint layers. Old wiring may remain hidden inside a wall until a mirror cable is added. A corroded pipe may work just well enough until the day a plumber tries to remove the old fitting.

Hidden risks are dangerous because they often appear at the exact moment the project feels like it is finally moving forward.

The demolition has started.
The tradie is on site.
Products have arrived.
The homeowner is excited.
The schedule is tight.

Then the wall opens.

This is why demolition is not just “removing the old bathroom” or “taking out the old kitchen”. It is a controlled entry into the unknown. Once you cut, drill, sand, scrape, lift flooring, remove wall linings or open ceilings, you may disturb materials and systems that were stable only because nobody had touched them.

This chapter is not written to make homeowners afraid of older homes. New Zealand’s older homes can be beautiful, practical and deeply worth renovating. But they require a different rhythm.

The rhythm is:

look first, disturb second.
pause when something is unknown.
test before assuming.
bring in the right person before the risk spreads.

A good renovation does not push through every surprise.
It knows when to stop.


The Rule for Older Homes: Unknown Until Checked

In New Zealand renovation planning, the year 2000 is a useful practical threshold.

It does not mean every home built before 2000 is unsafe.
It does not mean every post-2000 home is problem-free.

But for renovation work, especially work involving demolition or disturbance, homes built or renovated before 2000 deserve extra caution.

WorkSafe New Zealand advises that many buildings in Aotearoa New Zealand contain asbestos, and that homes built before 1 January 2000 may contain asbestos materials. WorkSafe also notes that a building originally built without asbestos may still contain it if an extension or refurbishment was carried out before 2000.

That one idea changes how you renovate.

A pre-2000 bathroom is not automatically dangerous.
A pre-2000 kitchen is not automatically a problem.
But both should be treated as unknown before materials are disturbed.

For kitchens, bathrooms and laundries, this matters because these rooms often involve:

  • lifting old vinyl or tiles;

  • cutting wall linings;

  • removing splashbacks;

  • opening service ducts;

  • replacing ceilings;

  • sanding painted trims;

  • drilling tiled or lined walls;

  • removing cabinets fixed to old surfaces;

  • changing pipes or wiring routes.

The risk is not that old materials exist. Many old materials are safe when intact and undisturbed.

The risk begins when someone turns them into dust.

So the practical rule is simple:

Do not disturb what you have not identified.

If a material is old, brittle, fibrous, dusty, layered, hidden behind fixtures, or part of an earlier renovation, do not assume it is safe to cut, drill, sand or break.


Asbestos: The Risk Behind “Just Removing It”

Asbestos is dangerous partly because it can look ordinary.

It may not look dramatic. It may not look toxic. It may be part of a wall sheet, vinyl backing, tile underlay, ceiling coating, pipe lagging or old service panel that has been sitting there for decades.

The material may have caused no immediate issue while it was sealed behind tiles, paint, cabinets or flooring. But once cut, drilled, sanded, broken or demolished, asbestos fibres can become airborne. That is where the health risk begins.

In kitchens, bathrooms and laundries, asbestos may be found around:

  • old vinyl flooring and backing;

  • tile underlay or adhesive;

  • textured ceiling coatings;

  • wall linings or cement sheets;

  • splashback panels;

  • pipe insulation or lagging;

  • service ducts and old heater areas;

  • soffits, eaves and fibre-cement sheets near extensions;

  • old laundry or bathroom wall panels.

The most important point for homeowners is this:

you cannot reliably identify asbestos by looking at it.

A board can look like ordinary fibre cement and still contain asbestos. Old vinyl can look harmless and still have asbestos backing. Adhesive can look like old glue and still be a problem.

A DIY guess is not a test.

If a suspicious material appears, the safest action is to stop disturbing it and arrange appropriate professional advice or testing. Do not dry sand it. Do not cut it to “see what happens”. Do not sweep dusty debris. Do not use a normal household vacuum on suspicious dust.

The moment suspicious dust is created, the problem becomes harder to contain.

For NZHomeware customers, this matters when a “simple replacement” turns into demolition. Removing an old vanity, toilet, laundry tub, splashback or sink cabinet may expose materials that were not visible during product selection.

The product may be ready.
The room may not be.

For identifying potential asbestos materials and managing removal, consult the official WorkSafe New Zealand Asbestos guidance.


Lead Paint: The Dust You Do Not Want to Create

Lead paint is another hidden risk that becomes more dangerous when disturbed.

It may be buried under newer paint layers. It may be on old timber windows, doors, skirtings, trims, weatherboards, old bathroom joinery or kitchen cabinetry. The surface may look stable, smooth and ordinary.

Then someone sands it.

Health New Zealand says lead-based paint cannot be identified by appearance alone, and that if a building was built in the 1980s or earlier it is best to presume it has been painted with lead-based paint unless testing shows otherwise.

Lead paint risk often appears during preparation rather than demolition. A homeowner may not think they are “renovating dangerously”. They may only be sanding a window frame, stripping an old door, preparing a painted bathroom trim, or repainting kitchen cabinetry.

But lead becomes a problem when old paint is:

  • dry sanded;

  • scraped aggressively;

  • heated;

  • burnt;

  • broken into flakes;

  • allowed to create dust;

  • cleaned up without containment.

Lead dust can be harmful, especially to children, pregnant people and anyone repeatedly exposed during renovation. It also spreads easily. Dust from one small area can travel into other rooms, settle on floors and remain after the visible work is finished.

The homeowner’s rule should be:

Do not create dust from unknown old paint.

If the home is older or the paint history is unclear, test first or seek professional advice. For larger areas, high-risk surfaces or homes with children, the safest answer is usually not DIY sanding. It is controlled preparation by someone who understands the risk.

A painted surface that was stable yesterday can become a contamination problem today.

For best practices on managing lead paint, refer to the Health New Zealand (Te Whatu Ora) lead paint safety resources.


Old Wiring: The Wall May Be Hiding More Than Cables

Electrical risk is often invisible until the wall is opened.

A bathroom may look simple: add an LED mirror, install a heated towel rail, replace the extractor fan. A kitchen may look straightforward: add under-cabinet lighting, install a dishwasher, upgrade the oven, move a few power points.

But once the wall or ceiling is opened, the electrician may find the house was never ready for those upgrades.

Older homes may have brittle wiring insulation, poor junctions, messy alterations, overloaded circuits, old switchboards, missing labels, damaged cable routes or protection that does not suit modern wet-area expectations.

One term homeowners may hear is TRS wiring, commonly referring to older tough-rubber-sheathed wiring. Over time, rubber insulation can deteriorate, crack or become brittle. Once old wiring is discovered, the right response is not to work around it casually. It should be assessed by a registered electrician.

Electrical assessment is especially important when renovating kitchens and bathrooms because these rooms combine water, metal fixtures, appliances and regular daily use.

Common triggers for calling a registered electrician include:

  • adding an LED or demister mirror;

  • installing a heated towel rail;

  • adding or moving power points;

  • installing a new extractor fan;

  • upgrading ovens, cooktops or dishwashers;

  • adding under-cabinet lighting;

  • opening a wall and finding old cables;

  • frequent tripping or flickering lights;

  • old ceramic fuses or messy switchboard wiring;

  • any water-damaged electrical fitting.

The Electrical Workers Registration Board explains that electrical workers must ensure some types of prescribed electrical work are inspected and certified as required, and that consumers should receive relevant certification after certain work.

For homeowners, the practical message is simple:

Do not ask old wiring to quietly support a modern renovation without checking it.

A beautiful LED mirror is not beautiful if the wiring behind it is unsafe.
A new kitchen is not complete if the switchboard cannot safely support the appliances.
A heated towel rail should not be installed on a hope.

If electrical work is fixed, hidden, wet-area-related or uncertain, bring in a registered electrician.

All electrical assessments must involve a registered professional. Verify your electrician's status via the EWRB Public Register.


Old Pipes: When a Tap Replacement Becomes Plumbing Work

Old pipework can turn a small job into a larger decision very quickly.

A homeowner may think they are replacing a kitchen tap. The plumber removes the old fitting and discovers corroded threads. The isolation valve does not close properly. The pipe moves when touched. The flow is weak. The water runs brown for a moment. The cabinet floor has old staining that nobody noticed before.

At that point, the question is no longer:

“Can we connect the new tap?”

It becomes:

“Should we hide this old pipework behind a new product?”

Many older New Zealand homes may contain galvanised steel pipework, older copper, mixed repairs, old valves or pipe routes that do not suit modern products. Galvanised pipes can corrode internally over time. A Waipā District Council notice on old plumbing explains that mineral build-up in galvanised pipes can restrict water flow and that replacing old galvanised pipes can reduce leak risk and may improve water pressure.

Signs that old plumbing may need attention include:

  • low water pressure;

  • weak hot-water flow;

  • rusty or brown water after first use;

  • noisy pipes;

  • visible corrosion around fittings;

  • slow-filling toilet cisterns;

  • old or missing isolation valves;

  • frequent leaks under sinks or vanities;

  • inconsistent shower temperature;

  • pipework that looks patched or mismatched.

This matters directly for product selection.

A modern mixer may not perform well on poor pressure.
A new shower may disappoint if the supply is restricted.
A vanity with drawers may not suit awkward old pipes.
A smart toilet may require better water supply planning.
A kitchen sink cabinet may need more room for updated waste and hose routing.

Replacing old pipework during renovation can feel like an unwanted extra cost. But replacing it later may mean cutting open new cabinetry, removing tiles, disturbing waterproofing or reopening finished walls.

A licensed plumber’s assessment is valuable because the goal is not to replace everything unnecessarily. The goal is to avoid building a new bathroom or kitchen around a failing system.


The Moment to Stop Work

Stopping work can feel expensive.

The tradie is already there.
The skip bin has been delivered.
The room is half demolished.
The products are sitting in boxes.
Everyone wants the job finished.

But some discoveries should not be pushed through.

Stop work and seek the right advice if you discover:

  • suspicious fibrous sheet material in a pre-2000 home;

  • old vinyl flooring or backing that crumbles or creates dust;

  • textured ceiling or wall coating that may contain asbestos;

  • pipe insulation or lagging of unknown material;

  • paint layers that flake heavily during sanding or scraping;

  • strong musty smells behind walls;

  • hidden dampness, mould or water staining;

  • blackened, brittle or damaged wiring;

  • exposed live electrical parts;

  • old wiring with cracked insulation;

  • water-damaged switchboards or fittings;

  • corroded pipes that move, crack or leak when touched;

  • previous DIY plumbing or wiring that looks unsafe;

  • unexpected structural decay or rotten framing;

  • any material or system you cannot identify.

The next step is not to “keep going carefully”.

The next step is to identify the risk.

Depending on what appears, that may mean contacting an asbestos assessor, registered electrician, licensed plumber, builder, building inspector, waterproofing specialist or local council.

Stopping for one day can feel frustrating. But it is usually cheaper than spreading asbestos dust, damaging old wiring, flooding a cabinet, sealing moisture behind new tiles or creating an electrical safety issue.

A paused project can restart.
A hidden risk that has been spread through the house is much harder to undo.


The Hidden-Risk Inspection Habit

The safest renovation habit is simple: inspect before you disturb. Use our Existing Home Inspection Notes to systematically record your findings before you pick up a single tool.

Before demolition, drilling, sanding or cutting, take time to:

  • identify the age of the home and previous renovation history;

  • review property files or council records where useful;

  • inspect visible pipework and electrical fittings;

  • photograph existing conditions;

  • check for moisture, stains, mould or soft flooring;

  • identify suspicious materials;

  • ask trades what risks they expect;

  • test materials where needed;

  • confirm water shut-off valves and switchboard locations;

  • plan what to do if hidden issues appear.

This habit is especially important in kitchens, bathrooms and laundries because these rooms compress water, electricity, ventilation, fixtures, finishes and hidden services into a small space.

A renovation plan should always include a risk allowance—track these potential contingencies using your Quote and Scope Comparison Sheet to ensure your budget can absorb these discovery costs.

Not every hidden risk will appear.
But if one does, the project should have a way to respond without panic.


Hidden-Risk Pause Checklist

Use this checklist before demolition—copy these findings directly into your 10_Communication Records so that any discovered risk is documented for your tradespeople or council records.

Question

Yes / No

Action

Was the home built or renovated before 2000?

Treat unknown materials carefully

Will the work disturb old sheet material, vinyl, wall lining or ceiling coating?

Consider asbestos risk

Will sanding or scraping old paint be required?

Consider lead-paint testing

Are old cables visible?

Ask registered electrician

Is the switchboard old, messy or missing modern protection?

Ask registered electrician

Are pipes corroded, patched or leaking?

Ask licensed plumber

Is water pressure already low?

Check before buying modern tapware or shower products

Is there hidden dampness, mould or musty smell?

Investigate before covering

Is framing soft, rotten or water stained?

Ask builder / inspector

Is any material unknown?

Stop and identify before disturbing


Chapter Summary

Hidden risks are most likely to appear when renovation work begins to disturb old materials and services. Homes built or renovated before 2000 require extra caution because asbestos-containing materials may be present. Lead paint may be hidden under newer layers and becomes risky when sanding, scraping or heat creates dust or flakes. Old wiring, including deteriorated rubber-sheathed wiring, old switchboards and missing modern protection should be assessed by a registered electrician before new bathroom or kitchen electrical products are added. Old galvanised pipes, corroded fittings and poor water pressure can turn a simple tap, sink or vanity replacement into a plumbing decision. The safest renovation habit is to inspect before disturbing and to stop work when suspicious materials, damaged wiring, corroded pipes, moisture, mould or unknown systems appear.

Chapter 7. Budget planning and quote comparison

Budget Planning and Quote Comparison

A renovation budget is not just a number.

It is not simply the amount you hope to spend, the amount you have in the bank, or the price someone mentioned in a showroom.

A renovation budget is a decision-making tool.
It is a risk buffer.
It is a communication document.
It is a way to test whether the project in your imagination matches the house in front of you.

Many kitchen and bathroom budgets fail quietly before the first tile is removed.

They fail when the scope is described too loosely.
They fail when the homeowner assumes “installation” means everything.
They fail when a quote excludes demolition, rubbish removal, waterproofing, electrical work or final testing.
They fail when products are chosen before site conditions are understood.
They fail when the contingency is spent on upgrades before the wall is opened.
They fail when a low quote is accepted because the total looks comforting, not because the scope is clear.

By the time the budget visibly fails, the project may already be difficult to stop.

The old bathroom is demolished.
The kitchen is unusable.
The plumber has found old pipes.
The electrician has asked about the switchboard.
The waterproofing detail is more complex than expected.
The benchtop cannot be cut the way the homeowner assumed.
The tradie says, “That was not included.”

This chapter is about avoiding that moment.

A good budget does not remove every surprise. Renovation always contains some uncertainty, especially in older New Zealand homes. But a good budget gives surprises somewhere to land. It helps you know what you can afford, where you can safely save, where you should not cut corners, and whether two quotes are really pricing the same job.

The goal is not to make the renovation expensive.

The goal is to make the real cost visible early enough to make good decisions.


Cost Ranges Are Starting Points, Not Promises

Renovation cost ranges are useful, but only when they are treated carefully.

They help a homeowner understand whether a project is likely to be a small refresh, a mid-range renovation or a complex rebuild. They can prevent unrealistic expectations. They can help decide whether to phase the work, simplify the scope or change product levels.

But cost ranges become dangerous when they are treated as promises.

A bathroom advertised as “from $15,000” may be a limited refresh with modest products, minimal tiling and no major service changes. A full bathroom renovation with demolition, waterproofing, tiling, plumbing, electrical work, ventilation, fixtures, testing, documentation and project management can cost much more. Current New Zealand renovation guides show a wide spread: some 2025 guides place average bathroom renovations around $15,000–$30,000, while other professional full-renovation guides place many bathrooms closer to $20,000–$35,000 or higher, and 2026 guides describe more complete projects moving well above that depending on scope and complexity.

Kitchen costs vary even more because cabinetry, benchtops, appliances, lighting, plumbing, electrical work, flooring and layout changes can completely change the budget. Recent New Zealand and Auckland-focused guides show wide ranges, from smaller upgrades around $20,000–$40,000 to full or custom kitchen projects commonly reaching $80,000+ and sometimes beyond $100,000 for luxury or complex renovations.

The exact number matters less than the lesson:

A range is not a quote.

A cost range does not know your house.
It does not know your pipes.
It does not know your switchboard.
It does not know whether your floor is level.
It does not know whether your wall contains asbestos.
It does not know whether your chosen vanity collides with the waste pipe.
It does not know whether your Council, body corporate or insurer will ask for records.

Use cost ranges as planning bands:

  • cosmetic refresh;

  • basic renovation;

  • full mid-range renovation;

  • high-end or complex renovation.

A range should help you ask better questions.

It should not replace a site-specific quote.


Bathroom Budgets: Small Room, Many Trades

Bathrooms are expensive because they compress many trades into a small space.

A room that is only a few square metres may still need demolition, rubbish removal, plumbing, electrical work, waterproofing, tiling, ventilation, carpentry, painting, silicone, product installation, testing and handover documentation.

That is why bathroom budgets often surprise homeowners.

They look at the room size and expect a small price.
But trades price the systems, not just the square metres.

A useful planning framework is:

Bathroom scope

Typical planning range

What it may include

Cosmetic refresh

NZD $5,000–$15,000

Painting, accessories, simple product replacement, minor repairs

Basic renovation

NZD $15,000–$30,000

Vanity, toilet, tapware, shower fittings, limited tiling, minimal layout change

Full mid-range renovation

NZD $30,000–$50,000

Demolition, waterproofing, tiling, plumbing, electrical work, ventilation, new fixtures

High-end or complex renovation

NZD $50,000–$80,000+

Layout changes, tiled showers, premium fixtures, old-home repairs, consent-related work

These ranges should be adjusted for location, access, product level, old-home risk and scope clarity. Auckland, Wellington, Queenstown/Wanaka and difficult-access homes may sit higher. Older homes may move from one band to another once walls or floors are opened.

The biggest bathroom cost drivers are usually:

  • moving plumbing;

  • tiled or level-entry showers;

  • waterproofing systems;

  • extent of tiling;

  • electrical upgrades;

  • ventilation upgrades;

  • structural or framing repairs;

  • asbestos or lead-paint management;

  • product quality;

  • project management and documentation.

The layout matters more than many people realise.

A bathroom that keeps the toilet, shower, vanity and bath in the same positions is usually easier to control. A bathroom that moves services becomes a different project. Moving a toilet is not a design tweak. Moving a shower is not just changing the look. Adding a tiled wet-area shower is not the same as swapping an acrylic unit.

If the budget is tight, the safest first question is:

“Can we improve the room without moving the services?”

Sometimes the answer is no. But when the answer is yes, it can save thousands.


Kitchen Budgets: The Cabinet Is Often the Budget

Kitchen renovations vary more than bathroom renovations because kitchens have more product layers.

A kitchen may include cabinetry, benchtops, sink, tapware, appliances, lighting, power points, flooring, splashbacks, rangehoods, plumbing, electrical work, ventilation, painting and sometimes structural changes.

Two kitchens with the same footprint can have completely different budgets.

One uses flat-pack cabinetry, laminate benchtop, standard appliances and no layout changes.
The other uses custom cabinetry, stone benchtop, integrated appliances, under-cabinet lighting, new circuits, moved plumbing and a wall removed for an island.

They may look similar in a mood board.

They are not similar in cost.

A practical planning framework is:

Kitchen scope

Typical planning range

What it may include

Cosmetic refresh

NZD $8,000–$20,000

Handles, paint, tapware, sink, selected appliance or benchtop updates

Basic kitchen renovation

NZD $20,000–$40,000

Flat-pack or entry-level cabinetry, basic benchtop, sink, tap, limited electrical/plumbing

Mid-range full renovation

NZD $40,000–$80,000

New cabinetry, benchtop, appliances, lighting, splashback, plumbing and electrical work

High-end or complex renovation

NZD $80,000–$150,000+

Custom cabinetry, premium benchtops, layout changes, structural or service upgrades

The biggest kitchen cost drivers are usually:

  • cabinetry type;

  • benchtop material;

  • appliance level;

  • moving plumbing;

  • adding electrical circuits or power points;

  • lighting design;

  • flooring changes;

  • structural wall removal;

  • splashback material;

  • sequencing delays;

  • custom details.

Cabinetry is often the largest cost centre. That does not mean homeowners must always choose the cheapest cabinets. It means cabinet decisions should be made with discipline.

Ask:

  • do we need custom cabinetry, or will modular work?

  • are all drawers necessary?

  • do we need full-height pantry storage?

  • is the island worth the service and clearance costs?

  • can existing appliance locations stay?

  • does the benchtop choice suit the budget?

  • are internal accessories worth the extra spend?

  • can we upgrade tapware and sink without rebuilding everything?

The fastest way to overspend in a kitchen is to treat every small upgrade as harmless.

Soft-close drawers.
Stone benchtop.
Integrated bin.
Pull-out pantry.
Waterfall island.
More power points.
More lighting.
Better appliances.
Custom splashback.

Each decision may be reasonable on its own.

Together, they become the budget.


Build the Budget in Categories

A single total number hides risk.

A category budget reveals it.

Instead of writing:

Bathroom renovation: $35,000

write the budget in sections:

Budget category

What to include

Design and planning

Designer, drafter, engineer, site measure, product consultation

Council and compliance

Building consent, inspections, CCC, producer statements, reports

Demolition and disposal

Labour, skip bin, hazardous material testing/removal

Labour

Builder, plumber, electrician, tiler, waterproofer, painter, installer

Products

Vanity, toilet, tapware, sink, mirror, shower, bath, appliances

Materials

Tiles, adhesive, grout, waterproofing, timber, linings, silicone

Service upgrades

Plumbing, electrical, ventilation, drainage, hot water

Finishing

Painting, sealing, trims, accessories, final clean

Documentation

Certificates, warranties, manuals, handover records

Contingency

Hidden problems, scope changes, price changes, delays

This helps you see what is missing.

A quote may include products but not installation.
It may include installation but not product supply.
It may include tiling but not waterproofing.
It may include plumbing fit-off but not rough-in.
It may include a fan but not ducting outside.
It may include labour but not GST.
It may include demolition but not asbestos testing.
It may include appliances but not new circuits.

Consumer Protection New Zealand explains that an estimate is a best guess and is not a fixed price unless specifically stated, while a quote is an offer to do a job for an exact price; it also advises getting quotes in writing and making sure the quote covers all work required.

A category budget makes the quote easier to challenge politely.

You are not saying:

“Why is this so expensive?”

You are asking:

“Which category is included, which category is excluded, and what assumptions is this price based on?”

That is a much better conversation.


Contingency: Do Not Spend the Lifeboat on Better Tapware

Contingency is not upgrade money.

It is not a hidden fund for a more expensive basin, designer tapware or premium tiles.

Contingency is the project’s lifeboat.

It exists because renovation opens things that were previously hidden. This is especially true in older homes and wet areas. A builder may find rotten framing. A plumber may find old galvanised pipe. An electrician may find unsafe wiring. A tiler may find the floor is not suitable. A waterproofer may need extra substrate preparation. Demolition may reveal asbestos risk or previous unconsented work.

For many straightforward renovations, 10–15% may be a starting contingency. For older homes, wet-area rebuilds, pre-2000 homes, undocumented previous work, significant layout changes or difficult-access properties, 20–30% may be more realistic.

The right number depends on risk, not optimism.

Use a higher contingency when:

  • the home is old;

  • the home was renovated before without clear records;

  • walls or floors will be opened;

  • waterproofing is involved;

  • plumbing will be moved;

  • electrical upgrades are likely;

  • asbestos or lead paint risk exists;

  • floors are uneven;

  • moisture damage is visible;

  • the property is remote or difficult to access.

The wrong way to use contingency is to spend it early on upgrades.

The right way is to protect it until high-risk stages are complete:

  • demolition;

  • hidden-material checks;

  • plumbing rough-in;

  • electrical rough-in;

  • framing repairs;

  • waterproofing preparation;

  • floor levelling;

  • first major inspections.

After those stages, if the contingency is still untouched, then the homeowner can decide whether to save it, keep it for later defects, or spend a controlled portion on upgrades.

Until then, do not spend the lifeboat.


Quote Comparison: Compare Scope Before Price

A cheap quote and an expensive quote may not be pricing the same project.

One quote may include demolition. Another may not.
One may include waterproofing. Another may only include tiling.
One may include electrical work. Another may assume the homeowner arranges it separately.
One may include GST. Another may not.
One may include product allowances. Another may assume owner-supplied products.
One may include documentation. Another may finish when the visible work is done.

That is why comparing only the total price is dangerous.

Before comparing numbers, compare scope.

A useful quote should clearly state:

  • what is included;

  • what is excluded;

  • who supplies products;

  • who is responsible for measurements;

  • whether demolition is included;

  • whether rubbish removal is included;

  • whether plumbing and electrical work are included;

  • whether waterproofing is included;

  • whether tiling is included;

  • whether ventilation is included;

  • whether painting and final finishing are included;

  • whether GST is included;

  • whether consent, inspections or documentation are included;

  • whether the quote is fixed price, estimate or charge-up;

  • what assumptions the quote is based on;

  • how variations will be handled;

  • what warranties apply.

A quote that says “install bathroom” is not detailed enough.

A quote that lists each stage, trade, product allowance, exclusion, assumption and document is much easier to compare.

When a quote is unclear, ask for clarification in writing.

Not because you distrust the contractor.

Because memory is a poor contract.


Quote Comparison Template

Use this table before accepting a renovation quote.

Item

Quote A

Quote B

Quote C

Contractor/company name

GST included?

Fixed price, estimate or charge-up?

Detailed scope attached?

Demolition included?

Rubbish removal included?

Plumbing included?

Electrical included?

Waterproofing included?

Tiling included?

Ventilation included?

Painting included?

Products included or owner-supplied?

Product allowances stated?

Consent or council costs included?

Certificates and documents included?

Start and finish dates stated?

Payment schedule clear?

Variation process clear?

Warranty terms clear?

Public liability insurance confirmed?

Licence/registration checked?

Exclusions listed?

Biggest risk or uncertainty

Do not choose a quote until you understand the empty boxes.


What “Too Cheap” Usually Means

A low quote is not automatically bad.

Some contractors are efficient. Some scopes are genuinely simple. Some homeowners choose cost-effective products wisely. Some work can be simplified without reducing safety or quality.

But a quote far below the others should be treated as a question, not a victory.

A very cheap quote may mean:

  • demolition is excluded;

  • rubbish removal is excluded;

  • waterproofing is not included;

  • electrical work is not included;

  • plumbing work is assumed to be simple;

  • consent costs are excluded;

  • product allowances are unrealistic;

  • GST is not included;

  • documentation is not included;

  • site risks have not been considered;

  • work is priced as labour-only;

  • materials are low quality;

  • the contractor is relying on variations later;

  • licensed work has not been properly allowed for.

The danger is not that the first invoice is low.

The danger is that the final cost becomes high after variations, delays, conflict and rework.

If a quote is much cheaper than the others, ask:

  • What exactly is excluded?

  • What happens if hidden issues are found?

  • Who pays for extra plumbing or electrical work?

  • Is waterproofing included, and who does it?

  • Are certificates and warranties included?

  • Is GST included?

  • What product allowances are assumed?

  • How are variations priced?

  • What licences or registrations does the contractor hold?

  • Can they show similar completed projects?

A good contractor should be able to answer clearly.

If the answer is vague, the low price may not be protection.

It may be bait.


Budget Protection Rules

The following rules protect renovation budgets better than almost any spreadsheet.

Rule 1: Keep the layout if possible

Moving plumbing, drainage, appliances, walls and electrical points is one of the fastest ways to increase cost.

If the existing layout mostly works, improve it before moving it.

Rule 2: Do not spend contingency early

Hold contingency until demolition, service checks, waterproofing preparation and rough-ins are complete.

A more expensive tap can wait. Rotten framing cannot.

Rule 3: Confirm products before trades are booked

Late products delay trades. Wrong products create rework. Missing templates delay benchtops.

Confirm the products that affect rough-in, cut-outs, wiring and fixing before the schedule is locked.

Rule 4: Ask for exclusions in writing

Exclusions are where many budget surprises begin.

A quote should not only tell you what is included. It should tell you what is not included.

Rule 5: Treat allowances carefully

A low allowance can make a quote look cheaper than reality.

If the quote allows $800 for a vanity but the one you want costs $1,600, the budget has already moved.

Rule 6: Keep variations written and priced

Verbal changes are a common source of dispute.

A variation should state what is changing, why, how much it costs, whether it affects timing, and who approved it.

Rule 7: Pay for risk control

Waterproofing, plumbing, electrical work, ventilation and structural safety are not the best places to chase the lowest price.

Save money on finishes where appropriate.

Do not save money by removing the protection layers.


Budget and Quote Control Sheet

Control question

Answer before accepting quote

What is the total budget including contingency?

What is the project scope in one page?

What must not change if budget is tight?

What can be downgraded safely?

What should not be downgraded?

What products must be confirmed before trades are booked?

What work may require licensed trades?

What work may require consent or council clarification?

What is excluded from the quote?

What allowances are included?

How are variations priced and approved?

What documents will be provided at handover?

What is the contingency amount and when can it be used?

What are the top three budget risks?


Chapter Summary

Kitchen and bathroom budgets should be built around scope, risk and documentation, not only product prices. Cost ranges are useful planning bands, but they are not promises or substitutes for site-specific quotes. Bathroom renovations can become expensive because many trades and moisture-control details are concentrated into a small room. Kitchen costs vary widely because cabinetry, benchtops, appliances, electrical work and layout decisions strongly affect the total. A realistic budget should include design, labour, products, materials, compliance, disposal, finishing, documentation and contingency. Older homes and wet-area projects need higher contingency because hidden issues are more likely. Quotes should be compared by scope, exclusions, assumptions, allowances, documentation and variation process before comparing total price.

Part 3 — Product and Material Selection

Part Introduction

A product can look perfect online and still be wrong for the room.

The size may be slightly off.
The trap may not match.
The water pressure may not suit the tap.
The vanity may not clear the pipework.
The mirror may require wiring that was not planned.
The finish may not survive coastal conditions.
The product may be attractive but difficult to install, service or document.

Kitchen and bathroom products are not decorative objects only. They connect to water, waste, electricity, walls, floors, ventilation, cleaning habits and long-term maintenance. In wet areas especially, the right product is not simply the best-looking product. It is the product that suits the house, the site, the user and the installation pathway.

This part helps homeowners choose products with more confidence. It explains compliance, fit-for-purpose selection, bathroom product decisions, kitchen and laundry product planning, and the questions that should be asked before ordering.

The best time to discover a product is unsuitable is before it leaves the warehouse.

Chapter 8. Choosing compliant products

Choosing Compliant Products

A beautiful product can still be the wrong product.

This is one of the most expensive lessons in kitchen and bathroom renovation.

A tap can look premium but fail the site because the water pressure is wrong.
A toilet can look modern but not match the waste position.
A vanity can look perfect online but collide with existing pipework.
An LED mirror can complete the design but require electrical work that was never planned.
A black kitchen sink can photograph beautifully but need cleaning habits the household will not maintain.

Most homeowners do not buy the wrong product because they are careless. They buy it because the product page shows what the product looks like, but not always what the house needs.

Renovation products are not like loose furniture.

A chair can be moved.
A rug can be returned.
A vase can be replaced.

But a toilet connects to drainage.
A tap connects to the water supply.
A heated towel rail may connect to electricity.
A kitchen sink depends on the cabinet, benchtop, waste, tapware and installer.
A shower fitting may affect waterproofing, wall penetrations and future leaks.

So the real buying question is not only:

“Do I like this product?”

The better question is:

“Can this product be compliantly installed in this specific home, by the right person, with the right documents, and maintained after handover?”

This chapter explains how to choose products with that question in mind.


Product Selection Is a Risk Decision

When homeowners compare products, they usually compare visible things:

  • colour;

  • finish;

  • size;

  • price;

  • style;

  • brand;

  • reviews;

  • delivery time.

Those things matter. But they are only the surface layer.

For renovation products, the hidden layer matters more:

  • Does the product meet relevant New Zealand requirements?

  • Does the product suit the home’s water pressure?

  • Does the product match the existing waste, inlet or power position?

  • Can the installer access the parts that need servicing later?

  • Does the wall, cabinet or benchtop support it?

  • Are manuals, certificates, labels and warranty documents available?

  • Are spare parts available after installation?

  • Will a licensed plumber, electrician or installer be willing to work with it?

A cheap product can become expensive when the installer refuses to install it.
A beautiful product can become frustrating when it is hard to maintain.
A compliant product can still be wrong if it does not suit the site.

The best product choice answers four questions:

  1. Is it compliant?

  2. Is it suitable for this house?

  3. Can it be installed correctly?

  4. Can it be maintained later?

If any answer is unclear, slow down before buying.


Compliance Comes Before Style

Compliance should not be the last check before installation. It should be part of the buying decision.

Many projects go wrong because the homeowner chooses a product first and asks compliance questions later. By then, the product may already be delivered, the installer may already be booked, and the old bathroom or kitchen may already be removed.

This creates pressure.

The customer wants the product installed.
The installer wants proof.
The supplier is asked for documents.
The schedule starts slipping.
The homeowner feels stuck.

The easiest time to check compliance is before payment.

In a kitchen, bathroom or laundry renovation, compliance may involve:

  • plumbing product documentation;

  • WaterMark or other relevant plumbing compliance evidence where applicable;

  • WELS water-efficiency information for covered products;

  • electrical safety information for powered products;

  • wet-area suitability;

  • installation instructions;

  • pressure requirements;

  • fixing requirements;

  • warranty and maintenance conditions.

New Zealand’s Building Performance guidance states that homeowners must ensure building work complies with the Building Code, even where a building consent is not required. That matters because product selection and installation cannot be separated. A product that connects to water, electricity, drainage, waterproofing or structure becomes part of the building work.

The simple rule is:

Do not buy first and investigate later.


WaterMark and Plumbing Product Evidence

For plumbing-related products, documentation matters.

A tap, mixer, shower fitting, toilet, cistern component, kitchen sink waste or laundry connection is not just a design object. It connects to a system that carries water, waste or both. If that product fails, the result may be more than inconvenience. It may be water damage, failed inspection, installation refusal, warranty argument or insurance questions.

Homeowners do not need to become certification experts. But they should ask basic questions before buying plumbing-related products:

  • What compliance evidence is available?

  • Does the model number on the document match the product being sold?

  • Is the product intended for the same use as the customer’s project?

  • Does the product suit New Zealand plumbing conditions?

  • Are installation instructions available?

  • Will a licensed plumber be comfortable installing it?

  • Are spare parts available later?

The dangerous phrases are vague ones:

“Australian standard.”
“High quality.”
“Suitable for most homes.”
“Our customers use it all the time.”

Those phrases may be true, but they are not documents.

For NZHomeware, this is also a customer-service opportunity. If the product has compliance information, make it easy for customers and tradies to access. If a product requires installer confirmation, say so clearly before purchase.

The goal is not to overwhelm the customer with technical language. The goal is to prevent a product from arriving on site with unanswered questions.


WELS: Useful, but Not the Whole Decision

WELS stands for the Water Efficiency Labelling Scheme.

The New Zealand WELS scheme gives consumers information about the water consumption and water efficiency of new water-using products through standardised labels at the point of sale. The Ministry for the Environment explains that WELS helps consumers identify products that use less water and perform satisfactorily.

WELS applies to specific classes of water-using products, including clothes washing machines, dishwashers, lavatory equipment, showers, tap equipment and urinal equipment.

For homeowners, WELS can help compare:

  • star rating;

  • litres per minute for taps or showers;

  • litres per flush for toilets;

  • water consumption for appliances;

  • model information.

The label matters. The Ministry for the Environment guidance states that suppliers and retailers have responsibilities to ensure covered products clearly display the label, including products offered online.

But WELS is not the whole decision.

A higher star rating usually means better water efficiency, but the most efficient product is not always the best product for every home.

A very low-flow shower may save water but disappoint a household that already has low pressure.
A restricted kitchen tap may feel frustrating when filling large pots.
A laundry tap with low flow may be inconvenient for cleaning tools or soaking items.
An efficient toilet still needs to clear waste properly.

So WELS should be read alongside:

  • water pressure;

  • hot water system type;

  • room use;

  • user expectations;

  • product purpose;

  • daily convenience;

  • installer advice.

WELS helps compare water efficiency. It does not replace fit-for-purpose selection.


Fit for Purpose: The Question Most People Skip

A product can be compliant and still unsuitable.

This is where many homeowners are surprised. They assume that if a product is legal, available and sold in New Zealand, it should work in their home.

That is not always true.

A compliant product may still be wrong if:

  • the water pressure is unsuitable;

  • the waste position does not match;

  • the wall lacks fixing support;

  • the cabinet cannot carry the product;

  • the benchtop cannot accept the sink type;

  • the mirror needs power where none exists;

  • the room has poor ventilation;

  • the finish is unsuitable for the environment;

  • the user cannot maintain it properly;

  • the installer cannot access parts after installation.

Fit-for-purpose selection asks:

“Is this product right for this house, this user, this room and this installation?”

That is a more useful question than:

“Is this product good?”

A product may be excellent in one house and a poor choice in another.

A wall-hung vanity can be perfect when the wall has proper support, but risky when the wall is already tiled and the framing is unknown.
A pull-out kitchen mixer can be practical in a spacious sink cabinet, but frustrating if the hose weight catches on the waste pipe.
A black tap can look elegant in a display bathroom, but show water marks quickly in a household that uses harsh cleaners or rarely wipes fittings dry.
A smart toilet can be convenient when water, power and service access are planned, but problematic when treated like a normal toilet replacement.

The product is only half the decision.
The site is the other half.


Insurance, Warranty and Installer Refusal

Product decisions can affect more than appearance.

They can affect who is willing to install the product, whether warranty support is available, and what questions may arise if something fails later.

A licensed plumber, electrician or installer may refuse to install a product if:

  • documentation is missing;

  • the product appears unsuitable;

  • the product does not match the site;

  • the installation instructions are unclear;

  • the work would create unacceptable risk;

  • required compliance information cannot be provided.

This refusal can feel frustrating, but it is not always unreasonable. Tradies carry their own responsibilities. A good installer does not want to connect a product they believe may fail, leak, be unsafe or create compliance problems.

Insurance is also a practical consideration. Policies differ, and homeowners should confirm cover directly with their insurer. But after damage, questions may be asked about workmanship, maintenance, installation method and product suitability.

That is why the cheapest product is not always cheap.

If it creates delays, returns, extra plumbing work, electrical changes, missing-document problems or warranty disputes, the real cost rises quickly.

Before buying, ask:

  • Who will install it?

  • Will they accept this product?

  • What documents will they need?

  • What does the warranty actually cover?

  • What maintenance does the product require?

  • What happens if the product fails after installation?

A good purchase decision protects the project after the sale.


Product-by-Product Buying Checks

The following checks are not designed to make customers afraid of buying. They are designed to make buying more confident.

Tapware

Tapware should be selected with pressure, reach and serviceability in mind.

Before buying, check:

  • relevant plumbing documentation;

  • WELS information where applicable;

  • high-pressure or low-pressure suitability;

  • minimum and maximum pressure requirements;

  • inlet connection type;

  • tap hole size;

  • benchtop or basin thickness;

  • spout reach;

  • splash risk;

  • cartridge and aerator availability;

  • finish-care instructions;

  • whether a licensed plumber should install it.

The most common mistake is choosing tapware only by colour.

A tall mixer on a shallow basin can splash.
A short spout may not reach the bowl properly.
A kitchen mixer may hit a windowsill.
A pull-out hose may catch on under-sink pipes.
A beautiful finish may be damaged by the wrong cleaner.

Good tapware is not just good-looking. It works with the basin, sink, water pressure and user habits.


Toilets

A toilet is one of the least forgiving products to buy without measuring.

Before buying, check:

  • S-trap or P-trap configuration;

  • set-out distance;

  • water inlet position;

  • pan projection;

  • floor and wall clearance;

  • cistern type;

  • seat replacement availability;

  • WELS information;

  • relevant plumbing documentation;

  • installation instructions;

  • whether a licensed plumber should confirm before purchase.

A toilet can be almost right and still wrong.

If the waste position does not match, the toilet may sit too far from the wall, require an offset connector, look awkward, or need plumbing changes. If the inlet is in the wrong place, the connection may be visible or difficult. If the pan projects too far, the bathroom may feel cramped.

Smart toilets add more checks:

  • power supply;

  • RCD protection;

  • water connection;

  • pressure requirements;

  • backflow considerations;

  • remote or control access;

  • future maintenance access.

A smart toilet should be planned as a plumbing and electrical product, not as a simple toilet upgrade.


Basins and Vanities

Basins and vanities are often chosen emotionally because they define the bathroom’s look.

But installation depends on less emotional details.

Before buying, check:

  • overall width, depth and height;

  • basin position;

  • tap hole location;

  • waste position;

  • drawer clearance around pipes;

  • wall-hung or floor-standing installation;

  • wall support;

  • cabinet material;

  • moisture resistance;

  • top material;

  • sealing requirements;

  • splash risk;

  • service access.

The most common vanity problem is pipe conflict.

A drawer vanity can be excellent, but if the existing waste pipe sits where the drawer needs to move, someone must decide whether to move plumbing, modify the vanity, choose a different vanity, or accept reduced storage.

Wall-hung vanities need stronger planning. They should be fixed into suitable support, not treated as ordinary furniture. If the wall has already been tiled and the framing is unknown, the installer may not be able to confirm safe fixing without further investigation.

Basins and tapware should also be selected together. A basin that looks beautiful alone may splash when paired with the wrong mixer.


Mirrors and LED Mirrors

A standard mirror may be simple. An LED or demister mirror may not be.

Before buying, check:

  • mirror size;

  • wall clearance;

  • fixing method;

  • wall type;

  • product weight;

  • whether power is required;

  • plug-in or hard-wired connection;

  • cable exit position;

  • switch or sensor control;

  • wet-area suitability;

  • demister function;

  • driver or transformer access;

  • whether a registered electrician is required.

The mistake is leaving the mirror until the end.

A hard-wired LED mirror should be planned before walls are closed or tiles are installed. If the cable is in the wrong place, the mirror may sit too high, too low, off-centre or require rework.

The mirror also needs to work for real users. Check height, reflection, vanity width, lighting direction and door swing.

A mirror is not only decoration. It is part of the daily routine.


Heated Towel Rails

A heated towel rail is often treated as a finishing accessory. That is too late.

Before buying, check:

  • hard-wired or plug-in type;

  • electrical requirements;

  • timer or switch control;

  • wall fixing strength;

  • distance from wet zones;

  • product size;

  • towel capacity;

  • finish durability;

  • installation instructions;

  • maintenance requirements;

  • whether a registered electrician is required.

A heated towel rail works best when it is planned with the room, not added after the room is finished.

Its position affects:

  • where towels dry;

  • whether users can reach towels from the shower;

  • whether the wall can support it;

  • whether drilling affects tiles or waterproofing;

  • where electrical supply is needed;

  • whether the door or vanity conflicts with it.

It helps towels dry, but it does not replace ventilation.


Kitchen Sinks and Laundry Tubs

Kitchen sinks and laundry tubs look simple until they meet the cabinet.

Before buying, check:

  • cabinet internal width;

  • bowl size and depth;

  • benchtop material;

  • top-mount, under-mount or flush-mount installation;

  • cut-out requirements;

  • tap hole location;

  • waste position;

  • overflow requirements;

  • dishwasher or washing machine connection;

  • pull-out tap hose clearance;

  • material durability;

  • sound insulation;

  • cleaning requirements.

A large sink in a small cabinet can create problems with clips, waste fittings, pull-out tap hoses and future servicing. An under-mount sink may not suit every benchtop. A black or composite sink may need more careful cleaning than a stainless steel one. A laundry tub that looks tidy may be too small for soaking, cleaning or pet washing.

The right sink is not the largest one.

It is the one that suits the cabinet, benchtop, tapware, waste system and household use.


The Product Decision Test

Before buying any kitchen, bathroom or laundry product, run this short test.

Question

Why it matters

Do I have the exact model number?

Prevents document and product mismatch

Do I have the manual or specification sheet?

Helps installer check requirements

Is compliance information available where needed?

Reduces installation and warranty risk

Does WELS apply to this product?

Helps compare water efficiency for relevant products

Does it suit my water pressure?

Prevents poor performance

Does it fit the existing waste, inlet or power location?

Avoids expensive site changes

Can the wall, cabinet or benchtop support it?

Prevents unsafe or unstable installation

Will a licensed tradie install it?

Avoids site refusal

Can it be serviced later?

Supports long-term maintenance

Do I understand the cleaning requirements?

Protects finish and warranty


Chapter Summary

Choosing compliant products is not a paperwork exercise. It is a way to protect the renovation before money is spent. A product should be checked for compliance, suitability, installation requirements and maintenance before purchase. WELS labels help consumers compare water efficiency for covered products, but water efficiency does not replace site suitability. Plumbing-related products should have appropriate documentation, and powered products must be planned with electrical safety in mind. A compliant product can still be wrong if it does not suit the home’s water pressure, waste position, cabinet, wall support, benchtop, ventilation or user habits. The safest product decision is the one that can be installed properly, supported by documents and maintained after handover.

Chapter 9. Choosing bathroom products correctly

Choosing Bathroom Products Correctly

A bathroom product should never be chosen by appearance alone.

A toilet, vanity, basin, shower mixer, mirror or heated towel rail may look simple in a showroom or online listing. But once it is placed into a real New Zealand bathroom, it has to work with existing plumbing, wall framing, electrical rules, waterproofing, room size, user habits, maintenance needs and long-term durability.

Many bathroom renovation problems begin before installation. They begin when the wrong product is purchased for the room.

A beautiful toilet may not match the existing waste position. A wall-hung vanity may not have proper wall support. An above-counter basin may splash with the wrong mixer. A shower niche may compromise waterproofing if planned too late. An LED mirror may require electrical wiring that was not allowed for. A heated towel rail may look like an accessory, but installation can involve fixed electrical work.

This chapter helps homeowners choose bathroom products in the right order:

  1. Measure the room and existing services.

  2. Check compliance and product documentation.

  3. Confirm installation requirements.

  4. Understand maintenance and daily use.

  5. Choose the style after the practical checks are clear.

In a good bathroom renovation, product selection is not a shopping activity. It is part of installation planning.


9.1 The Bathroom Product Selection Order

The safest bathroom product selection order is:

  1. toilet;

  2. shower;

  3. vanity and basin;

  4. mirror;

  5. heated towel rail;

  6. accessories and finishing details.

This order may seem unusual because many homeowners begin with the vanity or tiles. But the toilet and shower often have the strongest connection to fixed services, waterproofing and layout. They should be confirmed early.

A bathroom layout is usually constrained by:

  • waste pipe positions;

  • water supply positions;

  • shower waste location;

  • door swing;

  • window position;

  • wall framing;

  • ventilation route;

  • electrical zones and wiring;

  • waterproofing extent;

  • user clearance.

Once these constraints are understood, product selection becomes much easier.


9.2 Toilets: S-Trap, P-Trap, Back-to-Wall and Smart Toilets

Toilets are measurement-sensitive products. A toilet that looks correct in a catalogue may not fit the existing plumbing.

Before buying a toilet, confirm the trap type and set-out.

S-trap toilets

An S-trap toilet discharges through the floor. The most important measurement is the distance from the finished wall to the centre of the floor waste. This is often called the set-out.

If the set-out does not match the toilet, installation may require an offset pan connector or plumbing alteration. Too much mismatch can affect appearance, stability or drainage.

Before buying an S-trap toilet, check:

  • finished wall to waste centre measurement;

  • water inlet location;

  • pan projection into the room;

  • whether the cistern can sit against the wall;

  • floor level;

  • whether an offset connector is acceptable;

  • installation instructions;

  • WaterMark and WELS information.


P-trap toilets

A P-trap toilet discharges through the wall. The critical measurement is the height and position of the wall outlet.

Before buying a P-trap toilet, check:

  • floor to outlet centre height;

  • wall outlet position;

  • pan connector compatibility;

  • clearance behind the toilet;

  • water inlet location;

  • whether the wall has suitable service access;

  • whether the product suits the existing waste setup.

P-trap toilets are common in some homes and apartments, but the outlet height must be checked carefully.


Back-to-wall toilets

Back-to-wall toilets are popular because they look tidy and are easier to clean around. However, they require more accurate measurement than close-coupled toilets with more visible gaps.

Check:

  • whether the pan can sit neatly against the wall;

  • whether the cistern aligns with the wall;

  • whether the existing waste position suits the product;

  • whether the water inlet is concealed or exposed;

  • whether future access to fittings is possible;

  • whether the skirting board interferes with the pan.

A back-to-wall toilet can make a bathroom look more finished, but it is less forgiving if the plumbing position is wrong.


Smart toilets and bidet seats

Smart toilets and bidet seats add comfort, but they also add installation complexity.

Before buying, check:

  • electrical supply location;

  • whether power must be installed by a registered electrician;

  • RCD protection;

  • water supply position;

  • pressure requirements;

  • backflow prevention requirements;

  • seat size and pan compatibility;

  • user control position;

  • access for servicing;

  • warranty and spare parts;

  • whether the product can be serviced locally.

A smart toilet should not be treated as a standard toilet with extra buttons. It is a plumbing and electrical product.


9.3 Vanities: Floor-Standing vs Wall-Hung

The vanity is one of the most visible bathroom products, but it is also one of the most commonly mis-specified.

A vanity must work with plumbing, wall support, basin choice, storage needs, door swing, user height, floor level and moisture exposure.

Floor-standing vanities

Floor-standing vanities are usually easier to install than wall-hung vanities because the floor carries most of the load. They can hide pipework, provide storage and suit many replacement projects.

Before buying a floor-standing vanity, check:

  • width and depth;

  • drawer and pipe clearance;

  • waste position;

  • water inlet position;

  • floor level;

  • skirting board interference;

  • door swing and walking clearance;

  • cabinet material and moisture resistance;

  • whether the unit can be sealed appropriately;

  • whether service access remains possible.

Floor-standing vanities are often a practical choice for renovation projects where existing plumbing is awkward.

Wall-hung vanities

Wall-hung vanities create a clean, modern look and make floors easier to clean. They can also make a small bathroom feel larger. But they require proper wall support.

Before buying a wall-hung vanity, check:

  • whether the wall has timber framing at fixing points;

  • whether extra nogging or blocking is required;

  • product weight including basin and top;

  • expected load during use;

  • pipe alignment;

  • drawer clearance;

  • wall lining and tile thickness;

  • fixing instructions;

  • whether the wall needs to be opened before tiling;

  • whether waterproofing may be affected.

A wall-hung vanity should be planned before the wall is finished. Installing it after tiling without proper framing can lead to expensive rework.

9.4 Basins: Above-Counter, Inset and Under-Mount

Basin choice affects style, cleaning, splash control, tapware selection and vanity height.

Above-counter basins

Above-counter basins sit on top of the vanity or benchtop. They create a strong design feature and are popular in modern bathrooms.

Check:

  • overall height after installation;

  • mixer height and reach;

  • splash risk;

  • waste position;

  • benchtop material;

  • cleaning around the basin base;

  • whether the basin leaves enough usable counter space.

Above-counter basins can look elegant, but they must be paired carefully with the right mixer. A tall mixer and shallow bowl combination can splash badly.

Inset basins

Inset basins are partially set into the vanity top. They are practical, familiar and often easier to clean than some above-counter designs.

Check:

  • cut-out requirements;

  • sealing around the edge;

  • tap hole position;

  • cabinet clearance below;

  • overflow and waste compatibility;

  • whether the vanity top is supplied pre-cut.

Inset basins are often a good balance between style and practicality.

Under-mount basins

Under-mount basins are installed beneath the benchtop, creating a clean surface line. They are common with stone or solid-surface tops.

Check:

  • whether the benchtop material is suitable;

  • whether the cut-out edge will be finished properly;

  • fixing method;

  • weight support;

  • sealing detail;

  • access for future replacement;

  • whether professional fabrication is required.

Under-mount basins can look premium, but they are less forgiving and usually require more precise installation.

9.5 Showers: Mixers, Rails, Niches and Screens

The shower is one of the highest-risk parts of a bathroom because it combines water pressure, waterproofing, drainage, glass, wall penetrations and daily use.

Shower mixers

A shower mixer is not just a visible handle. Much of the important work sits inside the wall.

Before choosing a mixer, check:

  • WaterMark certification;

  • pressure suitability;

  • wall cavity depth;

  • cartridge access;

  • trim size;

  • compatibility with shower rail or outlet;

  • whether pipework must be changed;

  • whether a licensed plumber is required;

  • future cartridge replacement availability.

Replacing a visible handle is different from replacing the in-wall mixer body. Work inside the wall can affect plumbing and waterproofing.

Shower rails and outlets

Shower rails, hand showers and outlets may look simple, but they often require drilling into tiled wet-area walls.

Check:

  • wall fixing method;

  • tile type;

  • whether waterproofing will be penetrated;

  • whether fixings are sealed correctly;

  • user height;

  • hose length;

  • water pressure;

  • whether the rail will be used as a grab point.

A shower rail is not a grab rail unless designed and installed for that purpose. Do not allow users to rely on a standard shower rail for body support.

Shower niches

A shower niche can look beautiful and practical, but it must be planned before waterproofing and tiling.

Check:

  • wall framing;

  • niche size and location;

  • waterproofing system compatibility;

  • fall inside the niche base;

  • tile layout;

  • whether the wall is external or internal;

  • whether pipes or wiring are inside the wall;

  • whether a preformed niche is available.

A poorly planned niche can become a leak point.

Shower screens

Shower screens depend on wall alignment, floor fall, waterproofing, glass quality and fixing details.

Before buying, check:

  • opening width;

  • door swing or sliding direction;

  • wall plumbness;

  • floor level and fall;

  • glass thickness;

  • fixing method;

  • seal requirements;

  • whether drilling into waterproofed surfaces is required;

  • whether the screen suits the shower tray or tiled base.

A screen that fits on paper may not fit an out-of-square bathroom.

9.6 Mirrors: LED, Demister, Wiring and Fixing

Mirrors affect lighting, daily use, electrical planning and wall fixing.

Standard mirrors

For a standard mirror, check:

  • size relative to vanity;

  • user height;

  • fixing method;

  • wall type;

  • tile thickness;

  • weight;

  • edge clearance;

  • whether future removal is possible.

A heavy mirror should be fixed properly. Adhesive alone may not be suitable for all situations.

LED and demister mirrors

LED mirrors and demister mirrors require more planning.

Check:

  • power location;

  • plug-in or hard-wired connection;

  • switch or sensor control;

  • IP rating or wet-area suitability;

  • driver or transformer access;

  • wall cavity space;

  • whether a registered electrician is required;

  • warranty terms;

  • replacement part availability.

If an LED mirror is hard-wired, it should be planned before tiling. Adding wiring later can damage finished surfaces.

9.7 Heated Towel Rails and Electrical Planning

A heated towel rail is often selected at the end of a bathroom project, but it should be planned much earlier.

Before buying, check:

  • size and rail spacing;

  • towel capacity;

  • wall location;

  • fixing strength;

  • distance from shower or bath;

  • hard-wired or plug-in type;

  • switch or timer location;

  • cable exit point;

  • whether wall framing is needed;

  • whether a registered electrician is required.

The most common mistake is choosing a towel rail after the wall is already tiled and the electrical location is fixed. This can lead to awkward placement, visible wiring or extra cost.

A good heated towel rail plan should answer:

  • where towels will actually hang;

  • whether users can reach it easily;

  • whether it blocks drawers or doors;

  • how it will be switched;

  • how the wall will support it;

  • how it will be serviced later.

9.8 Bathroom Product Pre-Purchase Checklist

Use this checklist before ordering bathroom products.

Product

Check before buying

Toilet

Trap type, set-out, inlet location, WaterMark, WELS, pan projection

Smart toilet

Power, RCD, water pressure, backflow, service access, local support

Floor-standing vanity

Width, depth, pipe clearance, floor level, moisture resistance

Wall-hung vanity

Framing support, fixing points, pipe alignment, weight

Above-counter basin

Mixer height, splash risk, total height, waste position

Inset basin

Cut-out, sealing, tap hole, cabinet clearance

Under-mount basin

Benchtop material, edge finish, support, sealing

Shower mixer

WaterMark, pressure, wall depth, cartridge access, plumber requirement

Shower rail

Fixing, sealing, tile drilling, user height

Shower niche

Framing, waterproofing, fall, tile layout

Shower screen

Opening size, wall plumbness, floor fall, fixing method

Standard mirror

Weight, fixing method, user height, wall type

LED mirror

Power, hard-wiring, IP suitability, electrician requirement

Heated towel rail

Electrical type, location, fixing, switch/timer, safe clearance


9.9 A Better Way to Shop for Bathroom Products

A better bathroom shopping process is:

  1. measure the existing bathroom;

  2. photograph current plumbing and electrical points;

  3. identify what is staying in the same location;

  4. confirm what will move;

  5. ask which tasks require licensed trades;

  6. choose products based on site constraints;

  7. check compliance documents;

  8. confirm delivery timing;

  9. share product specifications with the installer before purchase;

  10. keep manuals, invoices and warranty records.

The best bathroom product is not the one that looks best in a catalogue. It is the one that works best in the actual room.

Chapter Summary

Bathroom products should be selected through measurement, compliance checks and installation planning. Toilets require trap and set-out confirmation. Vanities must match pipe positions, wall support and moisture conditions. Basin type affects height, cleaning and splash risk. Shower products require careful planning because they affect waterproofing, plumbing, glass fixing and daily water exposure. LED mirrors and heated towel rails should be planned with electrical requirements before walls are finished. The safest approach is to choose bathroom products according to the room, not only according to style.

Chapter 10. Choosing kitchen and laundry products correctly

Choosing Kitchen and Laundry Products Correctly

A kitchen sink is not just a bowl.
A laundry tub is not just a utility basin.
A kitchen tap is not just a finish colour.
And a dishwasher is not simply an appliance that slides into an empty gap.

These products look simple because the complicated parts are hidden.

In a showroom, the sink sits neatly in a benchtop. The tap turns smoothly. The laundry cabinet looks compact and clean. The dishwasher door opens in a straight line. There are no awkward pipes, no old repairs, no water filters, no swollen cabinet floors, no tight corners, no crooked walls, no missing power points, and no installer asking where the waste is supposed to go.

Real homes are different.

Under a kitchen sink, several things are fighting for space at the same time: the bowl, waste, trap, pull-out tap hose, dishwasher connection, water filter, isolation valves, cleaning products and future service access. Behind a laundry tub, there may be old water points, a low waste outlet, a washing machine hose, uneven flooring, poor ventilation or a cabinet that has already seen too much moisture.

The mistake many homeowners make is choosing the visible product before understanding the hidden space.

They choose the sink before checking the cabinet.
They choose the tap before checking the bowl depth.
They choose the laundry cabinet before checking the washing machine connection.
They choose the dishwasher before reading the installation manual.
They choose the black finish before thinking about cleaning habits.

Kitchen and laundry products are not separate objects. They are small systems connected to larger systems.

A good choice must fit the cabinet, match the benchtop, connect to water, drain properly, leave space for maintenance, suit the way the household actually uses the room, and still make sense after the first month of excitement is gone.

This chapter is about choosing products that look right, work right and age well in a New Zealand home.


Start Under the Sink

Most people choose a sink from the top view.

Single bowl or double bowl.
Rounded corner or square corner.
Stainless steel, ceramic or black composite.
With drainer or without drainer.
Top-mount or under-mount.

Those choices matter. But they are not the starting point.

The starting point is under the sink.

The cabinet below the sink is where the real installation lives. It decides how deep the bowl can be, where the waste can sit, whether a pull-out tap hose can move freely, whether a dishwasher can connect, whether a water filter can fit, and whether someone can still reach the trap later.

A large sink can be a poor choice if the cabinet is small.
A deep bowl can be inconvenient if the waste blocks storage.
A pull-out tap can become annoying if the hose catches on pipes.
A beautiful under-mount sink can become risky if the benchtop material is wrong.
A compact laundry tub can look neat but fail the way the household actually uses the room.

Before choosing the product, open the cabinet and look—log these internal measurements and plumbing details in your Existing Home Inspection Notes to ensure your choice is based on site reality, not just showroom aesthetics.

Ask:

  • How wide is the cabinet internally?

  • How much depth is available below the bowl?

  • Where is the existing waste?

  • Are there hot and cold isolation valves?

  • Is there a dishwasher connection?

  • Is there a water filter?

  • Will a pull-out hose have space to move?

  • Will cleaning products be stored in the same cabinet?

  • Can the trap be serviced later?

  • Will drawers or doors interfere with the plumbing?

If you cannot answer these questions, you are not ready to choose the sink.

This is not overthinking.
This is the difference between a product that only looks good and a product that works every day.


Sink Materials: Choose for Use, Not Just Mood

There is no single best kitchen sink material.

There is only the best material for a specific household, kitchen style, cleaning habit and level of daily use.

A family that cooks every night needs something different from a kitchen used mainly for coffee, breakfast and entertaining. A rental property needs different priorities from an owner-occupied home. A coastal home, a hard-water area and a busy family kitchen may all age the same finish differently.

The question should not be:

“Which sink looks best?”

It should be:

“Which sink will still make sense after two years of real use?”

Stainless steel

Stainless steel is popular because it is practical, familiar and forgiving. It suits many New Zealand kitchens and handles heavy daily use better than many more decorative materials.

It is usually a strong choice when:

  • the kitchen is used often;

  • the household cooks regularly;

  • the owner wants easier maintenance;

  • the budget needs control;

  • the sink needs to work with many tapware styles;

  • future replacement or servicing should remain simple.

But stainless steel is not all the same. Thickness, bowl shape, sound-deadening pads, drainage fall and corner radius all matter.

Very sharp internal corners can look modern but be harder to clean.
Very thin steel can feel noisy or flexible.
Very deep bowls can be useful but may make under-sink plumbing harder.
A sink that does not drain cleanly can leave water sitting in the bowl.

A good stainless steel sink should feel practical, not flimsy.

Ceramic

Ceramic sinks have presence. They can make a kitchen feel classic, calm and substantial. In farmhouse, traditional or transitional kitchens, they can become the visual anchor of the room.

But ceramic needs planning.

It is heavier.
It can chip if heavy cookware is dropped.
It needs suitable cabinet support.
It may need more careful installation.
White surfaces may show marks and require regular cleaning.

Ceramic is often a good choice when the sink is part of the design statement and the cabinetry, benchtop and household habits are planned around it.

It is less ideal when the kitchen is extremely rough-use, the cabinet is not designed for the weight, or the owner expects a low-maintenance utility surface.

Black composite or granite-style sinks

Black composite sinks are popular because they make a kitchen feel modern and intentional. They pair well with black, gunmetal or brushed tapware and can make a simple kitchen look more designed.

But black sinks are honest about maintenance.

They may show mineral deposits, soap residue or water marks more visibly, especially in harder-water areas. Some surfaces dislike harsh cleaners. Some finishes need regular wiping to stay showroom-clean.

That does not make them a bad choice. It makes them a lifestyle choice.

A black sink is usually best for a household that understands the cleaning routine and wants the design impact enough to maintain it.

If no one in the home wants to wipe, rinse or care for the surface, stainless steel may age more gracefully.


Mounting Style: Top-Mount, Under-Mount or Flush-Mount?

The way a sink is mounted changes not only the look, but also the risk.

A sink is not chosen alone. It is chosen with the benchtop.

Top-mount

A top-mount sink sits on top of the benchtop. It is usually the most forgiving option.

It often suits:

  • laminate benchtops;

  • many renovation projects;

  • budget-conscious upgrades;

  • situations where future replacement should be easier;

  • homes where practicality matters more than seamless appearance.

The visible rim may collect grime if not cleaned properly, and it does not look as minimal as an under-mount sink. But it is practical and often safer for renovations where the benchtop material or cut edge is vulnerable to water.

Under-mount

An under-mount sink sits below the benchtop. It looks clean and premium. It also makes wiping crumbs and water into the bowl easier.

But it requires more from the project.

The benchtop material must be suitable.
The cut-out must be precise.
The edge must be finished properly.
The sink must be supported correctly.
The seal must be reliable.
Future replacement may be more complicated.

An under-mount sink is not just a product choice. It is a fabrication and installation decision.

Flush-mount

A flush-mount sink sits level with the benchtop surface. It can look very refined, but it requires high precision.

It is usually best when the sink and benchtop are being planned together by a fabricator, rather than being selected separately at different times.

The common mistake

The common mistake is choosing the sink first, then asking the benchtop to make it work.

The better order is:

  1. choose the benchtop material;

  2. Confirm these installation details early—use your Quote and Scope Comparison Sheet to ensure your installers and fabricators are quoting based on the specific mounting and sealing requirements of your chosen products.

  3. choose a sink that suits that method;

  4. confirm the cut-out with the fabricator;

  5. confirm the tap hole and waste position;

  6. order only after the system is clear.

A benchtop and sink are not two purchases.
They are one installation system.


Kitchen Tapware: The Product Your Hands Will Judge Every Day

Kitchen tapware is one of the most used products in the home.

It is used when hands are wet, oily, cold, full or rushed. It fills pots, rinses rice, washes vegetables, cleans pans, fills pet bowls, rinses coffee cups and sometimes handles muddy buckets.

A kitchen mixer cannot only look elegant. It has to behave well.

Pull-out and pull-down taps

Pull-out and pull-down taps can be excellent. They make rinsing easier and are especially useful with large or deep sinks.

But they need space.

The hose and weight need a clear path inside the cabinet. If they catch on waste pipes, dishwasher hoses, water filters or cleaning bottles, the tap will annoy the user every day.

Before buying a pull-out or pull-down tap, check under the sink, not just above it.

Mixer height and spout reach

A tall mixer gives clearance for large pots, but it may splash if paired with a shallow sink.

A low mixer may reduce splash, but may make filling tall containers awkward.

A long spout can reach the centre of the bowl properly.
A short spout may land too close to the back edge.
A spout that reaches too far forward may splash toward the user.

The mixer should be chosen with the sink, not after it.

Handle position

The handle also matters.

Can it move without hitting the splashback?
Can it be reached while cooking?
Will it hit a windowsill?
Can a child or elderly user operate it easily?
Is the hot/cold direction clear?

These small details become daily experience.

When choosing kitchen tapware, imagine actual use:

  • filling a stock pot;

  • washing a large frying pan;

  • rinsing vegetables;

  • cleaning sink corners;

  • operating the tap with one hand;

  • keeping water inside the bowl;

  • moving between sink, dishwasher and bench.

The right kitchen tap is not the most dramatic one.
It is the one your hands stop noticing because it works naturally.


Laundry Tubs and Cabinets: Small Room, Heavy Work

The laundry is often the least glamorous wet area in the home, but it may work the hardest.

It handles dirty water, wet towels, pet mess, muddy shoes, cleaning tools, buckets, soaking, rinsing, washing machine discharge and storage. In many New Zealand homes, it also sits near an external door, garage or utility entry.

That means the laundry should not be planned only for neatness.

A small laundry tub may look tidy in photos, but may be frustrating for real tasks.
A deep tub may be useful, but may not suit the cabinet or washing machine layout.
A flat cabinet front may look clean, but the material must still handle splashing.
A closed cabinet may hide clutter, but may also trap moisture if ventilation is poor.

Before choosing a laundry tub or cabinet, ask how the household actually uses the room:

  • Do you soak clothes?

  • Do you clean shoes or tools?

  • Do you wash pets?

  • Do you empty buckets?

  • Does the washing machine drain into the tub or a standpipe?

  • Is storage more important than tub size?

  • Is the laundry used as a mudroom or entry space?

  • Will wet items sit on or near the cabinet?

  • Is there enough ventilation?

A laundry cabinet is wet-area furniture. It needs more than a good-looking front.

Check:

  • moisture resistance;

  • edge sealing;

  • floor clearance;

  • ventilation;

  • washing machine hose access;

  • waste position;

  • water point location;

  • whether the floor is level;

  • whether future repairs can be reached.

Laundry products age badly when they are chosen only for neatness.

They age well when they are chosen for work.


Benchtop Compatibility: The Surface Controls the Sink

The benchtop decides more than the kitchen’s visual style.

It decides how the sink can be mounted, how the tap can be fixed, how water is managed at the cut-out, and how future repair or replacement will happen.

Laminate

Laminate is common and cost-effective. It can work well in many kitchens, but cut edges are vulnerable to water if not sealed properly.

For this reason, laminate is usually more suited to top-mount sinks than under-mount sinks. A top-mount rim helps protect the cut edge. If water reaches an exposed or poorly sealed cut-out, swelling can occur.

Timber

Timber benchtops feel warm and natural, but around a sink they require discipline.

Every cut edge must be sealed. Standing water must be wiped. The owner must accept that timber is a living material and will respond to moisture.

Timber can be beautiful, but it is not a “set and forget” choice around water.

Engineered stone, porcelain and solid surface

These materials can work well with under-mount or more refined sink installations, depending on the product and fabricator. But they require accurate cutting, suitable support and proper edge finishing.

The fabricator should confirm:

  • sink model;

  • cut-out size;

  • mounting method;

  • tap hole;

  • edge finishing;

  • support requirements;

  • warranty implications.

The rule

Do not order the sink, tap and benchtop as separate decisions.

Confirm them together.

A sink choice can change the benchtop.
A benchtop choice can limit the sink.
A tap choice can affect the hole, splash and under-bench clearance.

The surface controls more than you think.


Dishwashers and Washing Machines: Familiar Does Not Mean Simple

Dishwashers and washing machines feel familiar because most people have used them for years.

But using an appliance is not the same as installing one.

A dishwasher needs more than a gap of the right width. It needs:

  • cabinet space;

  • water supply;

  • waste connection;

  • power supply;

  • hose path;

  • level floor;

  • door clearance;

  • ventilation or manufacturer clearance;

  • service access.

A common mistake is assuming that an old kitchen can accept a dishwasher without changes. Sometimes it can. Sometimes the cabinet, waste, tap connection, power point or flooring makes it more complicated.

A washing machine has similar needs, but often carries higher water-risk consequences.

Washing machine hoses age.
Connections leak.
Machines vibrate.
Floors get wet.
A small leak in an upstairs laundry can become a large repair.

Before buying a dishwasher or washing machine, read the installation manual, not only the marketing dimensions.

Check:

  • width;

  • depth;

  • rear clearance;

  • hose route;

  • power location;

  • water inlet;

  • drainage method;

  • door swing;

  • floor level;

  • whether service access remains possible.

Also remember water efficiency. WELS applies to dishwashers and washing machines in New Zealand, so water-use information should be checked before buying.

The better question is not:

“Will it fit in the gap?”

It is:

“Can it connect, drain, open, operate and be serviced safely in that gap?”

Note: For products with water-using components, New Zealand law requires WELS labelling. Always check the WELS (Water Efficiency Labelling Scheme) to verify water consumption ratings before finalising your purchase.


Measuring Before Ordering

Measuring is not glamorous, but it saves projects.

The phrase “standard size” causes many kitchen and laundry mistakes. Homes are not always standard. Previous renovations are not always standard. Cabinets are not always square. Imported products are not always identical. Even standard products still need actual measurements.

Before ordering, measure slowly and photograph the existing setup.

For kitchen sinks, record:

  • cabinet internal width;

  • cabinet internal depth;

  • benchtop depth;

  • existing cut-out size;

  • distance from wall to tap hole;

  • waste position;

  • depth available under the bowl;

  • dishwasher connection location;

  • water filter or waste disposal location;

  • window or shelf clearance above the tap.

For kitchen tapware, record:

  • tap hole diameter;

  • benchtop thickness;

  • distance to wall or splashback;

  • sink bowl depth;

  • under-sink hose space;

  • hot and cold inlet positions;

  • water pressure if known.

For laundry tubs and cabinets, record:

  • room width;

  • cabinet space;

  • washing machine size;

  • dryer position;

  • door swing;

  • waste and water points;

  • floor level;

  • wall clearance;

  • ventilation;

  • storage needs.

For appliances, measure the space and then read the manual. The manual usually tells you what the product really needs.

Take photos from three distances:

  1. whole area;

  2. product and surrounding cabinets;

  3. close-up of waste, water, power and fixing points.

Good measurements reduce guessing.
Good photos reduce misunderstanding.

Tip: Before confirming your order, consolidate your measurements and product details into the 11_Handover and Maintenance section of your project folder to ensure you have all manuals and specs stored for your installers.


The Product Choice That Ages Well

A kitchen or laundry product ages well when it continues to make sense after the first month of excitement is gone.

New products are easy to love.
The real test comes later.

After two years of cooking.
After hundreds of dishes.
After cleaning muddy shoes.
After wiping water marks.
After washing pet bowls.
After opening the cabinet to check a small drip.
After the first time a spare part is needed.

Good long-term choices usually share a few qualities:

  • they are easy to clean;

  • they suit the water quality;

  • they match the way the household actually uses the room;

  • they can be serviced;

  • parts are available;

  • the finish is not too fragile for the environment;

  • installation does not block future access;

  • the product does not depend on perfect habits to survive.

That last point matters.

Some products are beautiful but demanding. They require careful wiping, gentle cleaners, controlled use and immediate maintenance. That is fine for some households. It is unrealistic for others.

The honest buying question is not:

“Do I love this product today?”

It is:

“Will this product still suit the way we live when no one is trying to keep it showroom-perfect?”

That question saves more money than most discounts.


Kitchen and Laundry Pre-Order Checklist

Product area

What to confirm before ordering

Kitchen sink

Cabinet width, cabinet depth, bowl depth, waste position, mounting type, benchtop compatibility

Sink material

Cleaning habits, scratch risk, water marks, heat tolerance, warranty

Tapware

WELS where applicable, relevant plumbing documentation, height, reach, pressure, hose clearance

Pull-out tap

Space below sink, hose movement, filter and waste position

Benchtop

Cut-out method, edge sealing, sink mounting, tap hole, fabricator requirements

Laundry tub

Tub size, cabinet material, washing machine connection, splash exposure

Dishwasher

Width, depth, water supply, waste, power, hose path, door clearance

Washing machine

Water supply, waste, floor level, vibration, hose condition, service access

Installation

Who installs, what documents are needed, what happens if fittings do not match

Maintenance

Spare parts, cleaning requirements, warranty conditions, access for repair


Part 4 — Kitchen Renovation Planning

Part Introduction

A good kitchen is not built from beautiful products alone.

It is built from movement, sequence, clearance, storage, lighting, services, installation accuracy and daily habits. A kitchen may look impressive in a photo but still frustrate the people who use it every morning. The fridge door may hit the island. The sink may be too far from preparation space. The dishwasher may block a walkway. The tap may splash. The power points may be in the wrong places. The benchtop may depend on a cut-out decision made too early.

Kitchen renovation planning needs to connect design with use.

This part explains how to think about kitchen layout, workflow, work zones, appliance placement, sink and tapware planning, benchtop cut-outs, installation checkpoints and final handover. It is written for homeowners who want a kitchen that looks good, works naturally and avoids expensive installation mistakes.

A kitchen should not only be finished.

It should be usable.

Chapter 11. Kitchen layout and workflow

Kitchen Layout and Workflow

A good kitchen is not measured only by how it looks in photographs.

A kitchen can have beautiful cabinets, a premium benchtop, expensive tapware and carefully chosen lighting, yet still feel frustrating every day if the layout does not support the way people actually cook, clean, move and store things.

The best kitchens feel calm because the work flows naturally. You take food from the fridge, place it on the bench, wash or prepare it near the sink, cook it at the hob or oven, serve it, clean up, and put everything away without constantly crossing the room, bumping into doors, blocking another person or dripping water across the floor.

Kitchen layout is not about following one perfect rule. It is about understanding movement.

This chapter explains how to plan the kitchen as a working space before products and finishes take over the conversation.


11.1 Start With the Way the Household Uses the Kitchen

Before drawing cabinet lines or choosing benchtops, ask how the kitchen is actually used.

Some households cook every day. Some cook mainly on weekends. Some need space for lunchboxes, coffee, baking, meal prep or entertaining. Some kitchens are used by one person at a time. Others regularly have two adults cooking, children doing homework, pets walking through, or guests standing around the island.

A layout that works beautifully for one household may fail in another.

A couple who cooks simple meals may value a clean island and a compact workflow. A family with children may need more pantry space, landing space beside the fridge, durable surfaces and safe separation between the cooktop and the main traffic path. A serious home cook may care more about preparation space, ventilation, knife storage and proximity between the sink and cooktop. A rental or Airbnb kitchen may need durability and easy maintenance more than custom details.

Good kitchen planning starts with habits, not trends.

Useful questions include:

  • Who cooks most often?

  • Do one or two people cook at the same time?

  • Is the kitchen also used for homework, coffee, entertaining or work calls?

  • How often is the dishwasher used?

  • Do groceries arrive in large weekly shops or small frequent shops?

  • Are there children, elderly users or guests who need safe movement?

  • Is the kitchen open to the living area?

  • Does the household need more storage, more bench space or better appliance placement?

  • What annoys people most about the current kitchen?

The answers often reveal the real renovation priorities.


11.2 Work Triangle vs Modern Work Zones

For many years, kitchen design has referred to the “work triangle”: the relationship between the fridge, sink and cooktop. The idea is simple. These three points are used frequently, so the distance between them should be efficient and not blocked by obstacles.

The work triangle is still useful, especially in smaller kitchens. It reminds homeowners not to place the fridge too far from the preparation area, not to isolate the sink, and not to make the cook walk around an island every time they need water.

But modern kitchens often need more than a triangle.

Open-plan living, kitchen islands, dishwashers, large pantries, coffee stations, double ovens, recycling systems, children’s snack drawers and multiple users have changed how kitchens function. A modern kitchen is often better understood as a set of work zones.

Common zones include:

  • food storage zone;

  • cold storage zone;

  • preparation zone;

  • cooking zone;

  • cleaning zone;

  • serving zone;

  • coffee or breakfast zone;

  • recycling and waste zone;

  • appliance zone.

The triangle asks, “How far apart are the fridge, sink and cooktop?”
The zone approach asks, “Where does each task happen, and what does it need nearby?”

Both ideas are useful. The best kitchen layouts use the work triangle as a starting point, then refine the space through zones.


Example: the breakfast problem

A family renovates a kitchen and places the pantry at one end, the fridge at the other, the toaster in an appliance cupboard, and cups in a wall cabinet far from the coffee machine. Each morning, making breakfast requires opening four different areas while another person tries to empty the dishwasher.

Nothing is technically wrong with the kitchen. But the workflow is poor.

A better layout would place breakfast items, bread, cereal, cups, coffee, milk access and a small landing bench in one zone. This simple change can make the kitchen feel calmer every morning.


11.3 Sink, Cooktop and Fridge Placement

The sink is usually the hardest-working point in the kitchen. It is used for washing food, filling pots, rinsing hands, cleaning dishes, emptying liquids, preparing vegetables, dealing with rubbish and working around the dishwasher.

For that reason, the sink should not be treated as an afterthought.

A good sink position usually needs:

  • enough bench space on at least one side;

  • easy access to the dishwasher;

  • a clear path to the bin or waste system;

  • good lighting;

  • suitable window, splashback or wall clearance;

  • enough space below for plumbing, tap hoses and cleaning products;

  • a location that does not block the main traffic path.

The cooktop needs its own planning. It should have safe landing space nearby, good ventilation above, enough clearance from tall cabinets, and a position that does not put hot pans in the middle of household traffic. Placing a cooktop on an island can look elegant, but it brings extra questions: Where does the rangehood go? Will cooking smells spread into the living room? Is there enough clearance around seating? Are children likely to sit directly opposite hot pans?

The fridge is often underestimated. It is not just a storage box. It is one of the most visited points in the kitchen, including by people who are not cooking. If the fridge is placed deep inside the work area, snack traffic can interfere with cooking. If it is too far from the bench, unloading groceries becomes annoying. If the door swing is wrong, the layout may feel awkward every day.

A good kitchen gives the fridge a landing space. Somewhere to put groceries, lunchboxes, milk, leftovers or meal prep before things move into the next zone.


11.4 Island Planning

A kitchen island is often the dream feature. It promises extra bench space, casual seating, storage, social connection and a more open kitchen. But an island that is too large, too close to cabinets, overloaded with appliances or badly positioned can make a kitchen worse.

The first question is not, “Can we fit an island?”
The better question is, “Can we move comfortably around it?”

An island needs clearance on all working sides. It should not trap the cook between open appliance doors. It should not force people to squeeze past the dishwasher. It should not block the path between fridge, sink and cooktop. It should not become the place where everyone dumps keys, school bags and mail because no other landing zone exists.

An island can serve different purposes:

  • preparation space;

  • seating;

  • storage;

  • sink location;

  • cooktop location;

  • serving area;

  • homework area;

  • social gathering point.

It should not try to do everything at once unless the kitchen is large enough.

A sink on an island can be practical in open-plan kitchens, but it also means dirty dishes may be visible from living areas. A cooktop on an island can look impressive, but it needs serious ventilation planning and safe separation from seating. A plain island with a large uninterrupted worktop is often more useful than a crowded one.

One of the best island tests is simple: imagine opening the dishwasher, oven, fridge and rubbish drawer. Can people still move safely?


11.5 Clearance Requirements and Real Movement

Clearance is one of the least glamorous parts of kitchen design, but it decides whether the kitchen feels comfortable.

A plan may look spacious from above, yet feel tight when doors, drawers, people and appliances are added. The difference between a comfortable kitchen and an irritating kitchen can be just a few hundred millimetres.

When reviewing clearance, think about:

  • one person standing at the sink;

  • another person walking behind;

  • dishwasher door open;

  • oven door open;

  • fridge door open;

  • drawers pulled out;

  • island stools in use;

  • rubbish bin pulled out;

  • children or pets passing through.

The kitchen should be designed for movement during use, not just empty space on a plan.

Narrow clearances may be acceptable in small homes if the layout is simple and used by one person. But in a family kitchen or open-plan kitchen, tight clearances can create daily friction.

The most common clearance mistake is placing an island where the room really needed a peninsula, mobile table or no island at all.

A slightly smaller kitchen that moves well is better than a larger-looking kitchen that traps people.


通行间距是厨房设计中最不吸引人的部分之一,但它决定厨房是否舒服。

平面图上看起来宽敞的厨房,一旦加入门、抽屉、人和电器,就可能变得拥挤。一个好用厨房和一个烦人厨房之间,差别可能只有几百毫米。

检查通行间距时,要想象:

  • 一个人站在水槽前;

  • 另一个人从后面经过;

  • 洗碗机门打开;

  • 烤箱门打开;

  • 冰箱门打开;

  • 抽屉拉出;

  • 岛台椅有人坐;

  • 垃圾桶拉出;

  • 孩子或宠物从厨房穿过。

厨房应按使用中的移动来设计,而不是按平面图上的空白来设计。

在小户型中,如果布局简单且通常一人使用,较窄间距可能可以接受。但在家庭厨房或开放式厨房中,过紧间距会制造每天的摩擦。

最常见的间距错误,是在实际上更适合半岛台、移动桌或根本不适合岛台的空间里强行放岛台。

一个稍小但动线顺畅的厨房,比一个看起来更大却让人被困住的厨房更好。


11.6 Storage: Put Things Where They Are Used

Kitchen storage is not only about having enough cabinets. It is about placing storage where it supports the task.

Pots should live near the cooktop. Oils and spices should be close enough for cooking, but not so close that heat damages them. Plates and bowls should be near the dishwasher or serving area. Mugs should be near the coffee zone. Food containers should be near the fridge or prep area. Cleaning products should be near the sink, but safely away from children where needed.

Poor storage creates unnecessary movement.

A kitchen can have a large amount of cabinetry and still feel inefficient if items are stored in the wrong places. Deep corner cabinets may look like useful storage on a plan but become awkward if access is poor. High wall cabinets may provide capacity but not convenience. Open shelves may look beautiful but require constant cleaning and styling.

Before deciding cabinet layout, make a list of what needs a home:

  • everyday plates and bowls;

  • pots and pans;

  • chopping boards;

  • knives;

  • food containers;

  • dry goods;

  • spices and oils;

  • cleaning products;

  • rubbish and recycling;

  • small appliances;

  • baking trays;

  • pet food;

  • lunchbox items;

  • coffee and tea.

A good kitchen gives everyday items the best positions. Rarely used items can accept the less convenient spaces.


11.7 Lighting and Power Points

Lighting is not decoration only. In a kitchen, it is a safety and workflow tool.

A kitchen usually needs three layers of lighting:

  • general lighting for the whole room;

  • task lighting for benches, sink and cooking areas;

  • accent or ambient lighting for mood and open-plan living.

The most common lighting mistake is relying only on ceiling downlights. Downlights can illuminate the floor while leaving the benchtop in shadow, especially when the person working is standing between the light and the bench. Under-cabinet lighting can make a major difference in food preparation and cleaning.

Power points should be planned around real appliance use. A kitchen may need power for:

  • kettle;

  • toaster;

  • coffee machine;

  • microwave;

  • blender;

  • air fryer;

  • phone charging;

  • under-cabinet lighting;

  • dishwasher;

  • fridge;

  • oven;

  • cooktop;

  • rangehood;

  • waste disposal or water filter.

Adding power points after the kitchen is finished is expensive and disruptive. Electrical planning should happen before cabinetry and splashbacks are finalised.

This is especially true for islands. An island may need power for appliances, laptops or charging, but power supply must be planned safely and legally. Fixed electrical work should be carried out by a registered electrician.


11.8 Common Layout Mistakes

Most kitchen layout mistakes are not dramatic. They are small irritations repeated every day.

The fridge door opens the wrong way.
The dishwasher blocks the sink when open.
The bin is too far from the preparation area.
The cooktop has no landing space.
The island is too close to the opposite bench.
The sink is placed in a corner with no elbow room.
The pantry is large but inconvenient.
The coffee machine steals the only useful bench space.
The power points are in the wrong place.
The rangehood is too weak or too noisy to be used.

None of these problems may ruin the kitchen alone. Together, they make the room feel badly planned.

A good layout avoids daily friction.

Before finalising the kitchen, walk through a normal day:

  1. Bring groceries in.

  2. Put cold items away.

  3. Make breakfast.

  4. Prepare dinner.

  5. Cook with another person nearby.

  6. Load and unload the dishwasher.

  7. Clean the bench.

  8. Take rubbish and recycling out.

  9. Make coffee while someone else uses the sink.

  10. Serve food to the dining or living area.

If the layout fails during this mental walk-through, change it before construction begins.


11.9 A Better Kitchen Planning Sequence

A practical kitchen planning sequence is:

  1. understand household habits;

  2. identify what is wrong with the current kitchen;

  3. confirm room dimensions and fixed constraints;

  4. place fridge, sink and cooktop;

  5. define work zones;

  6. plan appliance positions;

  7. test island or peninsula clearance;

  8. plan storage by task;

  9. plan lighting and power;

  10. confirm plumbing and electrical implications;

  11. choose cabinetry style;

  12. choose benchtop, sink and tapware together;

  13. finalise finishes.

Many homeowners start at step 11 or 12. That is why kitchens can look good but work badly.


Kitchen Layout Walk-Through Checklist

Before approving the layout, test these questions.

Question

Why it matters

Is there landing space beside the fridge?

Makes grocery unloading and meal prep easier

Is the sink close to the dishwasher?

Reduces dripping and awkward loading

Can the dishwasher open without blocking the main path?

Prevents daily frustration

Is there bench space beside the cooktop?

Gives safe landing space for hot pans

Can two people use the kitchen at once?

Important for family and open-plan kitchens

Does the island have enough clearance?

Prevents squeezing and blocked appliance doors

Is the bin close to the prep zone?

Makes cooking and cleaning easier

Are cups, coffee and breakfast items grouped?

Improves morning workflow

Are power points where appliances will actually be used?

Avoids extension cords and rework

Is task lighting placed above work areas?

Improves safety and usability

Can rubbish and recycling be removed easily?

Supports daily maintenance

Does the layout still work when doors and drawers are open?

Tests real movement, not just floor plan space


Chapter Summary

A good kitchen layout begins with household habits, not finishes. The traditional work triangle is still useful, but modern kitchens also need clear work zones for storage, preparation, cooking, cleaning, coffee, serving and waste. Sink, cooktop and fridge placement should support natural movement. Islands should be planned around clearance and real use, not just appearance. Storage should be placed where tasks happen. Lighting and power points must be planned before cabinetry and splashbacks are finalised. The best kitchen is not the one that looks most impressive on day one, but the one that feels easy every day.

Chapter 12. Kitchen installation checkpoints

Kitchen Installation Checkpoints

A kitchen renovation does not usually fail because of one dramatic mistake.

It fails through small details that were not checked when they were still easy to fix.

The cabinet is only slightly out of level.
The sink cut-out is approved before the actual sink arrives.
The dishwasher opening is just a little too tight.
The tap handle almost touches the splashback.
The pull-out hose catches on the waste pipe.
The silicone behind the sink looks fine from a distance.
The leak test is skipped because everyone wants the job finished.

None of these problems feels serious at first.

But a kitchen is not a room that is used occasionally. It is used every day. Small installation errors become repeated irritation. A small leak becomes swollen cabinetry. A tight appliance opening becomes a future servicing problem. A poorly sealed cut-out becomes a water-damaged benchtop. A missing test becomes an argument after final payment.

This is why kitchen installation must be checked in stages.

A kitchen should not be judged only by how it looks on handover day. It should be judged by whether it is level, supported, sealed, connected, tested, documented and ready for real daily use.

This chapter is not a technical installation manual. It does not replace a builder, plumber, electrician, cabinetmaker or benchtop fabricator. It is a homeowner’s guide to knowing when to pause, what to ask, what to photograph and what should be checked before the kitchen is signed off.

A good kitchen handover is not a clean benchtop.

It is a kitchen that can be used tomorrow morning without surprises.

Tip: Don't rely on memory for these stage-by-stage checks. Log your progress and any discovered defects in the 10_Communication Records section of your project folder.


Installation Is a Sequence, Not a Single Event

A kitchen is installed in layers.

First, the room is prepared. Walls, floors, services and measurements are checked. Then cabinets are positioned, levelled, fixed and adjusted. Benchtops are measured, fabricated and fitted. Sinks, tapware, appliances, waste connections and splashbacks follow. Finally, the kitchen is sealed, tested, cleaned, documented and handed over.

Each layer depends on the one before it.

If the cabinets are wrong, the benchtop suffers.
If the benchtop opening is wrong, the sink suffers.
If the sink position is wrong, the tap and waste suffer.
If the tap and waste are crowded, future maintenance suffers.
If sealing is rushed, the cabinet suffers.
If testing is skipped, the homeowner suffers.

Kitchen installation goes wrong when the sequence is rushed, reversed or treated as separate jobs that do not affect each other.

A benchtop should not be cut from assumptions.
A sink should not be fixed before the cabinet below is checked.
A pull-out tap should not be tightened before hose movement is tested.
A dishwasher should not be pushed in before power, water, waste and door clearance are confirmed.
A splashback should not be finished before tap handle clearance and power-point positions are final.

The homeowner does not need to supervise every screw.

But they should understand the points of no easy return.

Before cabinets are fixed, layout mistakes are easier to correct.

Tip: Before your cabinets arrive, verify your site against the dimensions logged in your Existing Home Inspection Notes to ensure the room is truly ready.
Before benchtops are cut, sink and tap mistakes are easier to prevent.
Before splashbacks are installed, power-point and clearance mistakes are easier to fix.
Before final payment, defects are easier to resolve.

A smooth kitchen installation is not just fast. It is correctly sequenced.


Cabinet Installation: The Skeleton of the Kitchen

Cabinets are the skeleton of the kitchen.

If they are not level, square and securely fixed, every later stage becomes harder. The benchtop may not sit properly. Drawers may rub. Doors may have uneven gaps. The dishwasher may not slide in. The sink may not have enough space below. The island may reduce walkway clearance. Wall cabinets may feel unsafe. Tall units may lean just enough to make every door look wrong.

A good kitchen begins with boring accuracy.

Before cabinets are fixed, the room must be checked against the final plan.

Ask:

  • Is the floor level enough, or does it need packing?

  • Are the walls straight enough, or do panels need scribing?

  • Are plumbing and electrical services in the right positions?

  • Does the layout match the final cabinet plan?

  • Are doorways, windows, handles and appliance openings accounted for?

  • Can tall units stand upright during installation?

  • Is the dishwasher opening the correct width and height?

  • Is the fridge space large enough for ventilation and door swing?

  • Are wall cabinets fixed into proper structure?

  • Is the island position correct for walkway clearance?

The cabinet stage is also the right time to think about future access.

A beautiful kitchen that cannot be serviced is not well installed. The dishwasher should be removable. The sink trap should be reachable. Water isolation valves should not be buried. Service holes should be neat, not hacked oversized gaps. If holes are cut for pipes, they should be no larger than needed and sealed where appropriate.

The most dangerous cabinet mistake is saying:

“The benchtop will hide it.”

The benchtop may hide a visual problem.
It will not fix a level problem, a support problem or a service-access problem.


The Pre-Benchtop Pause

Before the benchtop is measured, fabricated or cut, stop.

This is one of the most important pauses in the whole kitchen renovation.

By this point, the base cabinets should be fixed, level and in their final position. The sink and tapware should be selected. Appliance openings should be confirmed. The fabricator should have accurate information. The homeowner should know what is being cut, where and for which product.

This is not the time for guessing.

The most expensive sentence at this stage is:

“It should be standard.”

Standard is not enough.

The actual sink model matters.
The actual tap model matters.
The actual cabinet position matters.
The actual wall shape matters.
The actual benchtop material matters.
The actual cut-out template matters.

A sink cut-out should not be made from a product photo or a rough online measurement. It should be made from the manufacturer’s template, the physical product, or a confirmed technical drawing supplied for that exact model.

Tap holes need the same care. A mixer placed too close to the wall may be hard to operate. A pull-out tap may need clearance below. A handle may hit the splashback. A window behind the sink may limit mixer height. A tap that looks perfect in a catalogue may not move properly in the actual kitchen.

Before cutting or fabrication, confirm:

  • final sink model;

  • final tap model;

  • mounting style: top-mount, under-mount or flush-mount;

  • manufacturer’s cut-out template;

  • cabinet internal clearance;

  • bowl depth;

  • tap hole position;

  • splashback height and thickness;

  • window clearance behind the tap;

  • appliance openings;

  • joins and overhangs;

  • edge sealing method;

  • who is responsible if measurements are wrong.

This pause may feel slow.

It is much faster than replacing a benchtop.


Sink Installation: A Water Detail, Not Just a Fitting

A kitchen sink is a water-management detail.

It must hold water, drain water, support tapware, resist movement and protect the cabinet below. It also needs to survive everyday use: heavy pots, hot water, cleaning chemicals, standing dishes, splashing, wiping and occasional accidents.

Most sink installation problems are predictable.

They usually come from:

  • rough or oversized cut-outs;

  • poor edge sealing;

  • rim not sitting flat;

  • clips that cannot be tightened;

  • insufficient support;

  • waste not aligning naturally;

  • overflow not connected correctly;

  • poor silicone;

  • water sitting around the rim;

  • slow leaks hidden inside the cabinet;

  • no future access to the trap.

A sink should be dry-fitted before final fixing. Place it into the opening, check the fit, check whether it sits flat, check the tap position, check the waste position and confirm the cabinet below still works.

This is especially important for heavier sinks, under-mount sinks and sinks being installed into new benchtops.

Top-mount sinks are usually more forgiving, but the rim still needs correct sealing. Under-mount sinks look cleaner, but support, bond, edge finish and sealing become more critical. Ceramic or composite sinks may need more attention to weight and support.

A sink that is forced into a poor opening may look acceptable on day one.

The cabinet below may tell a different story later.


Tapware Connection: Test How It Behaves, Not Only Whether Water Comes Out

A kitchen mixer works hard.

It is turned on and off many times a day, often by people whose hands are wet, greasy, full or rushed. A tap that is slightly awkward will be noticed every day.

Before installation, confirm:

  • relevant plumbing documentation where required;

  • WELS information where applicable;

  • hot and cold inlet positions;

  • hose length;

  • pressure suitability;

  • tap hole size;

  • benchtop thickness;

  • handle clearance;

  • splashback clearance;

  • pull-out hose clearance;

  • isolation valves;

  • cartridge and aerator serviceability.

For pull-out and pull-down taps, the visible tap is only half the product. The other half is under the sink.

The hose must move freely. The counterweight must not hit the waste pipe, water filter, cabinet wall, dishwasher hose or cleaning products. If the hose catches every time the tap is used, the customer will experience the product as faulty even if the tap itself is not defective.

After installation, do not only check whether water comes out.

Test real use:

  • full hot flow;

  • full cold flow;

  • mixing movement;

  • handle clearance;

  • pull-out hose return;

  • spray function;

  • splash behaviour;

  • leaks at inlet connections;

  • water around the tap base;

  • hose movement with cabinet contents in place.

The question is not:

“Does the tap work?”

The better question is:

“Does the tap work naturally in this kitchen?”


Dishwasher and Waste Connection: Do Not Hide a Service Problem

Dishwasher installation is often treated as simple because the appliance looks self-contained.

It is not.

A dishwasher needs a correctly sized opening, safe power supply, water supply, waste connection, hose route, level floor, door clearance and future access. If any one of these is wrong, the dishwasher may still look installed but create daily irritation or future servicing problems.

A common mistake is completing the cabinetry beautifully, then discovering:

  • the hose cannot reach;

  • the waste spigot is missing;

  • the power outlet is blocked;

  • the dishwasher opening is too tight;

  • the machine cannot be removed later;

  • the door hits a handle, island or skirting;

  • the hose bundle stops the machine from sliding fully back.

The waste connection is especially important. If the waste hose is routed or connected poorly, wastewater can flow back, odours can appear, drainage can be slow, or the machine can fault.

The dishwasher should be tested through a real cycle before handover. Turning it on is not enough. It should fill, wash, drain and show no leaks.

Before handover, check:

  • does the dishwasher fit without forcing?

  • can it be removed later for servicing?

  • does the door open fully?

  • does the door hit handles, island cabinets or skirting?

  • are water and waste hoses free from kinks?

  • is the waste hose connected according to instructions?

  • is the power outlet accessible and appropriate?

  • has the machine completed a test cycle?

  • are there leaks after the test cycle?

  • are manuals and warranty documents saved?

The dishwasher should not disappear behind a panel until the service connections have been checked.


Silicone, Sealing and Leak Testing

In a kitchen, silicone is not just a finishing line.

It is part of water management.

Water appears around the sink, tap base, benchtop edge, splashback, dishwasher area and sometimes window reveals. If sealing is poor, water can move into the benchtop, behind the splashback, under the sink rim, into cabinet joints or down the back of cabinetry.

Good sealing should be:

  • clean;

  • continuous;

  • compatible with the material;

  • properly tooled;

  • applied to prepared surfaces;

  • placed where water and movement require it;

  • not used to hide large uncontrolled gaps.

Poor silicone can look acceptable from across the room. It often fails where people do not look closely: behind the sink, under the rim, beside the splashback, around window reveals or where the benchtop meets the wall.

The kitchen leak test should be slow, patient and real.

After installation:

  1. Run the tap at full flow.

  2. Check hot and cold inlet connections.

  3. Fill and drain the sink.

  4. Check the waste and trap.

  5. Operate the pull-out tap repeatedly if applicable.

  6. Run the dishwasher test cycle.

  7. Wipe all areas dry.

  8. Wait and check again.

  9. Look inside the cabinet with a torch.

  10. Check for droplets, dampness, odour or swelling.

Many leaks are not obvious in the first minute. They appear after pressure changes, after the sink drains, after the dishwasher pumps out, or after water sits near a weak seal.

A kitchen should not be handed over until water has been tested in real conditions.


Final Kitchen Handover: Use the Kitchen Before You Accept It

Final handover should not be a quick visual walk-through.

A kitchen can photograph beautifully and still be unfinished as a working space.

Before accepting the kitchen, move through it as if it were an ordinary day.

Open every drawer.
Open every door.
Stand at the sink.
Pull the tap hose.
Run hot and cold water.
Open the dishwasher.
Pretend to unload groceries.
Check power points.
Switch on task lighting.
Look inside the sink cabinet.
Look under the dishwasher after testing.
Check whether the fridge, oven and cabinet doors can all operate naturally.

The question is not:

“Does the kitchen look finished?”

It is:

“Can this kitchen now be used, cleaned, maintained and serviced?”

Use this handover checklist.

Area

Handover check

Cabinets

Level, secure, doors aligned, drawers smooth, gaps even

Wall cabinets

Properly fixed, no movement, shelves stable

Tall units

Plumb, fixed, doors clear surrounding surfaces

Island

Secure, positioned correctly, walkway clearance maintained

Benchtop

Level, joins neat, cut-outs sealed, no chips or cracks

Sink

Secure, sealed, drains correctly, no rim leaks

Tapware

Hot/cold correct, no leaks, handle clears splashback, hose moves freely

Dishwasher

Fits opening, drains correctly, completes test cycle, no leaks

Waste system

Trap accessible, no odour, no dripping, dishwasher waste correct

Silicone

Continuous, neat, suitable for wet zones, no gaps behind sink

Splashback

Secure, sealed, power points aligned, no obvious defects

Power points

Working, positioned correctly, safe and documented where required

Lighting

Task lighting works, switches logical, no shadow over key work areas

Appliances

Installed, tested, manuals provided

Ventilation

Rangehood or extraction works and discharges appropriately

Cleaning

Protective films removed, cabinets cleaned, debris removed

Documents

Invoices, manuals, warranties, electrical/plumbing records where applicable

Photos

Hidden services and completed installation photographed

Defects

Defect list agreed in writing before final payment

Note: For electrical and plumbing works, always request and save the official Certificate of Compliance (CoC) as required by NZ regulations. This is your primary evidence of safety and professional accountability.

Do not rely on memory.

Take photos. Save manuals. Keep invoices. Record defects in writing.

A nearly finished kitchen is not the same as a properly handed-over kitchen.

Tip: Once you have completed your handover checklist, store all generated manuals, warranty certificates, and the final defect list in your 11_Handover and Maintenance folder to ensure long-term coverage.


When to Delay Final Payment

Final payment should not be used as a weapon.

But it should also not be released before the agreed work is complete.

In many projects, final payment is the homeowner’s strongest practical protection. Once it is paid, chasing small defects, missing documents or incomplete testing becomes harder.

It is reasonable to delay final payment, or hold an agreed retention, if:

  • water connections have not been tested;

  • the dishwasher has not completed a test cycle;

  • visible leaks are present;

  • cabinet doors or drawers are not adjusted;

  • benchtop chips, cracks or joint issues remain unresolved;

  • silicone is incomplete, messy or missing in wet areas;

  • missing parts have not been supplied;

  • required manuals, warranties or documents are missing;

  • electrical or plumbing records have not been provided where applicable;

  • agreed defects remain unresolved;

  • rubbish or debris has not been removed where included in the quote;

  • the kitchen has not been cleaned to the agreed handover standard.

The goal is not conflict.

The goal is completion.

A calm written defect list is better than an emotional argument. State:

  • what the issue is;

  • where it is located;

  • what evidence exists;

  • who is responsible;

  • what needs to happen;

  • when it will be completed;

  • whether final payment or retention is linked to completion.

For example:

“Sink cabinet shows moisture after tap and waste test. Please inspect and resolve leak before final payment. Photos attached.”

This is clear, factual and difficult to misunderstand.


Kitchen Installation Control Sheet

Use this during installation, not only at the end.

Stage

Pause point

What to confirm

Room preparation

Before cabinets arrive

Walls, floor, services, access, final plan

Cabinet fixing

Before benchtop measure

Level, square, secure, appliance openings

Benchtop measure

Before cutting

Sink model, tap model, template, mounting style

Sink fitting

Before final seal

Fit, support, waste alignment, edge sealing

Tapware install

Before tightening fully

Handle clearance, hose clearance, pressure suitability

Dishwasher install

Before pushing fully back

Power, water, waste, hose route, door clearance

Splashback

Before installation

Tap clearance, power points, wall condition

Silicone

Before handover

Continuous seal, correct material, no gaps

Water test

Before final payment

Tap, sink, waste, dishwasher, cabinet interior

Handover

Before sign-off

Documents, photos, defects, manuals, warranties


Chapter Summary

Kitchen installation succeeds when each stage is checked before the next one is hidden or made difficult to change. Cabinets must be level, square and securely fixed before benchtops are measured. Benchtop cut-outs should be based on the actual sink, tapware and manufacturer’s templates, not assumptions. Sink installation depends on cut-out accuracy, sealing, support and waste alignment. Tapware should be tested for real use, including flow, leaks, handle clearance and pull-out hose movement. Dishwashers require correct water, waste, power, clearance and test-cycle checks. Silicone and sealing are part of water management, not just finishing. A kitchen should not be accepted as complete until it has been tested, documented and walked through as a real working space.

Part 5 — Bathroom Renovation Planning

Part Introduction

Bathrooms fail differently from most rooms.

A living room problem is usually visible. A bathroom problem may hide behind tiles, under silicone, inside a wall, below a vanity or above the ceiling of the room underneath. By the time a wet-area failure becomes obvious, the damage may already be expensive.

This is why bathroom renovation needs more than good taste.

It needs planning around layout, clearances, drainage, waterproofing, ventilation, fixing, electrical safety, product compatibility and maintenance. A bathroom that looks finished on handover day may still be risky if it cannot dry, if waterproofing is poorly documented, if products are badly fitted, or if hidden leaks are not tested.

This part explains bathroom planning from the homeowner’s point of view: how to think about layout before installation, what waterproofing means, why ventilation matters, and what should be checked before a bathroom is accepted as complete.

In a bathroom, the best work is often the work you cannot see.

Chapter 13. Bathroom layout and pre-installation planning

Bathroom Layout and Pre-Installation Planning

A bathroom is usually the smallest room in the home where the most things can go wrong.

It has water, steam, drainage, electrical fittings, glass, tiles, waterproofing, ventilation, storage, mirrors, doors, towels, cleaning products and people moving in a tight space. A few centimetres can decide whether a vanity drawer opens properly, whether someone can sit comfortably on the toilet, whether a shower screen swings safely, or whether the bathroom feels calm instead of cramped.

This is why bathroom planning should begin before products are chosen.

Many homeowners start with style: a floating vanity, a frameless shower, a round mirror, brushed brass tapware, large tiles, a smart toilet or a niche in the shower wall. These choices matter, but they should come after the room has been tested on paper.

The better starting point is not:

“What products do I like?”

The better starting point is:

“How will this bathroom actually work when a person uses it?”

A bathroom layout must answer several practical questions:

  • Can the door open without hitting the vanity, toilet or shower screen?

  • Can someone sit on the toilet comfortably?

  • Is there enough space to stand at the vanity?

  • Can drawers and cabinet doors open without hitting pipework or the bathroom door?

  • Does the shower have enough usable space, not just measured space?

  • Where will water go?

  • Where will towels hang?

  • Where will power be needed?

  • Can the wall support the products being installed?

  • Will this bathroom still work for the household in five or ten years?

A good bathroom layout is not the layout that fits the most products. It is the layout that leaves enough space for water, movement, maintenance and future use.


The First Layout Test: Stand, Sit, Open, Reach

Before thinking about finishes, test the bathroom using four simple actions:

Stand. Sit. Open. Reach.

Stand at the vanity.
Can you use the basin without leaning awkwardly? Is there room for elbows? Does the door swing behind you? Will another person be able to pass?

Sit on the toilet.
Are your knees too close to the wall, vanity or shower glass? Is there comfortable shoulder space? Can the toilet paper holder be reached without twisting?

Open every door and drawer.
Open the bathroom door, vanity drawers, shower screen, medicine cabinet, laundry cupboard and any storage unit. Do they collide? Can they all work when the room is wet, steamy and in real use?

Reach for daily items.
Can you reach the towel after showering? Can you reach the mirror cabinet? Can a child reach the basin? Can an elderly user hold something stable if needed? Can someone clean behind the toilet or around the vanity?

This test is simple, but it catches many design mistakes before they become construction problems.

A bathroom may look balanced in elevation drawings, but fail when someone actually uses it.


Toilet Clearances: More Than Just “It Fits”

Toilet placement is one of the least glamorous parts of bathroom planning, but it has an enormous effect on comfort.

A toilet can technically fit into a space and still feel terrible to use. The problem may be the distance to the vanity, the position of the door, the shower glass beside it, the wall angle, the toilet roll holder, or the way the pan projects into the room.

The toilet should be planned around three things:

front clearance, side comfort, and service access.

Front clearance matters because people need space to sit, stand and move. If the toilet projects too far into a narrow room, it can block the main path. If the vanity is too close, the room feels cramped. If the door swings in front of the toilet, daily use becomes awkward.

Side comfort matters because people need shoulder and elbow room. A toilet squeezed between a wall and a vanity may meet the bare minimum on paper but feel uncomfortable every day.

Service access matters because toilets are not permanent sculptures. Seats may need replacing. Inlet valves may need servicing. The cistern may need access. The pan connector and water inlet should not be so hidden that future maintenance becomes destructive.

For smart toilets, the planning becomes even more important. In addition to normal toilet dimensions, the room may need water pressure checks, electrical planning, RCD protection, backflow considerations and space for controls or service access.

The best toilet location is usually the one that keeps plumbing practical while giving the user enough human space.


Vanity Width, Drawer Swing and the Reality of Storage

Vanities are often chosen too late or too emotionally.

A homeowner sees a vanity that looks perfect online: the right colour, the right basin, the right handles, the right floating look. But the real test is not whether the vanity looks good by itself. The test is whether it works in the room.

A vanity affects:

  • how people enter the bathroom;

  • how much space they have at the basin;

  • whether drawers can open;

  • whether pipework fits behind or inside the drawers;

  • whether the door swing feels natural;

  • whether cleaning is easy;

  • whether towels, toiletries and cleaning products actually have a home.

A wider vanity is not always better. In a small bathroom, increasing vanity width may reduce toilet comfort, shrink shower entry or make the door swing awkward. A narrower vanity with better drawer design may work better than a wide unit with poor internal clearance.

Drawer vanities need special attention. Drawers are useful, but they compete with plumbing. The waste pipe and water supplies need to pass through or behind the drawer system. If the vanity was not designed for the existing pipe positions, the installer may need to cut drawers, modify backs or use awkward pipework.

Wall-hung vanities create a lighter look and make floor cleaning easier. But they need proper wall framing. If the wall does not have suitable noggins or blocking, the wall may need to be opened before lining, waterproofing or tiling is completed.

Floor-standing vanities are often easier in renovation projects because they are more forgiving and can hide services. But they still need protection from water, correct sealing and enough ventilation.

The vanity should be selected only after the room layout, pipe positions and door swing have been tested together.


Shower Size, Screen Opening and the Space You Actually Use

The measured size of a shower is not always the same as the usable size of a shower.

A shower may be listed as 900 x 900 mm, but the person using it may feel restricted because of the screen position, mixer location, shelf, niche, door swing, towel rail, sloped floor or entry angle. A larger shower can also feel awkward if the screen opens into the wrong place or water escapes into the dry zone.

Before choosing a shower layout, think through the full sequence:

  • entering the bathroom;

  • opening the shower screen;

  • turning on the mixer;

  • waiting for water to warm;

  • stepping in;

  • reaching shampoo or soap;

  • turning around;

  • stepping out;

  • reaching a towel;

  • water dripping from the body;

  • cleaning the glass and floor afterwards.

A shower is a movement zone, not just a rectangle.

Shower screens need special planning. A hinged door needs swing space. A sliding screen needs track maintenance. A fixed panel needs enough length to control splash. A frameless screen looks clean but relies heavily on accurate walls, floors and fixing. An out-of-square bathroom can make glass installation difficult and expensive.

A shower niche should be decided early. It cannot be casually added after waterproofing. A niche affects wall framing, waterproofing, tile layout and drainage within the niche itself. If planned badly, it becomes a weak point.

The most reliable shower plan is one where drainage, waterproofing, glass, storage and user movement are planned as one system.


Drainage Positions: The Layout Constraint People Notice Too Late

Drainage is one of the strongest constraints in a bathroom.

A vanity can move a little. A mirror can shift. A towel rail can be relocated. But a toilet waste, shower waste or floor drain can control the whole room.

Moving drainage is possible in some projects, but it is not a casual layout decision. It can involve floor structure, pipe fall, waterproofing, access from below, council considerations, concrete cutting, timber repairs, or coordination with other trades.

Before finalising a bathroom layout, mark the existing drainage positions clearly:

  • toilet waste;

  • shower waste;

  • basin waste;

  • bath waste;

  • floor waste if present;

  • venting or service routes;

  • access panels or inspection points.

Then ask whether the proposed layout works with those positions or fights against them.

A layout that keeps drainage practical usually costs less, finishes faster and creates fewer risks. A layout that moves multiple wastes may still be worth doing, but it should be priced and planned honestly.

The worst situation is discovering drainage conflict after products have been purchased.


Wall Framing, Noggins and What Must Be Hidden Before the Wall Closes

The most important work in a bathroom is often completed before the room starts looking finished.

Wall framing and noggins are good examples. Once walls are lined, waterproofed and tiled, adding support becomes difficult and expensive. Yet many bathroom products rely on solid support inside the wall.

Before closing walls, confirm support for:

  • wall-hung vanity;

  • mirror or mirror cabinet;

  • heated towel rail;

  • shower screen fixing;

  • grab rails now or in the future;

  • toilet roll holder and accessories;

  • wall-mounted taps;

  • shower niche;

  • shelves or storage cabinets.

This is especially important for future-proofing. Even if grab rails are not needed today, adding timber support in the right places during renovation is much easier than opening finished tiled walls later.

The same applies to electrical and plumbing planning. If the bathroom will have an LED mirror, demister, heated towel rail, extractor fan, smart toilet or underfloor heating, these decisions need to be made before surfaces are finished.

Bathrooms punish late decisions. The wall that looks clean and simple at the end should contain the right support, wiring and service planning before it is closed.


Accessibility and Future-Proofing

Future-proofing does not mean turning every bathroom into a hospital bathroom.

It means making intelligent choices today so the bathroom remains easier to use tomorrow.

A young family may need bath access, storage and splash control. A couple planning to stay in the home long term may want a shower that is easier to enter, stronger wall support for future grab rails, better lighting, non-slip flooring and a vanity that is comfortable to use as mobility changes. A rental property may need durability, simple controls and easy cleaning. A multigenerational household may need different heights, safer movement and clearer circulation.

Future-proofing can be subtle:

  • avoid unnecessarily narrow shower entries;

  • choose slip-resistant flooring;

  • improve lighting;

  • use lever handles where practical;

  • allow space beside the toilet where possible;

  • add wall support for future grab rails;

  • avoid sharp corners in tight spaces;

  • choose easy-clean surfaces;

  • keep the layout simple and readable;

  • avoid placing essential controls in awkward positions.

The best time to future-proof is during renovation, before the walls are closed and the floor is finished.

A bathroom should not only look good for the current owner. It should remain usable as life changes.


Bathroom Pre-Installation Planning Sheet

Use this sheet before products are ordered and before walls are closed.

Planning area

Questions to confirm

Toilet

Is there enough front and side clearance? Does the trap position match? Can it be serviced later?

Vanity

Does the width suit the room? Can drawers open? Do pipes fit? Is wall support needed?

Basin

Is the height comfortable? Does the mixer reach correctly? Will it splash?

Shower

Is the usable space enough? How does the screen open? Where will water fall?

Drainage

Are existing wastes being kept or moved? Has a plumber assessed the changes?

Door swing

Does the bathroom door hit the vanity, toilet or shower screen?

Wall support

Are noggins needed for vanity, mirror, towel rail, screen or future grab rails?

Electrical

Are LED mirror, fan, heated towel rail, smart toilet or underfloor heating planned early?

Storage

Where will towels, toiletries and cleaning products go?

Future use

Will the bathroom still work for children, elderly users or long-term living?

Maintenance

Can valves, traps, filters and fixtures be accessed later?

Records

Have photos been taken before walls are closed?


Chapter Summary

Bathroom planning should begin with how the room will be used, not which products look best. A successful layout allows people to stand, sit, open doors and drawers, reach daily items and move safely. Toilet clearance is about comfort and service access, not only whether the pan fits. Vanity size must be tested against door swing, pipe positions and storage needs. Shower planning should consider real movement, screen opening, drainage, waterproofing and storage. Drainage positions can control the whole layout and should be confirmed before products are ordered. Wall framing and noggins must be planned before walls are closed, especially for wall-hung products, mirrors, towel rails, shower screens and future grab rails. A good bathroom is not the one that holds the most features, but the one that works well every day and adapts over time.

Chapter 14. Waterproofing explained for homeowners

Waterproofing Explained for Homeowners

Waterproofing is the part of a bathroom renovation that most homeowners see the least and pay for the longest if it fails.

When the bathroom is finished, waterproofing is invisible. It sits behind tiles, under floors, around wastes, behind shower screens, below silicone and inside corners. A good waterproofing job rarely receives attention because nothing happens. No swelling. No mould smell. No water stains. No soft floor. No downstairs ceiling damage.

A poor waterproofing job can look perfect on the day the bathroom is handed over.

That is what makes it dangerous.

A leaking vanity tap is usually noticed quickly. A poor silicone line may be visible. But failed waterproofing can hide for months or years. Water may move quietly into timber framing, wall linings, subfloor, insulation or adjacent rooms before the homeowner sees the first sign. By then, the repair is often no longer a simple surface fix.

This chapter explains waterproofing in plain language. It does not teach homeowners how to waterproof a bathroom themselves. Instead, it helps you understand why waterproofing matters, what should be planned before it begins, what documents to ask for, and what warning signs should never be ignored.

In New Zealand, internal moisture is recognised in the Building Code. Building Code Clause E3 deals with internal moisture, and MBIE describes requirements intended to help prevent fungal growth and damage from water overflow or water splash in wet areas.

Note: For the official regulatory requirements, refer to the MBIE Building Performance Clause E3 (Internal Moisture) guidance, which outlines the mandatory performance standards for wet areas in New Zealand.


Why Waterproofing Is the Highest-Risk Part of a Bathroom

Waterproofing is high risk because it sits between water and the building structure.

Every bathroom contains materials that do not like long-term moisture. Timber framing, particleboard flooring, plasterboard, insulation, cabinetry and some adhesives can all be damaged by repeated wetting. Tiles and grout may look waterproof, but in most bathroom systems they should not be treated as the only water barrier. The real protection is the waterproofing system behind or beneath them.

The risk is highest in showers, around baths, near floor wastes, behind vanities, at wall-floor junctions and anywhere water can sit or be repeatedly splashed.

There are three reasons waterproofing failures become expensive.

The first is delay. Water damage often develops slowly. By the time damage is visible, it may have spread behind finished surfaces.

The second is access. To repair failed waterproofing, finished tiles, shower screens, vanities, linings or flooring may need to be removed. The repair is rarely limited to the original defect.

The third is uncertainty. Once water has escaped into the structure, the full extent of damage may not be known until demolition begins.

This is why waterproofing is not the place to chase the cheapest shortcut. It is a risk-control system.

A beautiful bathroom with poor waterproofing is not a successful renovation. It is a future repair waiting behind the tiles.


Waterproofing Is a System, Not a Product

Many homeowners think of waterproofing as a product: a blue, grey or green coating painted onto the floor and walls. That is only part of the story.

Waterproofing is a system. It includes:

  • the substrate underneath;

  • surface preparation;

  • falls to waste;

  • corners and junctions;

  • tapes or reinforcing;

  • membrane type;

  • drying or curing time;

  • compatible adhesives;

  • tile or floor finish;

  • wastes and drains;

  • penetrations;

  • shower screens;

  • silicone and movement joints;

  • documentation and inspection.

A good membrane applied over a poor substrate may still fail. A correct membrane applied too thinly may fail. A good membrane cut by later drilling may fail. A correctly waterproofed floor with poor falls may still create standing water. A shower niche without proper detailing may become a leak point.

This is why waterproofing should be planned before the bathroom starts to look finished.

The best time to ask waterproofing questions is not after tiles are laid. It is before walls are closed, before the shower is framed, before the niche is built, before the drain is fixed, and before the products are installed.

BRANZ notes that tiled showers require careful substrate preparation, membrane detailing and plumbing installation to remain waterproof, and that poor work can lead to leaks and expensive repairs.


Liquid Membrane vs Sheet Membrane

Homeowners do not need to become membrane specialists, but they should understand the basic difference between liquid-applied membranes and sheet membranes.

A liquid membrane is applied as a coating, usually by roller, brush or trowel. It cures to form a waterproof layer. Liquid membranes are common because they can follow irregular shapes, corners, floors, walls and details. They depend heavily on preparation, thickness, reinforcing, drying time and correct application.

A sheet membrane is supplied as a sheet or roll and fixed to the substrate with compatible adhesives or bonding systems. Sheet systems can provide more consistent thickness because the membrane is manufactured before installation. They still depend on correct overlaps, seams, corners, penetrations and bonding.

Neither type is automatically better in every bathroom.

The question is not, “Which membrane is best?”
The better question is:

“Which waterproofing system is suitable for this bathroom, this substrate, this shower design and this installer’s experience?”

A waterproofing system should be selected according to:

  • substrate type;

  • shower design;

  • floor structure;

  • wall lining;

  • tile or finish;

  • wet-area extent;

  • manufacturer instructions;

  • installer training;

  • compatibility with wastes and adhesives;

  • required documentation.

The Waterproofing Membrane Association’s internal wet-area code of practice identifies different types of internal wet-area membrane systems used in New Zealand and reinforces the importance of system-based installation rather than treating membranes as generic coatings.

The most important homeowner question is simple:

“What system are you using, and will you provide the manufacturer’s instructions and completion documentation?”


The Places Where Waterproofing Usually Fails

Waterproofing rarely fails in the middle of a flat, open wall.

It usually fails at edges, corners, transitions and interruptions.

These are the places that deserve the most attention.

Corners and wall-floor junctions

Corners move. Floors and walls do not always expand, settle or flex in the same way. This is why corners and wall-floor junctions need correct reinforcing, membrane detailing and compatible sealants.

A bathroom can have a good membrane in the middle of the floor but fail at the corner where the shower wall meets the floor.

Penetrations

A penetration is any place where something passes through the waterproofing layer. Common examples include mixer bodies, shower outlets, tap fittings, waste pipes, fixings, screen brackets, niche corners and accessory screws.

Every penetration is a potential leak path.

This is why late drilling in a waterproofed shower should never be treated casually. Installing a shelf, rail, glass bracket or accessory after waterproofing and tiling may puncture the waterproofing system if not handled correctly.

Wastes and drains

The connection between the membrane and the waste is one of the most important details in a wet area. Water has to move into the waste, not around it, under it or into the substrate.

The floor also needs the right fall. A waterproof membrane is not a substitute for drainage. If water pools on the floor, the system is under constant stress.

Shower hobs and thresholds

A shower hob or threshold can help contain water, but it also creates more junctions and corners. If not detailed correctly, it can trap water or leak at the base.

Level-entry showers can look beautiful and accessible, but they require especially careful planning of falls, drainage, waterproofing extent and screen position.

Niches and ledges

A shower niche is a small detail with big waterproofing consequences. It has internal corners, horizontal surfaces, tile edges and a need for water to drain out. The base of the niche should not hold water. The waterproofing system must work continuously through the niche.

A niche should be designed before waterproofing starts, not improvised after the wall is built.


Flood Testing and Water Testing

Homeowners often ask whether every bathroom needs a flood test. The answer depends on the waterproofing system, project type, local requirements, installer process and whether the work is part of a consented project.

The important idea is that waterproofing should be tested, checked or verified before it is hidden.

A flood test usually means holding water in a wet area for a set period to check whether water escapes. It can be useful for certain shower floors, wet rooms or areas where the system allows it. However, not every membrane system or substrate is tested in the same way, and testing should follow the manufacturer’s instructions and project requirements.

Even when a formal flood test is not done, there should still be a quality check before tiling or covering the membrane.

This may include checking:

  • whether the substrate was suitable;

  • whether the membrane was applied to the required areas;

  • whether corners were reinforced;

  • whether penetrations were sealed;

  • whether drying or curing time was allowed;

  • whether membrane thickness met requirements;

  • whether the waste connection was detailed correctly;

  • whether the applicator recorded the work.

After the bathroom is complete, water testing should also happen under real-use conditions. This means running the shower, checking screen leakage, checking wastes, checking behind and around the vanity, and inspecting adjacent areas.

The key principle is simple:

Do not hide unverified waterproofing.

Once tiles are installed, the cost of finding out becomes much higher.


PS3 and Waterproofing Documentation

Waterproofing is invisible after the bathroom is finished, so documentation becomes very important.

In New Zealand construction, a Producer Statement Construction, commonly referred to as a PS3, may be used to confirm that certain construction work has been carried out in accordance with the relevant consented documents, specifications or standards. For waterproofing, a PS3 may be requested where the work forms part of a consented project or where the council, designer or project team requires it.

The exact documentation required depends on the project, local council, consent conditions and waterproofing system. Homeowners should not assume every small bathroom refresh will automatically involve a PS3. But for significant wet-area work, especially consented tiled showers or full bathroom renovations, it is sensible to ask early:

  • Who is doing the waterproofing?

  • Are they trained or approved for the system being used?

  • What membrane system will be used?

  • Will the manufacturer’s instructions be followed?

  • Will photos be taken before tiling?

  • Will a PS3 or equivalent completion record be provided?

  • Will product data sheets and warranty information be supplied?

  • Will the work be inspected before it is covered?

A waterproofing record should ideally include:

  • product name and batch information where available;

  • areas waterproofed;

  • substrate type;

  • preparation method;

  • reinforcing details;

  • number of coats or membrane type;

  • drying or curing times;

  • photographs before tiling;

  • applicator details;

  • warranties or limitations;

  • PS3 or completion statement where applicable.

The goal is not paperwork for its own sake. The goal is evidence.

If a problem appears later, documentation helps everyone understand what was done, by whom, with which system and under what conditions.


Warning Signs of Poor Waterproofing

Poor waterproofing may not show immediately, but there are warning signs homeowners should take seriously.

During the renovation, (Tip: Document these critical installation stages by recording your findings in the 10_Communication Records section of your project folder. Ensure you include photos of the membrane before any tiles are laid.)warning signs include:

  • waterproofing applied over dusty, dirty or unstable surfaces;

  • obvious gaps in corners;

  • no reinforcing at junctions where required;

  • membrane that looks patchy or uneven;

  • insufficient drying time before tiling;

  • penetrations not sealed;

  • drains or wastes poorly detailed;

  • no photos or records before tiling;

  • installer unable to explain the system being used;

  • waterproofing treated as a quick paint job.

After the bathroom is complete, warning signs include:

  • persistent musty smell;

  • mould returning quickly;

  • swollen skirting or architraves;

  • soft or springy floor areas;

  • cracked grout near wet areas;

  • loose tiles;

  • water staining on adjacent walls;

  • bubbling paint outside the shower;

  • dampness in rooms next to or below the bathroom;

  • ceiling stains under an upstairs bathroom;

  • silicone repeatedly failing in the same place;

  • insects or odours near wet areas;

  • unexplained increase in moisture readings.

Not every warning sign proves waterproofing failure. Some may be caused by poor ventilation, plumbing leaks, condensation or maintenance issues. But none should be ignored.

The practical response is:

Notice early. Photograph. Stop guessing. Get the right person to inspect.

A small sign investigated early may prevent a major repair later.


What Homeowners Should Ask Before Waterproofing Starts

The best waterproofing conversations happen before the work starts.

A homeowner does not need to tell the waterproofer how to do their job. But they should ask enough questions to confirm that the job is being treated seriously.

Useful questions include:

  1. What waterproofing system will be used?

  2. Is it suitable for this substrate and bathroom design?

  3. Who is applying it?

  4. Are they trained or approved for this system?(Note: Always verify the qualifications of your installer. If the work is part of a consented build, ensure they are an LBP (Licensed Building Practitioner) where required for restricted building work.)

  5. Which areas will be waterproofed?

  6. How will corners and wall-floor junctions be treated?

  7. How will wastes and penetrations be detailed?

  8. How long must it dry or cure before tiling?

  9. Will photos be taken before covering?

  10. Will there be a flood test or other inspection?

  11. What documents will be provided?

  12. What maintenance is required after completion?

The answers do not need to be complicated. What matters is that they are clear.

If the response is vague, rushed or dismissive, that is a warning sign.

Waterproofing should never be the mysterious part of the bathroom that nobody wants to talk about.


Homeowner Waterproofing Check Sheet

Use this before waterproofing is covered.

Area

What to confirm

Substrate

Clean, stable, suitable and prepared according to system requirements

System

Membrane product identified, suitable and documented

Corners

Reinforced or detailed according to manufacturer instructions

Wall-floor junctions

Treated as movement-prone, not ignored

Wastes

Correct membrane-to-waste detailing

Penetrations

Sealed before tiling or finishing

Shower niche

Planned, waterproofed continuously and sloped if needed

Shower hob/threshold

Correctly detailed at all junctions

Drying/curing

Adequate time allowed before tiling

Photos

Taken before the membrane is covered

Testing

Flood test, inspection or verification completed where required

Documents

Product data, warranty, PS3 or completion record where applicable


Tip: This Check Sheet is your most valuable piece of evidence. Scan and save the completed version—along with any PS3 documentation and installation photos—directly into your 05_Consents and Compliance folder for future warranty or resale protection.

Chapter Summary

Waterproofing is one of the highest-risk parts of a bathroom renovation because it is hidden after completion and failures may not appear until significant damage has occurred. It should be understood as a complete system, not a single product. Liquid membranes and sheet membranes can both work when used correctly, but each depends on substrate preparation, correct detailing, compatible products and trained application. The highest-risk areas are corners, wall-floor junctions, penetrations, wastes, shower hobs, niches and any place where water can sit or enter the structure. Homeowners should ask about testing, photographs, PS3 or completion documentation before waterproofing is covered. Warning signs such as musty smells, swollen trims, cracked grout, loose tiles or ceiling stains should be investigated early.

Chapter 15. Bathroom ventilation and moisture control

Bathroom Ventilation and Moisture Control

A bathroom does not become healthy simply because it has tiles.

Tiles can be wiped. Glass can be cleaned. A mirror can be polished. A towel rail can feel warm. But if moist air has nowhere to go, the bathroom will still struggle. Steam will sit on cold surfaces. Water will condense on mirrors, windows, ceilings and painted walls. Towels will stay damp. Silicone will darken. Mould will return after cleaning. Cabinet edges may swell. Paint may peel. The room may smell musty even when it looks tidy.

This is why ventilation is not an accessory in a New Zealand bathroom. It is part of the moisture-control system.

New Zealand homes often deal with a difficult combination: cool mornings, high indoor moisture, older building stock, mixed insulation quality, busy family routines and bathrooms that are expected to dry quickly after repeated showers. In this environment, opening a window “when someone remembers” is often not enough.

A good bathroom needs three things working together:

remove moist air, bring in replacement air, and keep surfaces warm enough to reduce condensation.

If one part is missing, the bathroom may still have problems.

A powerful fan without replacement air may struggle.
A warm towel rail without extraction may only warm damp towels in a damp room.
A window without regular use may provide little real ventilation.
A beautiful renovation without moisture control may age quickly.

This chapter explains bathroom ventilation in practical terms: how moisture is produced, how extraction works, why ducting must go outside, why door undercuts matter, how heating helps, and what daily habits keep mould from returning.


Why Ventilation Matters in New Zealand Homes

Every shower adds moisture to the air.

A short shower may not seem like much. But in a closed bathroom, warm water quickly becomes steam, and steam quickly becomes condensation when it meets colder surfaces. If that moisture is not removed, it does not disappear. It moves. It settles into towels, paint, grout, timber, cabinetry, ceiling linings and window frames.

In many New Zealand homes, bathrooms are small, external walls can be cold, windows may be kept shut for security or warmth, and families may take several showers close together. Moisture builds faster than the room can dry.

That is when mould begins to feel like a cleaning problem. But mould is often not the root problem. It is the visible result of a moisture-control failure.

Cleaning mould without improving ventilation is like wiping water off the floor while the tap is still running.

New Zealand’s Building Code includes ventilation requirements under Clause G4, and MBIE guidance on active ventilation notes that extractor fans should be placed close to the moisture source and vented to the outside, because otherwise moist air may end up in roof spaces and damage insulation or roof structure.

For rental properties, Healthy Homes ventilation requirements also make bathroom extraction a practical compliance issue. Tenancy Services advises landlords to ask installers for fan diameter, ducting and flow-rate details in writing so they can show compliance with the ventilation standard.

For homeowners, the message is simple: ventilation is not just about comfort. It protects finishes, structure, health, maintenance effort and property value.


The Bathroom Moisture System

A bathroom moisture problem is rarely caused by one thing.

It is usually a system problem.

Think of moisture control as five connected parts:

  1. Moisture production — showers, baths, wet towels, basins and cleaning.

  2. Extraction — removing moist air at the source.

  3. Replacement air — allowing fresh air to enter so the fan can work.

  4. Surface temperature — reducing condensation on cold surfaces.

  5. Maintenance habits — drying, cleaning, heating and using the fan properly.

If the bathroom produces more moisture than it removes, moisture accumulates.

If the fan is too weak, steam stays.
If the fan vents into the roof space, moisture has only been moved to a worse place.
If the door is sealed too tightly, the fan may struggle to pull air.
If the room is cold, steam condenses faster.
If towels stay wet, moisture continues after the shower ends.

The mistake is treating the extractor fan as the whole solution. It is important, but it is only one part of the system.

A well-performing bathroom dries because all parts work together.


Extract Fan Sizing: More Than the Number on the Box

Extractor fan sizing is often misunderstood.

A homeowner sees a fan advertised with a high airflow rating and assumes it will solve the problem. But the rating on the box may not reflect real performance once the fan is installed with ducting, bends, grilles, backdraft shutters and roof or wall outlets.

The real question is not only:

“How powerful is the fan?”

It is also:

“How much air will this fan actually move once installed in this bathroom?”

BRANZ guidance notes that extract systems must vent to the outside, and older New Zealand ventilation guidance commonly refers to minimum mechanical extract airflow rates of 25 litres per second intermittent or 10 litres per second continuous for bathrooms and toilets. Healthy Homes guidance also commonly uses bathroom extractor fan requirements based on fan diameter or exhaust capacity, with installers expected to provide written details of fan diameter, ducting and flow rate for rental compliance.

In practical renovation planning, fan performance depends on:

  • bathroom size;

  • shower use frequency;

  • ceiling height;

  • duct length;

  • number of bends in the duct;

  • outlet type;

  • fan position;

  • noise level;

  • whether the fan has a run-on timer;

  • whether there is replacement air.

A fan that is technically adequate but too noisy may not be used. A fan that runs only while the light is on may stop too soon. A fan installed too far from the shower may remove less moisture. A fan connected to long, kinked ducting may perform poorly.

For most homeowners, the best fan is not simply the biggest fan. It is the correctly sized, correctly ducted, quiet enough, well-positioned fan that people actually use.


Ducting to Outside: The Detail That Cannot Be Compromised

A bathroom fan that does not vent outside is not solving the moisture problem. It is relocating it.

This is one of the most important details in the whole ventilation chapter.

If moist bathroom air is discharged into the roof space, wall cavity, ceiling void or underfloor area, the bathroom may look better temporarily while the building fabric is being damaged elsewhere. Moisture can affect insulation, timber, roofing elements, linings and stored items. It may also create mould growth where homeowners rarely look.

MBIE’s active ventilation guidance is direct: extractor fans must be vented to the outside, otherwise moist air can end up in the roof space and damage insulation and roof structure.

Ducting should be treated as part of the fan, not an optional extra.

Good ducting should be:

  • as short and straight as practical;

  • properly connected;

  • insulated where condensation risk exists;

  • sloped or detailed to avoid water collecting in the duct;

  • discharged to an appropriate exterior location;

  • fitted with suitable exterior grille or cowl;

  • accessible enough for future maintenance where possible.

Poor ducting can ruin a good fan.

Long ducts, tight bends, crushed flexible ducting, blocked grilles, missing backdraft control or poor exterior termination can all reduce performance. A fan may sound like it is working while very little moist air actually leaves the house.

The homeowner’s practical question is:

“Where does the air go?”

If the answer is not clearly “outside”, the system is not acceptable.


Replacement Air: Why Door Undercuts Matter

An extractor fan removes air from the bathroom. But for air to leave, other air must come in.

This is the part many people forget.

If a bathroom door is tightly sealed and the window is closed, the fan may struggle to move air. It may become noisy, pull poorly, or create negative pressure without removing moisture effectively. Airflow needs a path.

Replacement air can come from:

  • an undercut at the bottom of the door;

  • a transfer grille;

  • an open window;

  • a gap from an adjoining space;

  • designed ventilation openings.

MBIE’s active ventilation guidance notes that because extractor fans remove moist air but do not bring fresh air in, another way of getting fresh air into the room is needed; vents on the opposite side of the room, or slightly opening doors or windows, can encourage airflow.

A door undercut is not a glamorous design feature, but it can make the ventilation system work better. Without replacement air, a fan may be like someone trying to drink through a straw with the other end blocked.

The location of replacement air also matters. Ideally, air should move across the room, from the drier side toward the moisture source and then out through the fan. This helps sweep moist air away rather than leaving dead zones.

The bathroom should be planned so the fan has both an exit path and an entry path.


Heated Towel Rails and Condensation Control

A heated towel rail does not replace ventilation.

This needs to be said clearly because many homeowners assume a warm towel rail will solve a damp bathroom. It helps, but only in a specific way.

A heated towel rail can:

  • help towels dry faster;

  • reduce the moisture held in towels;

  • improve comfort;

  • support daily drying;

  • reduce the chance of towels becoming musty.

But it cannot:

  • remove steam from the room;

  • vent moist air outside;

  • fix poor ducting;

  • stop condensation on cold windows by itself;

  • solve mould caused by inadequate extraction.

A towel rail deals with moisture stored in towels. A fan deals with moisture in the air. Heating deals with cold surfaces. All three may be needed.

Condensation happens when warm moist air meets a surface cold enough for water vapour to turn into liquid. This is why mirrors, windows and external walls often show moisture first. Better extraction reduces the amount of moisture in the air. Heating and insulation can help keep surfaces warmer. A demister mirror may keep the mirror clear, but it does not remove moisture from the room.

For a good bathroom, heated towel rails should be planned with:

  • fan performance;

  • room heating;

  • wall fixing;

  • electrical supply;

  • timer control;

  • towel quantity;

  • user habits;

  • safe placement.

A towel rail that is always off because there is no timer, or hidden behind a door where towels never dry well, will not help much.


Maintenance Habits That Prevent Mould

Even the best-designed bathroom still needs good habits.

Ventilation systems work best when people use them consistently. A fan that is switched off too early, a window that is never opened, a towel rail that is never turned on, and wet towels left in a pile can defeat good design.

The goal is not to make bathroom maintenance difficult. The goal is to build small habits that stop moisture from becoming a long-term problem.

Helpful habits include:

  • running the fan during every shower;

  • leaving the fan running after the shower, preferably with a timer;

  • keeping the door slightly open after use if privacy allows;

  • wiping excess water from glass and tiles;

  • hanging towels open, not folded in thick layers;

  • using the heated towel rail correctly;

  • cleaning fan grilles regularly;

  • checking that exterior vents are not blocked;

  • replacing or repairing failed silicone;

  • dealing with leaks immediately;

  • avoiding drying large amounts of laundry in the bathroom without ventilation;

  • keeping vanities and cabinetry dry around edges.

Fan maintenance is often forgotten. Dust build-up reduces airflow. A fan that sounds normal may not be moving enough air if the grille or duct is dirty.

Mould prevention is not about harsh cleaning chemicals. It is about controlling moisture before mould has the conditions to grow.


When a Bathroom Still Feels Damp

Sometimes a bathroom remains damp even after a fan is installed.

That does not always mean the fan is faulty. It may mean the system is incomplete.

Work through the problem in order:

First, check use.
Is the fan being used during and after showers? Does it run long enough? Are windows or doors kept closed all the time?

Second, check airflow.
Does the fan actually pull air? Is the grille dirty? Is there enough replacement air under the door?

Third, check ducting.
Does the duct go outside? Is it too long, crushed, disconnected or blocked? Is the exterior grille clear?

Fourth, check moisture load.
Are multiple people showering back-to-back? Are towels drying in the room? Is laundry being dried indoors?

Fifth, check temperature.
Are surfaces too cold? Is the room under-heated? Is there poor insulation on external walls or ceilings?

Sixth, check for leaks.
A damp smell may come from plumbing, waterproofing or building leaks rather than normal shower moisture.

This order matters. Many homeowners replace a fan before checking ducting or replacement air. Others clean mould for years without addressing cold surfaces or shower habits.

A damp bathroom is not a mystery to be tolerated. It is a system to be diagnosed.


Bathroom Ventilation Planning Sheet

Use this before finalising a bathroom renovation.

Planning area

Questions to confirm

Moisture source

Is there a shower, bath, laundry function or wet towel storage?

Fan location

Is the fan close to the shower or main moisture source?

Fan performance

Is the fan sized for the room and real ducting conditions?

Ducting

Does the duct discharge outside, not into a roof or wall cavity?

Duct path

Is the duct as short and straight as practical?

Replacement air

Is there a door undercut, grille or other air path?

Noise

Is the fan quiet enough that people will actually use it?

Timer

Will the fan continue running after showers?

Heating

Are surfaces warm enough to reduce condensation?

Towel drying

Is there a heated towel rail or good towel drying location?

Maintenance

Can the fan grille and exterior outlet be cleaned?

Rental compliance

If rented, are fan diameter, ducting and flow-rate details recorded?

Handover

Are product manuals, installation details and maintenance instructions saved?


Chapter Summary

Bathroom ventilation is a moisture-control system, not a single fan. New Zealand bathrooms often struggle with cool surfaces, repeated shower use, high humidity and limited natural drying. Good ventilation removes moist air at the source, discharges it outside, allows replacement air into the room, and works together with heating and daily habits. Extractor fan sizing should consider real installed performance, not only the number on the box. Ducting must go outside, because sending moist air into roof or wall spaces can damage the building. Door undercuts and air paths help fans work properly. Heated towel rails help dry towels but do not replace extraction. Long-term mould prevention depends on consistent fan use, drying habits, maintenance and early investigation of leaks or damp smells.

Chapter 16. Bathroom product installation checkpoints

Bathroom Product Installation Checkpoints

A bathroom can be beautifully planned and still fail during installation.

The toilet may be the right style but sit unevenly on the floor.
The vanity may fit the wall but block the waste pipe.
The basin may look elegant but splash because the mixer is wrong.
The LED mirror may arrive on time but the cable is in the wrong place.
The shower rail may be drilled through tile without proper sealing.
The screen may fit on paper but not on an out-of-square wall.
The silicone may look neat for one week and fail after the bathroom is used.

Bathroom installation is not simply the final step after product selection. It is the point where design, site conditions, plumbing, electrical work, waterproofing, fixing and daily use all meet.

This chapter gives homeowners practical checkpoints for bathroom product installation. It is not a technical installation manual and does not replace licensed trades. Instead, it helps homeowners ask better questions, recognise obvious risks, keep useful records and avoid accepting a bathroom before it has been properly checked.

A bathroom should not be handed over just because the products are in place.
It should be handed over because the products are secure, sealed, connected, tested, documented and usable.


Before Installation: Check the Room, Not Just the Product

Before any bathroom product is installed, the room should be checked one more time.

This is the moment to compare the real site with the plan. Measurements taken weeks earlier may no longer be enough. Walls may have changed after lining and tiling. Floor levels may be slightly different after waterproofing and tile build-up. Pipe positions may not be exactly where they appeared in the old bathroom. Electrical cables may not be where the mirror or towel rail now needs them.

Good installers know this. They do not assume the product will fit just because it was ordered for the room.

Before installation begins, confirm:

  • final finished wall-to-wall measurements;

  • finished floor level;

  • tile thickness and build-up;

  • waste and water positions;

  • wall framing and fixing points;

  • electrical cable positions;

  • shower screen opening dimensions;

  • door swing;

  • product model numbers;

  • installation manuals;

  • who is responsible for each connection;

  • which work requires a licensed plumber or registered electrician.

This check prevents one of the most common renovation frustrations: discovering a mismatch only after the product is unpacked, the installer is on site and the room is already finished.


Toilet Installation Checks

A toilet installation should feel solid, level and natural to use. It should not rock, leak, smell or sit awkwardly away from the wall unless that gap was expected and accepted.

Before installation, check that the trap type, set-out, inlet position and product model match the site. An S-trap toilet depends on the distance from the finished wall to the centre of the floor waste. A P-trap toilet depends on the wall outlet height and position. A back-to-wall toilet is less forgiving because it needs the pan and cistern to sit neatly against the finished wall.

If the set-out is slightly different, an offset connector may help in some cases. But offset connectors are not magic solutions. Too much adjustment can affect appearance, cleaning, stability or drainage performance. If the mismatch is large, the right answer may be plumbing work, not forcing the toilet to fit.

During installation, watch for three things: stability, sealing and access.

The toilet should sit firmly on the finished floor. If the floor is uneven, packing and fixing must be handled correctly. The pan should not wobble. Water connections should be accessible enough for future servicing. The cistern should fill and flush properly. The base should be sealed neatly where required, but sealing should not be used to hide movement or poor fixing.

After installation, the test is simple but important:

  • flush several times;

  • check around the pan connector;

  • check the water inlet;

  • check cistern refill;

  • check for odour;

  • sit gently and confirm there is no rocking;

  • inspect the floor around the base after use.

For smart toilets, add another layer of checks. Confirm the electrical supply, RCD protection, water connection, backflow prevention requirements, controls, remote pairing, user settings and access for maintenance. A smart toilet is not just a toilet. It is a plumbing and electrical product, and both sides need to be correct.

Vanity Installation Checks

A vanity is where many bathroom installation problems meet: water, storage, wall fixing, floor level, basin height, silicone, pipework and daily use.

Before installation, confirm whether the vanity is floor-standing or wall-hung.

A floor-standing vanity may be more forgiving, but it still needs a level floor, correct pipe alignment, moisture protection and clean sealing. If the floor slopes or tiles are uneven, the vanity may rock or leave gaps. If the back panel needs to be cut for pipes, the cut-outs should be neat and no larger than necessary. Poorly cut backs invite moisture, pests and future weakness.

A wall-hung vanity is less forgiving. It must be fixed into suitable framing, noggins or blocking. It should not rely only on wall lining or tile. The installer should know where the structure is before drilling. If the wall support was not prepared before tiling, the installation may need to stop and be reassessed.

The most common vanity mistake is discovering too late that the drawers and pipes want the same space.

Drawer vanities are practical, but the waste and water supplies must clear the drawer system. If the pipe positions are wrong, installers may cut the drawers, modify the cabinet or create awkward plumbing. Sometimes this works. Sometimes it ruins the storage that made the vanity attractive in the first place.

Before final fixing, open everything:

  • top drawer;

  • bottom drawer;

  • cabinet doors;

  • waste access;

  • water valve access;

  • bathroom door;

  • nearby shower screen.

The vanity should not only fit the wall. It should work in the room.

After installation, check basin height, drawer operation, pipe clearance, silicone lines, wall contact, floor contact, and whether water can be wiped away easily. A vanity that traps water against the wall or floor will age quickly.


Basin and Tapware Checks

A basin and mixer should be tested as a pair.

Many basin problems are not caused by a defective product. They are caused by poor pairing: a tall mixer on a shallow basin, a short spout that barely reaches the bowl, a tap hole too close to the wall, or a basin height that feels uncomfortable once the vanity and top are installed.

Before final fixing, confirm:

  • basin position on the vanity;

  • waste alignment;

  • overflow connection if applicable;

  • tap hole position;

  • mixer height;

  • spout reach;

  • handle clearance;

  • splash risk;

  • access to water connections;

  • access to the trap;

  • compatibility with the vanity top.

The water should land in a sensible part of the basin, not too close to the front edge, not directly onto a flat surface, and not so far back that hands hit the bowl. The mixer handle should move freely without hitting the splashback, mirror, wall or windowsill.

After installation, run the tap at different flow levels. Do not only test a gentle stream. Test real use. Turn the handle quickly, fill the basin, wash hands, check splash, drain water, and look underneath with a torch.

Small leaks under basins can be slow and easy to miss. A dry hand towel under the trap during testing can reveal drips quickly.

For wall-mounted basin mixers, the checks are more serious. The in-wall body must be correctly positioned before lining, waterproofing and tiling. Once the wall is finished, changing the depth or alignment becomes difficult. Wall-mounted tapware should never be left as a late design decision.


Mirror and LED Mirror Checks

A mirror installation looks simple until it is not.

The most common mirror problems are height, alignment, fixing strength, glare, electrical position and access for future replacement.

Before a standard mirror is installed, confirm the height in relation to the vanity, basin and users. A mirror centred on the wall may not be centred on the vanity. A mirror that looks perfect for one person may be too high for children or too low for a tall user. A heavy mirror or mirror cabinet needs proper fixing, not guesswork.

For mirror cabinets, check door swing. Cabinet doors may hit side walls, lights, tapware or each other. Internal shelves should be usable. The cabinet should not project so far that users feel crowded at the basin.

LED mirrors and demister mirrors require additional planning. They may be plug-in or hard-wired. A hard-wired mirror involves fixed electrical work and should be installed by a registered electrician. The cable exit point must align with the mirror design. If the cable is in the wrong place, the mirror may sit too high, too low or off-centre.

Before installation, confirm:

  • mirror size;

  • final mounting height;

  • centreline relative to vanity;

  • fixing method;

  • wall support;

  • cable position if powered;

  • switch, sensor or touch control;

  • IP suitability for bathroom location;

  • access to driver or transformer if applicable;

  • demister function;

  • warranty requirements;

  • electrical documentation where required.

After installation, test the mirror at the time of day the bathroom is normally used. Check reflection height, lighting comfort, glare, demister operation, switch access and whether the mirror feels natural while standing at the vanity.

A mirror is not just a decorative finish. It is part of the daily routine.


Shower Rail, Mixer and Screen Checks

The shower is where installation quality is tested every day.

Water pressure, body movement, wall penetrations, glass fixing, waterproofing, silicone and drainage all come together in a small area. A shower that looks clean in photos may still leak, splash, rattle, drain slowly or feel awkward to use.

For shower mixers, the most important work often happens before the wall is finished. The in-wall body must be at the correct depth, level and position. If it is too deep, the trim may not fit properly. If it is too shallow, it may sit proud. If it is not level, the finished control looks wrong every day.

Before tiling, confirm the mixer location with the actual product instructions. Do not assume every mixer body has the same depth or trim tolerance.

For shower rails and outlets, the main risk is drilling through tiled wet-area walls. Every fixing point should be properly sealed. A shower rail should be fixed securely but should not be treated as a grab rail unless it is designed and installed for that purpose.

For shower screens, measure after tiling, not only before. Tiled walls may not be perfectly square. Floor falls may affect glass alignment. A hinged screen needs swing clearance. A sliding screen needs track clearance and cleaning access. A fixed panel needs enough length to control splash.

Before final acceptance, test the shower as it will actually be used:

  • run water at normal pressure;

  • aim the shower head in typical directions;

  • test the mixer temperature movement;

  • check around the screen;

  • check the door seal;

  • check the bottom seal;

  • check whether water escapes onto the dry floor;

  • check drainage speed;

  • look outside the shower after several minutes;

  • check the room again after the floor dries.

A shower should not be judged only by whether the glass is straight. It should be judged by whether water stays where it should.


Silicone and Final Water Test

Silicone is the last visible line of defence in many bathroom details.

It is not a substitute for waterproofing, poor fixing or bad design. But it is still important. Silicone helps manage water at junctions, edges, glass, vanity tops, basins, baths and screens. Poor silicone work can allow water into places that are difficult to dry and easy to damage.

Good silicone should be clean, continuous, compatible with the materials and placed where movement or water exposure requires it. It should not be smeared over dirty surfaces, used to fill large uncontrolled gaps, or applied before the area is properly dry.

A bathroom final water test should not be rushed.

Test the room in stages:

  1. Run the basin tap and check underneath.

  2. Fill and drain the basin.

  3. Flush the toilet several times.

  4. Run the shower for several minutes.

  5. Move the shower head as people normally would.

  6. Check outside the screen.

  7. Check around wastes and corners.

  8. Run the bath if there is one.

  9. Check vanity edges and wall junctions.

  10. Leave the room for a short time, then inspect again.

Use a torch. Use dry tissue. Open the vanity. Look under the trap. Touch the floor outside the shower. Check the ceiling below if the bathroom is upstairs.

The best time to find a leak is before final payment and before the room is used normally.

A bathroom that has not been water-tested is not fully handed over.


Bathroom Product Handover Checklist

Use this checklist before accepting the bathroom as complete.

Area

Handover check

Toilet

Stable, level, flushes correctly, no leaks, no odour, inlet accessible

Smart toilet

Power tested, water tested, controls working, documentation supplied

Vanity

Level, secure, drawers clear pipes, doors open, edges sealed

Wall-hung vanity

Fixed into suitable support, no movement, load feels stable

Basin

Waste aligned, drains correctly, no leaks below, splash acceptable

Tapware

Hot/cold correct, pressure suitable, no leaks, handle clears surfaces

Mirror

Correct height, secure fixing, aligned with vanity, no unsafe movement

LED mirror

Electrical connection completed by appropriate person, light and demister tested

Heated towel rail

Secure, positioned well, electrical control tested, documentation kept

Shower mixer

Trim fitted correctly, temperature adjusts smoothly, no wall leaks visible

Shower rail

Secure, fixing points sealed, height comfortable

Shower screen

Door/screen operates smoothly, seals checked, no obvious water escape

Silicone

Clean, continuous, correct locations, no gaps or messy overfilling

Drainage

Basin, shower, bath and floor wastes drain correctly

Ventilation

Fan works, ducting confirmed, run-on timer tested where fitted

Documents

Manuals, warranties, invoices, electrical/plumbing records saved

Photos

Finished installation and hidden work photos kept

Defects

Written defect list agreed before final payment


When Not to Accept Handover Yet

It is reasonable to delay final acceptance if essential checks are incomplete.

Do not accept the bathroom as fully complete if:

  • the toilet rocks or leaks;

  • the vanity is not secure;

  • drawers hit pipework;

  • the basin leaks underneath;

  • hot and cold water are reversed;

  • shower water escapes onto dry areas;

  • the shower screen does not close properly;

  • LED mirror or towel rail electrical work has not been tested;

  • silicone is missing or poorly applied;

  • drainage is slow or smells;

  • ventilation does not operate;

  • required documents are missing;

  • defects have not been written down;

  • the room has not been water-tested.

This does not mean starting an argument. It means protecting the project.

A clear defect list should state:

  • what the issue is;

  • where it is located;

  • who is responsible;

  • what action is required;

  • when it will be completed;

  • whether payment is being held until completion.

Good handover protects both the homeowner and the contractor. Everyone knows what has been completed and what still needs attention.


Chapter Summary

Bathroom installation is where product choice, site conditions, plumbing, electrical work, waterproofing and daily use come together. Each product should be checked in the finished room before acceptance. Toilets must be stable, correctly connected and tested. Vanities must be level, secure, compatible with pipework and properly sealed. Basins and tapware should be tested as a pair for flow, splash, leaks and access. Mirrors and LED mirrors require correct height, fixing and electrical planning. Shower mixers, rails and screens should be checked for depth, sealing, fixing, water escape and real use. Silicone is important but cannot replace waterproofing or poor installation. A bathroom should not be handed over until water testing, product testing, documentation and defect recording are complete.

Part 6 — Working with Professionals

Part Introduction

Hiring a professional does not mean handing over all responsibility.

It means choosing the right person, agreeing on the right scope, communicating clearly, recording decisions and understanding when documentation matters. A good tradie can protect a renovation. The wrong person, the wrong scope or a vague agreement can turn even a simple project into conflict.

Many homeowner disputes do not begin with bad intentions. They begin with assumptions.

The homeowner assumes something is included.
The contractor assumes the site is ready.
The plumber assumes the product will fit.
The electrician assumes the mirror location is confirmed.
The builder assumes variation approval was understood.

This part helps homeowners work with professionals more confidently. It explains how to check tradies, manage scope, handle variations, record progress, prepare for handover and protect themselves if problems appear later.

A renovation runs better when everyone knows what has been agreed.

Chapter 17. How to choose and check tradies

How to Choose and Check Tradies

Most renovation problems are not caused by one bad decision.

They are usually caused by a chain of small decisions: accepting a vague quote, not checking a licence, assuming insurance exists, trusting a verbal promise, choosing the cheapest person, failing to confirm who is responsible for certificates, or letting work begin before the scope is clear.

A good tradie does more than install a product. They ask questions. They notice risks. They explain limits. They tell you when something needs a licensed person. They protect their own work by doing it properly. They leave records behind.

A poor tradie may still be friendly, confident and affordable. That is why choosing a tradie should not depend only on personality or price.

For homeowners, the goal is not to become suspicious of everyone. The goal is to make checking normal.

Before accepting a quote, you should know:

  • who is doing the work;

  • whether they are licensed, registered or qualified for that work;

  • whether they carry appropriate insurance;

  • whether they have done similar projects before;

  • what is included and excluded;

  • what documents will be provided;

  • how variations will be handled;

  • what happens if hidden issues appear.

A renovation is a relationship, but it is also a risk agreement. Good professionals understand both.


Start With the Work, Then Choose the Person

The first mistake many homeowners make is asking, “Do you know a good tradie?”

A better first question is:

“What type of work do I actually need done?”

A bathroom renovation may need a plumber, electrician, waterproofer, tiler, builder, glass installer, painter and sometimes an LBP or designer. A kitchen renovation may need a cabinetmaker, benchtop fabricator, plumber, electrician, flooring installer, splashback installer and appliance installer.

Not every tradie can legally or safely do every part.

A handyman may be suitable for replacing cabinet handles, assembling furniture, minor repairs or installing simple accessories. But that does not mean they should move plumbing, connect fixed wiring, waterproof a shower or alter structural framing.

A builder may manage many parts of a renovation, but they may still need licensed subcontractors for plumbing, gasfitting, drainlaying and electrical work.

A plumber may install plumbing fixtures, but they do not replace the need for a registered electrician when a smart toilet, heated towel rail or LED mirror requires fixed wiring.

The right person depends on the work, not on convenience.

Before contacting anyone, write down the job in plain language:

  • Are products being replaced in the same position?

  • Is plumbing being moved?

  • Is drainage changing?

  • Is fixed wiring needed?

  • Is waterproofing involved?

  • Is any wall being opened?

  • Is any structural work possible?

  • Is the work part of a consented project?

  • Is documentation needed at the end?

Once the work is clear, you can choose the right type of professional.


Licensed Plumber, Gasfitter and Drainlayer

In New Zealand, plumbing, gasfitting and drainlaying are regulated because mistakes can affect health, safety, sanitation, gas safety and property damage.

For kitchen, bathroom and laundry renovations, a licensed plumber, gasfitter or drainlayer may be needed for work involving:

  • moving water supply pipes;

  • altering waste pipes;

  • installing or relocating toilets;

  • installing showers, baths, basins or kitchen sinks;

  • connecting dishwashers or washing machines where plumbing alterations are needed;

  • gas cooktops or gas hot water systems;

  • drainage changes;

  • backflow prevention;

  • work involving sanitary plumbing.

The Plumbers, Gasfitters and Drainlayers Board provides a public register that homeowners can use to check authorised people in these trades. The official PGDB register lets consumers search for registered and licensed plumbers, gasfitters and drainlayers.

For homeowners, the practical step is simple:

Ask for the person’s full name and licence details, then check them on the register before work begins.

Do not rely only on a company name. A company may employ several people. You want to know who will actually do or supervise the restricted work.

Also ask what documentation will be provided after completion. Plumbing documentation can vary by project, but for significant renovation work, you should keep invoices, product details, photos, compliance records and the name of the licensed person who completed the work.

Gas work deserves special caution. Gasfitting should never be treated as ordinary DIY or handyman work. If a project involves gas, confirm the gasfitter’s authorisation before work starts.


Registered Electrician

Electrical work in kitchens and bathrooms requires special care because these rooms combine moisture, metal fixtures, appliances and frequent daily use.

A registered electrician may be needed for:

  • new power points;

  • moving switches or sockets;

  • fixed wiring;

  • LED mirrors that are hard-wired;

  • demister mirrors;

  • heated towel rails;

  • extractor fans;

  • under-cabinet lighting;

  • ovens and cooktops;

  • dishwasher power;

  • smart toilets;

  • switchboard upgrades;

  • RCD protection.

The Electrical Workers Registration Board exists to promote safety by ensuring electrical workers are competent, and homeowners can use the official electrical worker register to check a person’s registration details.

Ask the electrician:

  • Are you registered and currently licensed for this work?

  • What type of electrical work is involved?

  • Will this require a Certificate of Compliance?

  • Will an Electrical Safety Certificate be provided?

  • Is inspection required?

  • Is RCD protection present or needed?

  • Where will cables and switches be located?

  • Will the work be completed before tiling or cabinetry closes the area?

The timing matters.

Electrical planning should happen before walls are closed, before tiles are installed and before mirrors, towel rails or fans are ordered. A product that looks simple can become expensive if the electrical provision is missing.

A good electrician should be able to explain what documents you will receive and when.


Licensed Building Practitioner

An LBP is not needed for every kitchen or bathroom job. Replacing a tap, installing a mirror, changing cabinet handles or repainting a room does not automatically require an LBP.

But an LBP becomes important when the work involves Restricted Building Work or affects critical parts of a residential building, such as structure or weathertightness.

Kitchen and bathroom projects may need LBP involvement if they include:

  • structural wall changes;

  • framing alterations;

  • floor structure changes;

  • external wall penetrations;

  • window or cladding changes;

  • work affecting weathertightness;

  • consented building work requiring LBP records;

  • repairs where water damage has affected framing;

  • alterations linked to a larger building consent.

Homeowners can search the public LBP register to find an LBP, check licensing status, view licence history and see certain discipline history. The LBP homeowner guidance also explains that you can ask to see the practitioner’s current licence ID and scan the QR code to check credentials.

The important point is licence class.

Not every LBP is licensed for every type of building work. A person may hold a licence in carpentry, roofing, external plastering, design or another class. Check that the licence matches the work being done. MBIE’s LBP licence class guidance notes that homeowners can search the public register to check which licence class a person holds and view licence history.

Ask:

  • Does this work require an LBP?

  • Which licence class is relevant?

  • Who will carry out or supervise the restricted work?

  • Will a Record of Work be provided?

  • Is the work part of a building consent?

  • Who is responsible for council inspections?

  • What happens if hidden damage is found?

For bathrooms especially, water damage can reveal framing issues. If structural repair becomes necessary, the project may move beyond a simple product installation.


Public Liability Insurance

A tradie’s skill matters. Their insurance matters too.

Public liability insurance can help cover damage to other property or injury to third parties caused by business activities. The exact cover depends on the policy, exclusions and circumstances, so homeowners should not assume every policy covers every renovation problem. But asking about insurance is still an important part of due diligence.

Ask for evidence of current insurance before significant work begins.

A professional should not be offended by this question. It is normal business practice, especially where work involves water, electricity, glass, structural elements, access risks, heavy products or other trades.

Ask:

  • Do you have current public liability insurance?

  • What is the cover amount?

  • Does it cover the type of work being done?

  • Are subcontractors covered, or do they carry their own insurance?

  • Can you provide a certificate of currency?

  • Does the quote or contract state insurance responsibilities?

  • What happens if accidental damage occurs?

Insurance is not a substitute for good work. It is a safety net for when something goes wrong.

Be careful with vague answers such as “Don’t worry, we’re covered” without evidence. For larger projects, insurance details should be written into the project records.


References and Past Work

Good past work does not guarantee perfect future work, but it is still one of the best ways to understand a tradie’s real standard.

Do not only look at finished photos. Finished photos show style, but they do not show process, communication, punctuality, problem-solving, cleanliness, documentation or how the work performed after six months.

Ask for examples that are similar to your project.

If you are renovating a tiled bathroom, do not judge only by a kitchen splashback photo. If you need a wall-hung vanity, ask whether they have installed similar units. If you need a wet-area shower, ask about waterproofing documentation. If you are in an older home, ask whether they have experience with old framing, uneven floors, asbestos awareness or hidden services.

When checking references, ask practical questions:

  • Was the quote clear?

  • Did the final price change? Why?

  • Did they communicate delays early?

  • Was the site kept reasonably clean?

  • Were variations written down?

  • Did they bring in licensed trades when needed?

  • Were documents provided at the end?

  • Did any problems appear later?

  • If something went wrong, did they return to fix it?

  • Would you hire them again?

The final question is often the most useful.

A tradie does not need a perfect story. Renovations often involve surprises. What matters is how they handle those surprises.


Questions to Ask Before Accepting a Quote

A good quote is not only a number. It is a description of responsibility.

Before accepting a quote, ask the questions that make responsibility clear.

Scope

What exactly is included?
What is excluded?
Is demolition included?
Is rubbish removal included?
Are materials included?
Are products owner-supplied or tradie-supplied?
Who measures?
Who orders?
Who checks compatibility?

Licensed work

Does this project require a licensed plumber, gasfitter, drainlayer, registered electrician or LBP?
Who will do that work?
Have their details been provided?
Will certificates, records or statements be supplied?

Timing

When can work start?
How long is expected?
What could delay the project?
Are lead times allowed for?
What happens if products arrive late?

Variations

How are variations priced?
Will variations be written and approved before work continues?
What happens if hidden damage is found?
What hourly rates or margins apply to extra work?

Insurance and risk

Do you have current insurance?
What happens if accidental damage occurs?
Who protects existing floors, walls and fixtures?
Who is responsible for temporary water shut-off or power isolation?

Handover

What will be tested before completion?
What documents will be provided?
What warranties apply?
Who handles defects after completion?
When is final payment due?

Consumer Protection New Zealand explains that an estimate is a best guess and the final price can vary, while a quote is an agreed price for specific work; for expensive jobs, getting a written quote is recommended. Consumer NZ also describes a quote as an exact price for a job that becomes binding once accepted.

The most dangerous quote is not always the expensive one. It is the vague one.


Red Flags When Choosing Tradies

Most red flags are visible before work begins, but homeowners often ignore them because they want the project to move forward.

Be cautious if a tradie:

  • refuses to provide licence or registration details;

  • says licensing “doesn’t matter for this small job” when the work clearly involves restricted systems;

  • avoids written quotes;

  • gives a very low price without clear scope;

  • cannot explain what is included or excluded;

  • pushes for a large cash deposit without paperwork;

  • has no insurance evidence;

  • dismisses consent, waterproofing, electrical or plumbing documentation;

  • cannot provide similar project examples;

  • becomes irritated by reasonable questions;

  • wants to start immediately before checking site conditions;

  • says “we always do it this way” instead of explaining the system;

  • refuses to put variations in writing;

  • cannot say who will actually be on site.

One red flag may not prove someone is bad. But several red flags together should make you pause.

A good tradie does not need to be perfect at sales. But they should be clear, honest and willing to document the work.


Tradie Checking Sheet

Use this before accepting a quote or allowing work to begin.

Check area

What to confirm

Identity

Full name, company name, contact details

Role

What work they will personally do or supervise

Licence/register

PGDB, EWRB or LBP register checked where relevant

Licence class

Licence matches the work required

Insurance

Public liability insurance evidence provided

Scope

Written scope with inclusions and exclusions

Quote type

Fixed quote, estimate or charge-up clearly stated

Products

Who supplies, measures and checks compatibility

Subcontractors

Names and responsibilities of licensed subcontractors

Consent

Who checks consent requirements and manages inspections

Documentation

Certificates, PS3, Record of Work, manuals or warranties identified

Variations

Written variation process agreed

Timeline

Start date, duration and delay risks discussed

References

Similar past work or customer references checked

Payment

Deposit, progress payments and final payment terms clear

Handover

Testing, defect list and documents agreed before final payment

Chapter Summary

Choosing a tradie should begin with understanding the work required. Plumbing, gasfitting, drainlaying, electrical work and Restricted Building Work may require licensed or registered professionals. Homeowners should check PGDB, EWRB and LBP registers where relevant, confirm licence classes, ask for insurance evidence, review similar past work, and understand exactly what is included in the quote. A quote should make responsibility clear, not just show a price. The best tradies communicate clearly, document their work, bring in licensed people when needed and explain risks before they become problems.

Chapter 18. Managing the renovation process

Managing the Renovation Process

A renovation does not usually fall apart in one dramatic moment.

It drifts.

At the beginning, everyone is friendly. The homeowner is excited. The tradie is confident. The quote looks acceptable. Products are being chosen. The start date feels close. Small details are left for “later”.

Then later arrives.

The plumber asks whether the vanity is wall-hung or floor-standing.
The electrician asks where the LED mirror cable should exit.
The tiler asks whether the niche is still required.
The cabinetmaker says the sink cut-out information is missing.
The homeowner thought rubbish removal was included.
The contractor thought the homeowner was supplying the tapware.
Someone says, “We talked about this.”
Someone else says, “That’s not what I meant.”

This is how renovation disputes often begin — not with bad intentions, but with unclear expectations.

Managing a renovation does not mean the homeowner must become a project manager. It means the homeowner must create enough structure so that decisions are visible, responsibilities are written down, changes are recorded, and hidden work does not disappear without evidence.

The aim is simple:

Make the project harder to misunderstand.


Scope of Work: The Project’s Memory

The scope of work is the project’s memory.

People forget conversations. Messages get buried. Photos sit in different phones. Product links change. A quote may describe the room in broad terms but not explain who supplies the mirror, who removes the old vanity, who patches the wall, who disposes of rubbish, or who books the electrician.

A good scope of work prevents the project from relying on memory.

It should describe, in plain language, what will be done, what will not be done, who is responsible, and what assumptions the price is based on.

For a bathroom, the scope should answer questions such as:

  • Is demolition included?

  • Is rubbish removal included?

  • Are plumbing alterations included?

  • Are electrical works included?

  • Is waterproofing included?

  • Who supplies the vanity, toilet, tapware, mirror and towel rail?

  • Who checks WaterMark, WELS or electrical suitability?

  • Are tiles included, or only tiling labour?

  • Is painting included?

  • Is ventilation included?

  • Are certificates, PS3 records or electrical documents included where applicable?

  • Is final cleaning included?

For a kitchen, the scope should answer:

  • Who supplies cabinetry?

  • Who measures the room?

  • Who checks appliance dimensions?

  • Who supplies sink, tapware and waste fittings?

  • Is benchtop templating included?

  • Are cut-outs included?

  • Is splashback installation included?

  • Are plumbing and electrical connections included?

  • Is dishwasher installation included?

  • Is old kitchen removal included?

  • Is flooring affected?

  • Is rubbish removal included?

The scope does not need to be full of legal language. It needs to be specific enough that a person who was not at the first meeting can understand the job.

Consumer Protection New Zealand explains that written quotes or estimates are useful evidence if something goes wrong, and that quotes should show what work will be done, other costs, hourly rates and how long the work will take.

The most dangerous phrase in renovation is:

“That should be included, right?”

If it matters, write it down.


Timeline and Sequencing: The Order Matters

A renovation timeline is not only about dates. It is about dependencies.

One task often cannot begin until another task is complete. The walls cannot be closed until hidden services are checked. Waterproofing cannot be covered until it has cured and been inspected or documented. Benchtops cannot be cut properly until cabinets are fixed and the sink model is confirmed. A shower screen should usually be measured after tiling, not from rough framing. Electrical fit-off cannot be completed if the mirror has not arrived or the cable position is wrong.

A realistic timeline should show the order of work, not just a start date and finish date.

For a bathroom, the sequence may include:

  1. final site measure;

  2. product confirmation;

  3. demolition;

  4. hidden-risk inspection;

  5. plumbing and electrical rough-in;

  6. framing or noggins;

  7. wall lining and substrate preparation;

  8. waterproofing;

  9. inspection, testing or documentation;

  10. tiling;

  11. product installation;

  12. electrical and plumbing fit-off;

  13. silicone and sealing;

  14. final water test;

  15. defect list and handover.

For a kitchen, the sequence may include:

  1. final measure;

  2. product and appliance confirmation;

  3. demolition;

  4. wall, floor and service preparation;

  5. plumbing and electrical rough-in;

  6. cabinet installation;

  7. benchtop templating;

  8. benchtop fabrication and installation;

  9. sink, tapware and appliance installation;

  10. splashback;

  11. electrical and plumbing fit-off;

  12. silicone and sealing;

  13. water and appliance testing;

  14. defect list and handover.

A rushed sequence creates expensive pressure. When the tiler is booked before waterproofing has had enough time, quality suffers. When the benchtop is booked before the sink arrives, assumptions replace measurements. When the electrician is called after tiles are finished, cables become expensive.

The project should not be planned around optimism. It should be planned around dependencies.


Variation Orders: The Moment the Budget Changes

A variation is not a problem by itself.

Renovations change because houses reveal things. A wall is opened and rotten framing appears. A pipe is corroded. The floor is not level. The homeowner chooses a different tile. The original mirror is out of stock. The electrician finds the switchboard needs attention. The plumber discovers the toilet set-out does not match the selected pan.

The problem is not variation. The problem is undocumented variation.

Consumer Protection explains that once a quote is accepted, the provider generally cannot charge more than the quoted price unless the customer agrees to extra work or the scope changes; legally, this is a variation to the contract.

A good variation process protects both sides.

It should answer:

  • What changed?

  • Why did it change?

  • Who requested or discovered it?

  • Is it required or optional?

  • What is the cost?

  • How does it affect the timeline?

  • Does it affect other trades?

  • Does it require consent, inspection or documentation?

  • Who approves it?

  • When was it approved?

A variation should be written before the extra work is done, unless there is an emergency such as stopping active water damage or making the site safe.

The words “just do it” can become expensive.

A simple variation note can be enough:

Variation 04 — Bathroom vanity plumbing adjustment. Existing waste position conflicts with new drawer vanity. Licensed plumber to alter waste within vanity cabinet. Additional cost: $___ incl. GST. Additional time: half day. Approved by homeowner on [date].

This is not bureaucracy. It is memory protection.


Progress Payments: Pay for Progress, Not Hope

Payment structure can either protect a project or weaken the homeowner’s position.

A fair payment schedule should match real progress. The contractor should not be expected to fund the whole project from their pocket, but the homeowner should not pay far ahead of completed work either.

Consumer Protection notes there is no legal requirement to pay a deposit when accepting a quote, and if a deposit is requested, it recommends not paying more than 10% of the total cost. Building Performance also states that written contracts are required for residential building work costing $30,000 or more including GST, and recommends written contracts even below that threshold so both parties know what is being paid for.

A good payment schedule may be linked to milestones such as:

  • contract signed and start date confirmed;

  • demolition complete;

  • rough-in complete;

  • waterproofing complete and documented;

  • tiling complete;

  • cabinetry installed;

  • benchtop installed;

  • plumbing and electrical fit-off complete;

  • final testing complete;

  • defects resolved and documents provided.

Avoid payment stages that are vague, such as “halfway through” or “when most work is done”. Those phrases invite disagreement.

Also be cautious about paying the final amount before testing, documents and defects are complete. Final payment is often the homeowner’s strongest practical protection. It should not be withheld unfairly, but it should be connected to completion.

A good rule is:

Never make the payment schedule more advanced than the work.


Site Photos and Hidden-Work Records

Photographs are one of the cheapest and most powerful renovation tools.

They do not replace professional documents, but they help everyone remember what happened before the wall was closed, before the tile was laid, before the cabinet was installed and before the problem appeared.

Hidden work should be photographed before it disappears.

For a bathroom, photograph:

  • exposed framing;

  • noggins for vanity, mirror, towel rail and grab rails;

  • plumbing rough-in;

  • electrical cable locations;

  • waterproofing before tiling;

  • shower niche waterproofing;

  • floor waste and membrane details;

  • ventilation ducting;

  • product labels;

  • final installed products.

For a kitchen, photograph:

  • wall and floor condition after demolition;

  • plumbing and electrical rough-in;

  • cabinet fixing;

  • sink cabinet before benchtop;

  • under-sink connections;

  • dishwasher hose route;

  • tapware hoses and pull-out weight;

  • appliance labels;

  • final water tests.

Photos should be dated and stored in one project folder. Do not rely on scattered phone galleries or messaging apps. Name files clearly where possible:

  • “Bathroom waterproofing before tiling — 12 Aug”

  • “Kitchen sink waste connection — final test”

  • “LED mirror cable location before tiling”

  • “Vanity noggins before wall lining”

These photos may help with future repairs, warranty claims, insurance questions, resale, or simply remembering where pipes and cables are.

The best record is the one you take before you need it.


Avoiding “He Said, She Said” Disputes

“He said, she said” disputes happen when there is no shared record.

The homeowner remembers one thing.
The tradie remembers another.
The quote is vague.
The message thread is incomplete.
The product changed.
The cost changed.
The timeline changed.
Nobody wrote down the exact decision.

These disputes are emotionally draining because both sides may genuinely believe they are right.

The solution is not mistrust. The solution is simple written confirmation.

After any important conversation, send a short message:

Just confirming today’s discussion: we agreed to keep the toilet in the existing position, change the vanity to 900 mm wall-hung, add noggins before lining, and move the LED mirror cable 150 mm to the left. Please confirm if I have misunderstood anything.

This kind of message is powerful because it gives the other party a chance to correct the record immediately.

Use written confirmation for:

  • product changes;

  • layout changes;

  • cost changes;

  • delays;

  • variation approvals;

  • site discoveries;

  • decisions to stop or proceed;

  • responsibility changes;

  • handover defects;

  • payment agreements.

The tone should stay calm and professional. The goal is not to trap anyone. The goal is to keep the project clear.

If a disagreement appears, return to records:

  • quote;

  • scope;

  • emails;

  • messages;

  • photos;

  • variation approvals;

  • invoices;

  • certificates;

  • defect list.

Consumer Protection advises gathering evidence when trying to resolve problems with a service provider, including showing the original quote or estimate and reminding them what was expected.

A project with records is easier to resolve than a project built on memory.


The Weekly Renovation Control Habit

For longer projects, one weekly check-in can prevent many problems.

It does not need to be formal. It can be a short email or message every Friday.

The check-in should cover:

  • what was completed this week;

  • what was not completed;

  • why anything changed;

  • what is planned next week;

  • what decisions are needed from the homeowner;

  • what products must arrive;

  • what variations are pending;

  • what photos or documents were added;

  • what risks need attention.

A simple weekly update keeps the project visible.

Example:

This week: demolition complete, old pipework exposed, electrician rough-in completed.
Issue: existing vanity waste is lower than expected. Plumber recommends adjustment before vanity installation. Variation price to follow.
Next week: framing support for wall-hung vanity, waterproofing preparation, fan duct route confirmation.
Homeowner decision needed: confirm final towel rail location by Monday.

This is the kind of communication that prevents surprise.

A project does not need endless meetings. It needs rhythm.


Renovation Process Control Sheet

Use this during the project, not only at the beginning.

Control area

What to record

Scope

Current agreed scope, inclusions and exclusions

Products

Final model numbers, supplier, delivery status

Timeline

Current sequence, upcoming work, delay risks

Decisions

Date, decision made, who approved

Variations

Description, reason, cost, time impact, approval

Payments

Amount, milestone, invoice, paid date

Hidden work

Photos before walls, floors or cabinets are closed

Licensed work

Name, licence/register details, certificates expected

Inspections

Council, waterproofing, electrical or other checks

Site issues

Damage, hidden defects, access problems

Handover

Tests completed, defects listed, documents received

Communication

Important emails, messages and meeting notes saved


Chapter Summary

Managing a renovation is not about controlling every trade. It is about keeping the project clear. A written scope of work acts as the project’s memory and prevents assumptions from becoming disputes. Timelines should be planned around sequencing and dependencies, not only dates. Variations are normal in renovation, but they should be written, priced and approved before extra work proceeds wherever possible. Progress payments should be linked to real milestones and should not run ahead of completed work. Site photos and hidden-work records protect future maintenance, warranty claims, insurance questions and dispute resolution. The best way to avoid “he said, she said” disputes is to confirm important decisions in writing while everyone still remembers them.

Chapter 19. Handover, maintenance and dispute preparation

Handover, Maintenance and Dispute Preparation

A renovation does not truly finish when the last tradie leaves.

It finishes when the homeowner has received the documents, checked the work, recorded the defects, understood the maintenance requirements, tested the products, stored the warranties, and knows what to do if something fails later.

This is why handover matters.

A rushed handover can make a finished room look complete while important information is missing. The bathroom looks clean, but the waterproofing photos were never supplied. The kitchen tap works, but no one kept the installation manual. The LED mirror turns on, but the electrical certificate has not been sent. The shower looks good, but no one tested water escaping under the screen. The vanity is installed, but the homeowner does not know which silicone requires maintenance.

A good handover turns a renovation from “finished” into “protected”.

It gives the homeowner a record of what was installed, who installed it, what was tested, what is still defective, what must be maintained, and what evidence exists if a problem becomes serious.

The goal is not to prepare for conflict.
The goal is to prepare so conflict is less likely.


Handover Is Not a Walk-Through. It Is a Record Transfer.

Many homeowners treat handover as a visual inspection.

They walk into the finished bathroom or kitchen, check that everything looks clean, open a few drawers, turn on the tap, thank the tradie, and pay the final invoice.

That is not enough.

A proper handover should transfer information from the people who built the project to the people who will live with it.

The homeowner should understand:

  • what products were installed;

  • where manuals and warranties are;

  • what work was done by licensed trades;

  • what certificates or records exist;

  • what maintenance is required;

  • which defects remain;

  • what has been tested;

  • who to contact if something fails;

  • what is covered by workmanship or product warranty;

  • what is not covered because it is maintenance.

A room can look finished and still be poorly handed over.

The handover should answer one simple question:

“If something goes wrong six months from now, will I know what was installed, who did the work, and what evidence I have?”

If the answer is no, the handover is incomplete.


What Documents to Collect

The best time to collect documents is before final payment, not months later.

Once everyone has been paid and moved on to the next job, documents become harder to chase. Emails go unanswered. Subcontractors become difficult to identify. Product labels disappear. Hidden work is covered. Defects become harder to connect to the original installation.

Create a project folder before handover. It can be digital, physical, or both.

For a kitchen or bathroom renovation, collect:

  • final quote or contract;

  • final agreed scope of work;

  • approved variations;

  • invoices and receipts;

  • product manuals;

  • installation instructions;

  • warranty cards or warranty terms;

  • model numbers and serial numbers;

  • WaterMark or WELS information where relevant;

  • electrical certificates where applicable;

  • plumbing or gas records where applicable;

  • waterproofing PS3 or completion record where applicable;

  • LBP Record of Work where applicable;

  • producer statements or council records where applicable;

  • before, during and after photos;

  • hidden-work photos;

  • defect list;

  • final handover checklist;

  • maintenance instructions;

  • contact details for all key trades.

Do not rely on product boxes. Boxes are thrown away. Labels fade. Links change. Take photos of model labels and store PDFs where possible.

A good project folder is not paperwork clutter. It is the memory of the renovation.

Tip: Don't let these documents scatter. Organize them all into the Appendix D: Homeowner Project Folder Structure, specifically the '05_Consents and Compliance' and '11_Handover and Maintenance' folders.


CoC, PS3, Warranties and Manuals

Not every renovation will produce every type of document. A small cosmetic refresh will not need the same records as a full bathroom renovation with waterproofing, electrical work and consented building work.

But homeowners should understand the main document types.

Electrical certificates

For electrical work, ask what certificate or record will be provided. In New Zealand, prescribed electrical work may require certification, and electrical workers should be able to explain whether a Certificate of Compliance, Electrical Safety Certificate, or other record applies to the work completed. The Electrical Workers Registration Board is the official body responsible for electrical worker registration and competence, and homeowners can use it to check electrical workers.

Waterproofing PS3 or completion record

For waterproofing, especially in consented wet-area work, ask whether a PS3 or equivalent completion record will be provided. The exact requirement depends on the project, council, consent documents and waterproofing system. Even where a PS3 is not required, photos, product data sheets and a written completion record are still valuable.

LBP Record of Work

If Restricted Building Work is involved, the relevant Licensed Building Practitioner may need to provide a Record of Work. This is particularly relevant where the project affects structure, weathertightness or other restricted parts of residential building work. Homeowners can check LBP details through the public register and should confirm that the licence class matches the work being done.

Product warranties and manuals

Product warranties are only useful if the homeowner knows what product was installed and what conditions apply.

Save manuals for:

  • toilets;

  • smart toilets;

  • tapware;

  • shower mixers;

  • vanities;

  • basins;

  • LED mirrors;

  • heated towel rails;

  • extractor fans;

  • kitchen sinks;

  • dishwashers;

  • washing machines;

  • ovens, cooktops and rangehoods.

Manuals often contain cleaning restrictions, maintenance instructions, spare-part information and warranty conditions. A finish may be damaged by the wrong cleaner. A cartridge may need a specific replacement part. A fan may need regular grille cleaning. A smart toilet may require filter or nozzle maintenance.

A warranty is not a promise that nothing needs care. It is usually a promise under conditions.


The Defect List: Be Specific, Calm and Written

A defect list is not an insult to the tradie. It is a normal part of finishing a project.

Most renovations have small defects at handover: a drawer needs adjustment, silicone needs tidying, a paint touch-up is required, a missing cover cap needs to be supplied, a door rubs slightly, a product manual is missing, a shower screen seal needs trimming.

The problem is not the existence of defects. The problem is unclear defects.

A useful defect list should be:

  • written;

  • dated;

  • specific;

  • photographed;

  • linked to a room or product;

  • assigned to a responsible person;

  • given an expected completion date;

  • reviewed before final payment.

Avoid vague complaints such as:

“Bathroom finish is bad.”

Write instead:

“Vanity right-side silicone line has a 60 mm gap near the wall junction. Photo 14. Please reseal before final payment.”

Avoid emotional wording such as:

“The tiling is terrible.”

Write instead:

“Two cracked grout lines visible at shower niche left internal corner. Photo 22. Please inspect and advise repair method.”

Specific defects are easier to fix. Emotional defects are easier to argue about.

Tip: Don't rely on your memory. Print or digitise your Handover and Maintenance Planning Calendar and pin it to your laundry or kitchen cupboard as a constant, practical reminder.


Maintenance Calendar: Protect the Renovation After Handover

A renovated kitchen or bathroom is not maintenance-free.

Some problems blamed on “bad products” or “bad workmanship” are actually maintenance failures. Silicone was never checked. Fan grilles were never cleaned. Tapware was cleaned with harsh chemicals. Shower glass was left with mineral deposits. Cabinet edges stayed wet every day. Washing machine hoses were never inspected. A slow leak under the sink went unnoticed for months.

A maintenance calendar turns care into a habit.

Monthly

Check:

  • under-sink and vanity cabinets for drips;

  • silicone around wet areas;

  • fan grille cleanliness;

  • shower screen seals;

  • tapware aerators;

  • toilet base and inlet valve area;

  • cabinet edges near water;

  • mould returning around corners.

Every 3–6 months

Check:

  • extractor fan performance;

  • exterior vent outlets;

  • heated towel rail operation;

  • grout condition;

  • shower waste and drainage speed;

  • dishwasher hose area;

  • washing machine hoses;

  • smart toilet filters or nozzles if applicable;

  • tapware finish and cleaning products used.

Annually

Review:

  • all warranties and maintenance requirements;

  • silicone condition;

  • signs of moisture in adjacent rooms;

  • water stains under upstairs bathrooms;

  • ventilation habits;

  • appliance filters;

  • product manuals for service items;

  • insurance records and renovation documents.

Maintenance should be simple, but it should not be ignored.

A good maintenance habit is usually cheaper than one emergency repair.


When to Contact the Tradie Again

Do not wait too long to report a problem.

Small issues are easier to diagnose when they are fresh. If water appears under a vanity one week after installation, contact the tradie immediately. If a shower screen leaks from day one, report it immediately. If silicone fails within a short period, photograph it and ask for inspection. If a fan does not seem to extract moisture after installation, ask whether ducting, airflow and replacement air have been checked.

Contact the tradie when:

  • a product does not work as expected;

  • water leaks or drips appear;

  • drainage is slow or smells;

  • electrical fittings behave unusually;

  • a fan is noisy or ineffective;

  • a toilet rocks or smells;

  • a cabinet swells near water;

  • silicone opens or darkens quickly;

  • tiles loosen or grout cracks;

  • mould returns unusually fast;

  • the same issue repeats after cleaning.

When contacting them, include:

  • date of installation;

  • product involved;

  • clear description of the issue;

  • photos or video;

  • when the issue appears;

  • whether it is getting worse;

  • what action you are requesting.

A useful message might be:

Hi [Name], the vanity installed on 14 March appears to have a slow drip under the basin trap. We noticed water in the cabinet this morning. I have attached photos and a short video. Could you please inspect and advise the repair time?

Stay factual. Do not start with blame. The first goal is diagnosis.


Dispute Preparation: Build the File Before You Need It

Note: If direct communication with the tradie fails, you can seek advice from Consumer Protection New Zealand or the Disputes Tribunal to understand your legal rights regarding warranties, workmanship standards, and claim processes.

Most homeowners do not want a dispute. Most tradies do not want one either.

But if a disagreement cannot be resolved directly, evidence matters.

The Disputes Tribunal is designed to be quicker, cheaper and less formal than court, and it can hear small claims up to $60,000. Lawyers generally cannot represent parties at the hearing, and hearings are handled by referees rather than judges.

This does not mean every renovation disagreement should go to the Tribunal. Many issues should first be handled by calm communication, inspection, written defect lists, mediation, manufacturer warranty claims, insurance enquiries or specialist reports.

But if you need to prepare, your file should make the story clear.

A strong dispute file usually includes:

  • contract or accepted quote;

  • scope of work;

  • proof of payment;

  • invoices;

  • messages and emails;

  • approved variations;

  • product details;

  • photos before, during and after;

  • hidden-work photos;

  • defect list;

  • requests for repair;

  • tradie responses;

  • expert inspection reports if obtained;

  • warranty terms;

  • certificates or missing-document requests;

  • timeline of events;

  • clear summary of what remedy you want.

The Tribunal application process allows claims to be lodged online, and additional documents can be uploaded online.

Your evidence should not be a pile of emotional messages. It should be organised.

A simple timeline helps:

Date

Event

Evidence

10 March

Quote accepted

Quote PDF

20 March

Waterproofing completed

Photos 12–18

25 March

Tiling completed

Invoice 02

2 April

Shower leak noticed

Photos 31–34, video

3 April

Tradie contacted

Email thread

10 April

Repair request repeated

Message screenshot

18 April

Independent inspection

Report PDF

The goal is to make the problem understandable to someone who was not there.

How to Ask for a Remedy

When a problem appears, do not only say, “I am unhappy.”

Say what you want done.

A clear remedy request may ask for:

  • inspection;

  • repair;

  • replacement;

  • completion of unfinished work;

  • missing certificates or documents;

  • refund of a specific amount;

  • reimbursement for repair by another qualified person;

  • contribution toward independent inspection;

  • written explanation of why the work is acceptable;

  • warranty claim support.

A strong written request should include:

  1. the issue;

  2. the evidence;

  3. the expected remedy;

  4. a reasonable response deadline;

  5. a calm tone.

Example:

We have identified water leaking from the shower screen base during normal shower use. The bathroom was handed over on 5 May. Photos and video are attached. Please inspect and propose a repair method by 15 May. If we do not hear back, we may need to arrange an independent inspection and seek recovery of reasonable costs.

This wording is firm but not aggressive.

A dispute file should show that you acted reasonably, gave the other party a chance to respond, and kept records.

Handover and Maintenance File Checklist

Use this checklist before final payment and keep it after handover.

File area

What to collect

Contract

Final quote, contract, scope of work

Variations

Approved variation records, costs and dates

Payments

Invoices, receipts, payment schedule

Products

Model numbers, serial numbers, supplier details

Manuals

Installation, use and cleaning instructions

Warranties

Product and workmanship warranty terms

Electrical

CoC, ESC or relevant electrical records where applicable

Plumbing/gas

Licensed person details and relevant records

Waterproofing

PS3, completion record, product data, photos where applicable

LBP

Record of Work where Restricted Building Work applies

Photos

Before, during, hidden work and completed work

Defects

Written defect list with photos and completion dates

Tests

Water tests, appliance tests, ventilation tests

Maintenance

Calendar, cleaning rules, service requirements

Contacts

Tradies, suppliers, warranty contacts

Dispute file

Timeline, messages, reports and remedy requests if needed


Chapter Summary

Handover is the point where the renovation becomes a record, not just a finished room. Homeowners should collect quotes, contracts, variations, invoices, manuals, warranties, certificates, PS3 records, Record of Work documents, photos, defect lists and maintenance instructions before final payment where possible. Defects should be recorded calmly, specifically and in writing. A maintenance calendar helps protect products, finishes, ventilation, silicone, plumbing connections and appliances after the tradies leave. If problems appear, homeowners should contact the tradie early with clear evidence and a specific remedy request. If a dispute cannot be resolved, an organised file with a timeline, evidence, photos, communications and reports will be far stronger than memory or emotion.

Part 7 — NZHomeware Practical Support System

Part Introduction

Many product problems are not really product problems.

They begin before ordering, when measurements are missing.
They begin during installation, when a question is asked too late.
They begin after handover, when no one knows whether the issue is a product fault, installation problem, site condition or maintenance matter.

A good customer support system should not pretend to replace licensed trades. It should help customers ask better questions, provide clearer information, understand product requirements, prepare useful photos, follow manuals and know when professional help is needed.

This part explains a practical support workflow for kitchen, bathroom and homeware products. It covers what customers should check before buying, how installation support should be handled without crossing professional boundaries, and how after-sales troubleshooting can be organised in a fair, useful and responsible way.

The goal is not to answer every technical question internally.

The goal is to guide the customer to the right next step.

Chapter 20. Before-you-buy support workflow

Before-You-Buy Support Workflow

A good renovation product is not only sold at the checkout.

It is confirmed before the customer buys it.

For kitchen, bathroom and laundry products, many problems begin before payment: the customer chooses a toilet without checking the trap set-out, buys a vanity without checking pipe positions, orders a kitchen sink before confirming cabinet width, chooses an LED mirror without knowing whether power is available, or buys tapware without considering water pressure and spout reach.

These are not only customer mistakes. They are support opportunities.

A good before-you-buy support workflow helps customers slow down at the right moment. It gives them a simple way to measure, photograph, ask and confirm before committing to a product. It protects the customer from buying the wrong item, and it protects NZHomeware from preventable returns, installation disputes and avoidable frustration.

The purpose is not to make purchasing difficult.

The purpose is to make the customer feel guided.

A customer who sends measurements and photos before ordering is not creating extra work. They are giving the support team the information needed to help them buy with confidence.


Why Before-You-Buy Support Matters

Most customers do not know what they do not know.

A customer may understand colour, size and price, but not understand set-out, waste position, water pressure, wall framing, mounting type, WELS, WaterMark, electrical wiring or cabinet clearance. They may see a product as a single item, while the installer sees it as part of a system.

For example:

A toilet is not only a toilet. It must match the waste position, trap type, inlet position and floor condition.

A vanity is not only a cabinet. It must work with pipe positions, drawer clearance, wall support, basin height and splash exposure.

A kitchen sink is not only a bowl. It must fit the cabinet, benchtop, tapware, waste fittings and dishwasher connection.

An LED mirror is not only a mirror. It may require electrical planning, wall fixing, switch location and safe placement.

A tap is not only a finish colour. It must suit the basin or sink, water pressure, mounting hole, spout reach and daily use.

The customer may not know which questions to ask. NZHomeware can make those questions visible.

Before-you-buy support matters because it can:

  • reduce wrong-product purchases;

  • reduce avoidable returns;

  • reduce installer refusal;

  • reduce damage caused by incompatible products;

  • improve customer trust;

  • help customers understand site limitations;

  • create clearer records before ordering;

  • show that NZHomeware is a support partner, not only a product seller.

The most valuable support often happens before the sale.


The Before-You-Buy Workflow

The workflow should be simple enough for customers to follow and structured enough for the support team to use consistently.

A practical workflow can follow six steps.

Step 1: Identify the product type

The support team first identifies what the customer wants to buy:

  • toilet;

  • vanity;

  • basin;

  • tapware;

  • shower product;

  • mirror or LED mirror;

  • heated towel rail;

  • kitchen sink;

  • laundry tub;

  • dishwasher or appliance connection product.

Each product type has different risk points. A toilet needs trap and set-out checks. A vanity needs width and pipe clearance checks. A kitchen sink needs cabinet and benchtop checks. An LED mirror needs power and fixing checks.

Step 2: Ask whether it is replacement or new installation

This is one of the most important questions.

A replacement in the same position may be simpler. A new installation or relocation may involve plumbing, electrical work, drainage, consent or professional advice.

Ask:

“Are you replacing an existing product in the same location, or changing the layout?”

This single question often reveals the level of risk.

Step 3: Request measurements

The support team should not rely on descriptions like “standard size”, “normal toilet”, “usual basin” or “same as old one”.

Customers should be guided to send specific measurements depending on the product.

Step 4: Request photos

Photos reduce guessing. A customer may describe a pipe as “on the left”, but a photo can show whether it conflicts with drawers, whether the wall is tiled, whether the inlet is exposed, or whether the waste is too high.

Step 5: Ask compatibility questions

These questions do not replace a licensed installer, but they identify obvious concerns before the order is placed.

Step 6: Confirm limits clearly

If the support team cannot confirm compatibility from photos and measurements, say so clearly.

A good response is:

“Based on the measurements and photos you provided, this product appears likely to suit your current layout. However, final installation suitability should be confirmed by your licensed plumber or installer before purchase or installation.”

If risk is visible, say:

“This may not be a straightforward replacement. The waste position appears different from the product requirements. Please confirm with a licensed plumber before ordering.”

The goal is to help, not overpromise.


What Customers Should Measure Before Ordering

Measurements should be simple, but they must be specific.

The support team should avoid asking customers to “measure everything”. That feels overwhelming. Instead, ask for the few measurements that matter most for the product.

For toilets

Ask customers to measure:

  • distance from finished wall to centre of floor waste for S-trap toilets;

  • floor to centre of wall outlet for P-trap toilets;

  • water inlet position;

  • available width;

  • distance from wall to front obstruction;

  • skirting or tile thickness if relevant.

For vanities

Ask customers to measure:

  • available wall width;

  • depth from wall to door swing or obstruction;

  • existing waste position from wall and floor;

  • hot and cold water positions;

  • finished floor level if uneven;

  • height preference;

  • whether drawers need to clear existing pipes.

For basins and tapware

Ask customers to measure:

  • vanity top size;

  • existing tap hole diameter;

  • basin waste position;

  • distance from tap hole to wall;

  • basin depth;

  • spout reach needed;

  • bench or top thickness.

For LED mirrors

Ask customers to measure:

  • available wall width;

  • height from vanity top to ceiling or light;

  • desired mirror centreline;

  • existing cable or power point position;

  • distance from water sources;

  • wall type if known.

For kitchen sinks

Ask customers to measure:

  • cabinet internal width;

  • existing cut-out size if replacing;

  • benchtop depth;

  • current sink bowl size;

  • waste position;

  • tap hole position;

  • space under the sink;

  • dishwasher or water filter location if relevant.

For kitchen tapware

Ask customers to measure:

  • tap hole diameter;

  • bench thickness;

  • distance from tap hole to splashback or wall;

  • sink bowl depth;

  • under-sink hose clearance;

  • hot and cold inlet positions.

The best measurement instructions use a photo with arrows or a simple sketch. If the customer can see exactly where to measure, support quality improves immediately.


Photos Customers Should Send

Photos are often more useful than long explanations.

Customers do not always know the technical name for what they are seeing. A photo lets the support team identify risks that the customer may not describe.

Ask customers to send clear, well-lit photos from three distances:

  1. Whole area photo — shows the room or product in context.

  2. Medium-distance photo — shows the product and nearby walls, doors or cabinets.

  3. Close-up photo — shows pipes, waste, inlet, power, holes, labels or fixing points.

Bathroom product photos

For bathroom products, ask for photos of:

  • existing toilet from front and side;

  • toilet waste or trap area if visible;

  • water inlet;

  • vanity front;

  • inside vanity cabinet showing pipes;

  • wall behind vanity if exposed;

  • basin and tap area;

  • mirror wall;

  • existing power point or cable for LED mirror;

  • shower mixer and rail;

  • shower screen opening;

  • floor waste;

  • ventilation fan and duct outlet if visible.

Kitchen and laundry photos

For kitchen or laundry products, ask for photos of:

  • whole sink or laundry area;

  • inside the sink cabinet;

  • waste pipe and trap;

  • hot and cold water connections;

  • dishwasher hose connection;

  • tap mounting area;

  • existing sink from above;

  • benchtop cut-out if visible;

  • under-bench space;

  • washing machine or laundry connection;

  • product label if replacing an appliance.

Photo quality matters.

Ask customers to:

  • turn lights on;

  • avoid extreme close-ups without context;

  • include a tape measure in the photo when possible;

  • take photos straight-on, not only at angles;

  • send one photo per detail rather than one crowded collage.

A good photo can prevent a bad sale.


Product Compatibility Questions

Compatibility questions should be short, practical and product-specific.

The goal is not to interrogate the customer. The goal is to uncover risks before they become returns or installation problems.

General compatibility questions

Ask:

  • Is this for a new build, renovation or replacement?

  • Are you keeping the product in the same location?

  • Has a licensed plumber or electrician already checked the site?

  • Do you know the water pressure?

  • Are there any space restrictions?

  • Is the wall tiled, plasterboard, concrete or timber-framed?

  • Are you in an apartment, townhouse or standalone home?

  • Do you need installation by a tradie?

  • Is the product needed by a specific date?

  • Do you have photos and measurements available?

Risk-based questions

If the product involves water:

  • Does it connect to existing plumbing?

  • Are you moving any pipes or wastes?

  • Is the current product leaking or damaged?

  • Are isolation valves available?

  • Is the waste position fixed?

If the product involves electricity:

  • Is there an existing power point or cable?

  • Is the product plug-in or hard-wired?

  • Has a registered electrician checked the location?

  • Is the product near a wet area?

  • Is wall access still available before tiling?

If the product is wall-mounted:

  • Do you know if there are studs or noggins behind the wall?

  • Is the wall already tiled?

  • What is the product weight?

  • Will users pull, lean or hang weight on it?

  • Is future removal or service access needed?

Support boundary statement

For higher-risk products, use a clear boundary statement:

“We can help check product dimensions and general compatibility based on your photos and measurements, but final installation suitability must be confirmed by your licensed installer.”

This protects both the customer and NZHomeware.


Bathroom Product Pre-Check Form

This form can be used by NZHomeware customer service before recommending toilets, vanities, basins, mirrors, heated towel rails or shower products.


Customer details

Field

Customer response

Customer name

Contact email / phone

Product interested in

Product SKU or link

New installation or replacement?

Same location or layout change?

Property type: standalone / apartment / townhouse

Has a licensed installer checked the site?

Desired delivery date


Toilet pre-check

Question

Customer response

Existing toilet type: S-trap / P-trap / unsure

Distance from finished wall to floor waste centre

Wall outlet height if P-trap

Water inlet position

Available width

Photo of current toilet sent?

Photo of waste/inlet sent?

Smart toilet power available?

Plumber confirmation received?


Vanity pre-check

Question

Customer response

Available wall width

Maximum depth allowed

Floor-standing or wall-hung preferred?

Existing waste position

Hot/cold water positions

Drawer clearance concern?

Wall support confirmed for wall-hung vanity?

Photos inside current vanity sent?

Door swing checked?

Installer confirmation received?


Basin and tapware pre-check

Question

Customer response

Basin type: above-counter / inset / under-mount

Vanity top size

Tap hole position and diameter

Mixer height checked?

Spout reach checked?

Splash risk considered?

Water pressure known?

Product documentation sent to installer?


Mirror / LED mirror pre-check

Question

Customer response

Wall width available

Height from vanity top to ceiling/light

Desired mirror size

Standard mirror or LED mirror?

Existing power point or cable available?

Hard-wired installation required?

Electrician confirmation received?

Wall fixing support checked?

Door or cabinet swing conflict?


Shower product pre-check

Question

Customer response

Product type: mixer / rail / screen / niche / other

Existing shower size

Wall type and tile status

Mixer depth or plumbing compatibility checked?

Screen opening width measured after tiling?

Floor fall and drainage considered?

Fixing points and waterproofing risk discussed?

Installer confirmation received?


Support note

NZHomeware note:
Based on the information provided, this product appears:
☐ likely suitable
☐ possibly suitable but installer confirmation required
☐ not recommended without further site check
☐ insufficient information provided

Customer advised to confirm final installation suitability with:
☐ licensed plumber
☐ registered electrician
☐ builder / installer
☐ cabinetmaker / fabricator
☐ other: _______


Kitchen Sink and Tapware Pre-Check Form

This form helps NZHomeware support customers before they order kitchen sinks, laundry tubs and tapware.


Customer details

Field

Customer response

Customer name

Contact email / phone

Product interested in

Product SKU or link

New kitchen / renovation / replacement

Existing benchtop retained or replaced?

Installer / plumber / cabinetmaker involved?

Desired delivery date


Kitchen sink pre-check

Question

Customer response

Cabinet internal width

Benchtop depth

Existing cut-out size if replacing

Preferred sink type: top-mount / under-mount / flush-mount

Benchtop material

Bowl depth suitable for cabinet?

Waste position checked?

Tap hole required?

Dishwasher connection nearby?

Water filter or waste disposal unit installed?

Under-sink photo sent?

Top-view sink area photo sent?

Cabinetmaker/fabricator confirmation received?


Kitchen tapware pre-check

Question

Customer response

Tap hole diameter

Benchtop thickness

Distance from tap hole to splashback/wall

Sink bowl depth

Mixer height clearance checked?

Spout reach checked?

Pull-out or pull-down hose clearance checked?

Hot and cold inlet positions

Water pressure known?

WELS information checked where applicable?

Plumber confirmation received?


Laundry tub / cabinet pre-check

Question

Customer response

Available space width

Depth allowed

Existing waste position

Hot/cold water positions

Washing machine connection required?

Washing machine drains to tub or standpipe?

Floor level checked?

Cabinet moisture exposure considered?

Photos of current laundry area sent?

Installer/plumber confirmation received?


Support note

NZHomeware note:
Based on the information provided, this product appears:
☐ likely suitable
☐ possibly suitable but installer confirmation required
☐ not recommended without further site check
☐ insufficient information provided

Key risk identified:
☐ cabinet width
☐ benchtop compatibility
☐ cut-out size
☐ waste position
☐ tap hose clearance
☐ dishwasher / washing machine connection
☐ water pressure
☐ other: _______


Suggested Customer Support Scripts

When customer asks, “Will this fit?”

Thanks for checking before ordering. To help us assess general suitability, could you please send:

  1. a photo of the current area,

  2. a close-up photo of the plumbing or fixing point, and

  3. the key measurements listed below.

We can help check the product dimensions and obvious compatibility risks, but final installation suitability should be confirmed by your licensed installer.

When photos show possible incompatibility

Based on your photos, this may not be a straightforward replacement. The existing pipe/waste position appears different from the product requirements. We recommend checking with a licensed plumber before ordering to avoid installation issues or return costs.

When information is insufficient

At this stage, we do not have enough information to confirm whether this product is likely to suit your site. Please provide the missing measurements and photos below. Without them, we recommend confirming with your installer before purchase.

When product appears suitable based on provided information

Based on the measurements and photos provided, this product appears likely to suit your current setup. Please note that this is a general compatibility check only. Final installation suitability should be confirmed by your licensed plumber, electrician or installer before installation.

Chapter Summary

Before-you-buy support is one of the most effective ways to prevent wrong-product purchases, installation issues and avoidable returns. NZHomeware can support customers by asking whether the product is a replacement or new installation, requesting the right measurements, asking for clear photos and identifying compatibility risks before ordering. Customers should measure product-specific details rather than relying on “standard size”. Photos should show the whole area, medium view and close-up details. Support staff should ask practical compatibility questions while clearly explaining that final installation suitability must be confirmed by licensed professionals where required. Structured pre-check forms for bathroom products, kitchen sinks and tapware can turn customer service into a reliable support system.

Chapter 21. Installation support workflow

Installation Support Workflow

Selling a renovation product does not end when the box leaves the warehouse.

For many customers, the most stressful part begins after delivery: the product is on site, the installer is booked, the old product has been removed, and suddenly someone has a question.

Which hose goes where?
Can this mirror be hard-wired?
Can the vanity drawers be cut?
Why does the toilet not sit against the wall?
Can the shower rail be drilled here?
Is this normal?
Can your team tell my plumber how to install it?

These questions matter. They affect customer confidence, installation success, product reputation and after-sales workload. But they also carry risk.

NZHomeware customer service can help with product information, manuals, dimensions, missing parts, general guidance and troubleshooting. But customer service should not replace a licensed plumber, registered electrician, builder, waterproofer, gasfitter, drainlayer or council inspector.

The purpose of an installation support workflow is to give customers useful help while keeping boundaries clear.

The best support style is:

helpful, specific, documented and careful.

Not vague.
Not dismissive.
Not overconfident.
Not legally responsible for work that must be assessed on site.


What Customer Service Can Answer

Customer service can safely answer questions about the product itself.

These are usually questions based on information NZHomeware can verify from product pages, manuals, supplier data, installation drawings, warehouse checks or previous support records.

Customer service can help with:

  • product dimensions;

  • model confirmation;

  • colour or finish confirmation;

  • what is included in the box;

  • whether parts are missing;

  • where to find the manual;

  • basic assembly sequence shown in the manual;

  • product weight;

  • packaging size;

  • warranty terms;

  • care and cleaning instructions;

  • spare-part availability;

  • replacement part identification;

  • delivery damage reporting;

  • known product-specific notes;

  • installation video links;

  • general compatibility reminders already stated in the manual.

For example, customer service can say:

“The vanity overall width is 900 mm, and the waste cut-out is shown on page 4 of the manual.”

“This LED mirror is designed for hard-wired installation. Please ask a registered electrician to complete the connection.”

“The tapware package should include the mixer body, flexible hoses, mounting kit and installation instructions. If any item is missing, please send a photo of all contents laid out clearly.”

“The shower screen should be measured against the finished tiled opening. Please refer to the size range in the product manual.”

Customer service can also help customers communicate with installers by sending the correct manual, specification sheet or product drawing.

What customer service should not do is turn product information into site-specific approval.

There is a big difference between:

“The product manual says the minimum cabinet width is 600 mm.”

and:

“Yes, this will definitely fit your cabinet.”

The first is product information.
The second may be a site-specific installation judgment.

What Must Be Referred to a Licensed Tradie

Some questions cannot be answered responsibly by customer service because they depend on the customer’s site, existing services, local compliance requirements or licensed work.

New Zealand homeowners are responsible for ensuring building work meets relevant requirements, and MBIE states that all building work must comply with the Building Code even if it does not require a building consent. That is why NZHomeware should avoid giving site-specific compliance approvals.

Refer customers to a licensed or registered professional when the question involves:

  • moving plumbing;

  • altering drainage;

  • gasfitting;

  • fixed electrical work;

  • switchboard or RCD questions;

  • hard-wired LED mirrors;

  • heated towel rail electrical connections;

  • extractor fan wiring;

  • waterproofing;

  • shower base or wet-area membrane details;

  • cutting structural framing;

  • adding wall support after tiling;

  • council consent questions;

  • Restricted Building Work;

  • apartment body corporate requirements;

  • suspected asbestos or lead paint;

  • hidden leaks or water damage;

  • gas cooktops or gas hot water systems.

For Restricted Building Work, MBIE explains that LBPs who carry out restricted building work must provide a Certificate of Design Work or Record of Building Work, and council checks restricted building work as part of consent and inspection processes.

A useful rule for the support team is:

If the answer could change depending on what is inside the wall, under the floor, behind the tile, in the switchboard or in the consent documents, refer it to the right professional.

This protects the customer and the business.


How to Guide Customers Without Taking Legal Responsibility

Good support does not mean avoiding every question. It means answering the right part of the question.

When a customer asks an installation question, separate it into three layers:

  1. Product information — what NZHomeware can confirm.

  2. General guidance — what the manual or common installation process says.

  3. Site-specific decision — what only the installer can confirm.

For example, a customer asks:

“Can I install this wall-hung vanity on my tiled wall?”

A risky answer would be:

“Yes, that should be fine.”

A better answer is:

“This vanity is designed for wall-hung installation and must be fixed into suitable wall support. We can provide the fixing dimensions from the manual. Because your wall is already tiled, please ask your installer or builder to confirm whether there are suitable studs or noggins behind the wall before installation.”

This answer helps without overpromising.

Another example:

“Can I connect this LED mirror myself?”

A risky answer:

“Just connect the wires as shown.”

A better answer:

“This LED mirror is a powered product and the connection method is shown in the manual. If it is hard-wired, please have a registered electrician complete the connection and provide any required electrical documentation.”

The support team should use language that is:

  • helpful;

  • factual;

  • based on product documents;

  • clear about limits;

  • respectful of licensed trades;

  • written in a way that can be saved.

Avoid phrases such as:

  • “This will definitely work.”

  • “You do not need a plumber.”

  • “Just drill it there.”

  • “It should be legal.”

  • “You can wire it yourself.”

  • “Council will not care.”

  • “Any handyman can do it.”

  • “This is easy.”

Use safer alternatives:

  • “The manual states…”

  • “The product is designed for…”

  • “Please confirm with your licensed installer…”

  • “This depends on your existing plumbing/electrical setup…”

  • “We can provide dimensions, but your installer must confirm site suitability…”

  • “For safety and compliance, please refer this to a registered electrician/licensed plumber…”

The goal is to remain useful while keeping the installation responsibility where it belongs.


Installation Video and Manual Structure

Installation videos and manuals are powerful support tools.

They reduce confusion, help customers prepare, reduce repeated support questions and give installers product-specific information. But they must be structured carefully.

An installation video should not create the impression that every customer can safely install every product themselves. It should show product-specific steps while clearly stating when licensed trades are required.

A good installation video structure is:

  1. Product identification
    Show the exact product model, SKU and package contents.

  2. Important disclaimer
    State that the video is a general product guide, not a substitute for licensed installation where required.

  3. Tools and parts overview
    Show included parts and required tools, separating supplied parts from installer-supplied items.

  4. Before installation checks
    Confirm measurements, wall support, water positions, electrical supply, waste position or site requirements.

  5. Safety and licensed-work reminder
    Identify which steps require a plumber, electrician, builder or other professional.

  6. Main installation sequence
    Show clear product-specific steps without rushing.

  7. Common adjustment points
    Show drawer adjustment, hinge adjustment, bracket alignment, seal placement or hose routing where relevant.

  8. Testing
    Show water test, leak check, electrical function test, door/drawer operation or screen movement.

  9. Maintenance reminder
    Show cleaning, silicone checks, filter cleaning, spare parts or care instructions.

  10. Support contact
    Tell customers what photos or information to send if they need help.

Manuals should follow the same logic. A good manual is not just diagrams. It should include:

  • model identification;

  • package contents;

  • before-you-start checklist;

  • dimension drawings;

  • site compatibility reminders;

  • installation steps;

  • licensed-work warnings;

  • adjustment instructions;

  • water or function testing;

  • maintenance instructions;

  • warranty conditions;

  • support contact and required photos for help.

The manual should answer the customer’s next question before they ask it.

Common Installation FAQs

This section can be used by NZHomeware support staff as a response guide.


“Can you tell me how to install this product?”

Recommended response

We can provide the product manual, installation video and product-specific dimensions. If the installation involves plumbing, electrical work, waterproofing, gas, drainage or structural fixing, please have the work confirmed or completed by the appropriate licensed professional.

“My plumber says the toilet does not fit. What should I do?”

Recommended response

Please send photos of the current waste position, water inlet, the toilet model label and the measurement from the finished wall to the waste centre. We can help compare these against the product specifications, but your licensed plumber must confirm the final installation solution.

“Can I cut the vanity drawers to fit my pipes?”

Recommended response

We do not recommend modifying the product unless your installer confirms it is safe and will not affect function, structure or warranty. Please send photos of the pipe position and the drawer area, and we can provide the vanity internal dimensions for your installer to review.

“Can I install the LED mirror myself?”

Recommended response

If the mirror requires hard-wired electrical connection, please have it installed by a registered electrician. We can provide the manual and cable position information, but we cannot advise customers to complete fixed electrical work themselves.

“Can I drill the shower rail into the tiled wall?”

Recommended response

The shower rail must be fixed securely and all fixing points in wet areas must be sealed correctly. Because drilling may affect waterproofing behind tiles, please ask your installer to confirm the fixing position and sealing method before drilling.

“The tap is leaking after installation. Is the product faulty?”

Recommended response

A leak can be caused by installation, connection, washer position, water pressure or a product issue. Please send a short video showing where the leak appears, photos of the connections, and proof of installation if available. We recommend asking your plumber to inspect the connection first so we can identify the next step.

“The shower screen leaks. Can you send a replacement?”

Recommended response

Please send a video of the leak during normal shower use, photos of the screen alignment, bottom seal, side seals and floor fall. Some leaks are caused by installation alignment or sealing rather than glass defects. We will review the information and advise whether replacement parts, adjustment or installer inspection is needed.

“The extractor fan does not remove steam well.”

Recommended response

Please confirm whether the fan is ducted to the outside, the duct length, whether the grille is clear, and whether there is replacement air under the door or through another opening. We can provide product specifications, but airflow performance also depends on installation and ducting conditions.

Support Escalation Levels

Not every installation question needs the same response. NZHomeware can use three support levels.

Level 1 — Product information

Handled by customer service.

Examples:

  • dimensions;

  • included parts;

  • manual link;

  • care instructions;

  • package contents;

  • product SKU confirmation.

Level 2 — Product troubleshooting

Handled by experienced support or product specialist.

Examples:

  • missing parts;

  • suspected product fault;

  • adjustment guidance from manual;

  • replacement part identification;

  • installation video clarification;

  • comparison between product specification and customer photos.

Level 3 — Licensed or site-specific issue

Referred to customer’s licensed tradie, installer, council, electrician, plumber or builder.

Examples:

  • plumbing alteration;

  • electrical connection;

  • waterproofing;

  • structural fixing;

  • consent question;

  • gas work;

  • drainage changes;

  • hidden water damage;

  • unsafe installation.

The support team should not feel they have failed when a question is referred. Referral is part of good support.


Installation Support Decision Sheet

Customer question type

Can customer service answer?

Recommended action

Product size or SKU

Yes

Provide product page, manual or drawing

Package contents

Yes

Confirm included parts; request photo if missing

Manual or video request

Yes

Send correct link and version

Cleaning and care

Yes

Provide manual-based care instructions

Missing part

Yes

Request order number and clear parts photo

Product adjustment shown in manual

Usually

Provide manual page or video; avoid site-specific claims

Toilet set-out mismatch

Partly

Compare specs, then refer to licensed plumber

Vanity pipe conflict

Partly

Provide internal dimensions, refer installer for modification decision

LED mirror hard-wiring

No

Refer to registered electrician

Heated towel rail wiring

No

Refer to registered electrician

Shower rail drilling in wet area

No for final decision

Refer installer due to waterproofing risk

Waterproofing issue

No

Refer waterproofer/builder/council as applicable

Drainage alteration

No

Refer licensed plumber/drainlayer

Gas product connection

No

Refer authorised gasfitter

Structural wall or fixing uncertainty

No

Refer builder/LBP where relevant

Consent requirement

No final decision

Refer council or qualified professional


Chapter Summary

Installation support should help customers without replacing licensed professionals. NZHomeware customer service can answer product-based questions such as dimensions, manuals, package contents, care instructions, missing parts and product-specific adjustment guidance. Questions involving plumbing alteration, electrical work, gasfitting, waterproofing, drainage, structural fixing, consent or Restricted Building Work should be referred to the appropriate professional. The safest support method is to separate product information from site-specific installation decisions. Installation videos and manuals should include product identification, disclaimers, pre-checks, licensed-work reminders, installation steps, testing and maintenance. Common FAQs should guide customers clearly while avoiding overpromising. A three-level support escalation system helps staff know when to answer, when to troubleshoot and when to refer.


Chapter 22. After-sales and troubleshooting workflow

After-Sales and Troubleshooting Workflow

Note: Effective troubleshooting requires a clear distinction between product maintenance and regulated building work. For work involving fixed wiring, sanitary plumbing, or drainage, always ensure your actions align with the New Zealand Building Code and refer to a licensed professional for any site-specific adjustments.

After-sales support is where a product seller becomes a long-term service partner.

A customer usually contacts after-sales support when something has already gone wrong, or appears to have gone wrong. They may be frustrated, worried, embarrassed, under pressure from an installer, or unsure whether the issue is caused by the product, the installation, the site condition or user error.

The first response matters.

If the response is too defensive, the customer loses trust.
If the response is too casual, the issue may become worse.
If the response promises too much, NZHomeware may take responsibility for something that belongs to installation, plumbing, electrical work or site conditions.
If the response asks for the wrong information, the case becomes slow and emotional.

A good troubleshooting workflow should do three things:

  1. Protect the customer.

  2. Identify the likely cause.

  3. Decide the right next action.

Not every problem means the product is faulty.
Not every problem means the installer made a mistake.
Not every problem can be solved by sending a replacement part.
Not every problem requires a tradie visit.

The job of after-sales support is to slow the situation down, gather evidence, separate product issues from installation issues, and guide the customer toward a practical solution.


The First Response: Acknowledge, Pause, Collect Evidence

When a customer reports a problem, do not begin by arguing about responsibility.

Begin by acknowledging the issue and asking for the information needed to assess it.

A strong first response sounds like this:

English

Thank you for letting us know. We are sorry to hear there is an issue. To help us identify the cause and the best next step, could you please send the following information:

  1. order number;

  2. product SKU or product name;

  3. clear photos of the installed product;

  4. close-up photos of the issue;

  5. a short video if the issue involves leaking, movement, noise or power;

  6. installation date;

  7. whether the product was installed by a licensed tradie or electrician where applicable;

  8. any installer comments.

Once we receive these details, we can review whether this appears to be a product issue, installation issue, site compatibility issue or missing/replaceable part issue.

The Troubleshooting Logic: Product, Installation, Site or Use

Tip: Regardless of the issue, keep a clear record of these troubleshooting steps. Save your evidence, correspondence, and eventual resolution in the 10_Communication Records section of your project folder.

Most after-sales issues fall into four categories.

Product issue

The product may be defective, damaged, missing a part, incorrectly manufactured, or not performing as specified.

Examples:

  • cracked component on arrival;

  • missing mounting kit;

  • faulty LED driver;

  • damaged cartridge;

  • incorrect part in box;

  • visible manufacturing defect.

Installation issue

The product may be correct, but installed incorrectly or incompletely.

Examples:

  • tap hoses connected poorly;

  • toilet not fixed level;

  • vanity not secured to wall;

  • shower screen not aligned;

  • LED mirror wired incorrectly;

  • silicone missing;

  • waste connection leaking.

Site compatibility issue

The product may be correct, but the customer’s site does not suit it.

Examples:

  • toilet set-out mismatch;

  • vanity drawers conflict with existing pipes;

  • low water pressure affects tap or shower performance;

  • wall lacks support for wall-hung vanity;

  • cabinet too small for sink;

  • mirror cable exits in wrong place.

Use or maintenance issue

The product may be correct, but cleaning, maintenance or user habits are affecting performance.

Examples:

  • black tapware cleaned with abrasive chemicals;

  • aerator blocked by debris;

  • fan grille clogged with dust;

  • shower screen seal not cleaned;

  • vanity left wet daily;

  • smart toilet filter or nozzle not maintained.

The support team should not decide too early. Evidence comes first.

A useful internal question is:

“What would prove or disprove each possible cause?”


Tap Leaking

A leaking tap is one of the most common after-sales issues, but it can have several causes.

The leak location matters.

A leak from the spout may suggest cartridge, internal seal or pressure-related issues.
A leak under the bench or vanity may suggest hose connection, washer placement, loose fittings or installation.
A leak around the tap base may suggest sealing, movement or water running back from the surface.
A leak from a pull-out hose may suggest hose damage, loose connection or incorrect routing.

The first step is to ask the customer to identify where the water appears.

Request:

  • photo of the full tap installation;

  • close-up of leak location;

  • video showing the leak while water is running;

  • photo of under-bench or under-vanity connections;

  • installation date;

  • whether a plumber installed it;

  • water pressure if known;

  • whether leak happens when tap is off or only when running.

Customer guidance

English

Please stop using the tap if water is leaking into the cabinet or wall area. Turn off the isolation valves if safe to do so, wipe the area dry, and take photos before and after running water briefly for the video. If the leak is active or worsening, please contact your plumber immediately to prevent water damage.

Likely next steps

Send replacement parts when:

  • the leak is clearly from a replaceable component;

  • the installer confirms installation is correct;

  • photos show no visible connection error;

  • the issue matches a known part failure.

Refer to plumber when:

  • leak is from hose connection;

  • water is leaking inside cabinet;

  • installation method is unclear;

  • water pressure may be abnormal;

  • product has been modified;

  • leak may cause property damage.


Low Water Pressure

Low water pressure is often reported as a product issue, but it is commonly caused by site conditions, debris, supply restrictions or installation.

Before assuming the tap or shower is faulty, check whether the issue affects:

  • only one product;

  • only hot water;

  • only cold water;

  • the whole bathroom;

  • the whole house;

  • only after installation;

  • only when another fixture is running.

Ask the customer:

  • Was the pressure normal before installation?

  • Is the issue on hot, cold or both?

  • Is the aerator or filter clean?

  • Are isolation valves fully open?

  • Are hoses kinked?

  • Is there debris in the cartridge or aerator?

  • Is the product suitable for the property’s pressure system?

  • Has a plumber checked the supply?

Customer guidance

English

Low flow can be caused by the product, but it can also be caused by supply pressure, partially closed valves, debris in the aerator, kinked hoses or installation restrictions. Please send a short video of the flow, photos of the connections, and confirm whether other taps in the home have normal pressure.

Likely next steps

Send replacement part when:

  • aerator, cartridge or flow restrictor is confirmed faulty;

  • the issue affects only this product;

  • installer has checked supply and connections;

  • product-specific part issue is likely.

Refer to plumber when:

  • whole house pressure is low;

  • hot water only is affected;

  • hoses are kinked or connections are restricted;

  • pressure system compatibility is unknown;

  • debris may be from old pipes;

  • installation altered plumbing.


Toilet Rocking

A toilet should not rock.

A rocking toilet may be caused by uneven flooring, poor fixing, incorrect pan connector, insufficient bedding, tile irregularity, damaged fixing points or installation error. It should not be ignored, because movement can damage seals, create leaks, cause odours or loosen connections.

Ask the customer:

  • Was the toilet installed by a plumber?

  • Did it rock from day one?

  • Is the floor level?

  • Are fixing bolts installed?

  • Is there a visible gap under the pan?

  • Is water leaking around the base?

  • Is there any odour?

  • Is the pan connector under stress?

  • Has silicone been used to hide movement?

Request:

  • video showing the movement;

  • photo of the toilet base from all sides;

  • photo of floor surface;

  • photo of rear connection if visible;

  • installer comments.

Customer guidance

English

Please avoid using the toilet if it moves significantly, leaks or smells. A rocking toilet should be checked by the installer or plumber because movement may affect the pan connector or seal. We can review product photos, but fixing and floor suitability need to be assessed on site.

Likely next steps

Send part when:

  • a specific fixing component is missing or damaged;

  • correct installation is confirmed;

  • product defect is visible.

Refer to plumber/installer when:

  • toilet rocks after installation;

  • base seal may be compromised;

  • floor is uneven;

  • pan connector may be under stress;

  • leak or odour is present.


Smart Toilet Not Powering On

A smart toilet combines plumbing and electricity. When it does not power on, support must be careful.

Do not instruct the customer to open electrical components or alter wiring. The first checks should be safe, external and basic.

Ask:

  • Is the product plug-in or hard-wired?

  • Is the power point working with another device?

  • Has the RCD or breaker tripped?

  • Was installation completed by an electrician if hard-wired?

  • Is the remote paired or powered?

  • Is there any display light?

  • Is water supply connected?

  • Has the product ever powered on?

  • Did the issue start after cleaning, water splash or a power outage?

Request:

  • product model and order number;

  • photo of power connection;

  • photo or video of control panel;

  • video showing attempted power-on;

  • electrician comments if hard-wired;

  • serial number if available.

Customer guidance

English

For safety, please do not open the electrical parts or modify wiring. If the unit is hard-wired or the power supply is uncertain, please contact a registered electrician to check the power connection. We can review product information and help identify whether this may be a product fault after the power supply has been confirmed.

Likely next steps

Send replacement part when:

  • power supply is confirmed normal;

  • electrician confirms wiring is correct;

  • fault points to remote, adapter, control unit or known replaceable component;

  • no sign of water damage or incorrect wiring.

Refer to electrician when:

  • hard-wired connection is involved;

  • breaker or RCD trips;

  • power point is uncertain;

  • wiring has been modified;

  • water may have entered electrical area;

  • unit never powered on after installation.


LED Mirror Not Working

An LED mirror issue may involve the mirror, transformer, driver, touch sensor, demister pad, cable connection, wall switch, power supply or installation.

Customer service can help identify the model and symptoms, but electrical diagnosis must be handled carefully.

Ask:

  • Is the mirror plug-in or hard-wired?

  • Does the light not work, demister not work, or both?

  • Is there a wall switch?

  • Does the touch button light up?

  • Was it installed by an electrician?

  • Did it ever work after installation?

  • Did the issue happen suddenly or from day one?

  • Has power supply been tested?

  • Is there visible damage to the cable or mirror?

Request:

  • order number and model;

  • photo of mirror front;

  • video of switch or touch button being used;

  • photo of cable or connection area if safely visible;

  • electrician comments if hard-wired;

  • installation date.

Customer guidance

English

If the mirror is hard-wired, please have a registered electrician confirm that power is reaching the unit and that the connection has been completed correctly. Please do not remove the mirror or access wiring yourself. Once the power supply has been confirmed, we can help assess whether the issue may relate to the mirror, driver, sensor or demister component.

Likely next steps

Send replacement part when:

  • electrician confirms power supply and wiring are correct;

  • issue points to replaceable driver, sensor or component;

  • product is within warranty;

  • no installation damage is visible.

Refer to electrician when:

  • hard-wired power has not been confirmed;

  • wall switch or circuit may be faulty;

  • mirror never worked after installation;

  • wiring access is needed;

  • RCD or breaker trips.


Vanity Door Adjustment

Vanity door or drawer adjustment is usually a lower-risk support issue, but it still needs a clear process.

Many cabinet doors shift slightly during transport, handling or installation. This does not always mean the vanity is defective. Hinges and drawer runners are often adjustable.

Ask:

  • Is it a door, drawer or soft-close issue?

  • Did the problem appear before or after installation?

  • Is the cabinet level?

  • Are screws tight?

  • Is the wall or floor uneven?

  • Is the door rubbing another panel?

  • Is the drawer hitting pipework?

  • Is there shipping damage?

Request:

  • front photo of the vanity;

  • close-up of hinge or runner;

  • video showing the issue;

  • photo inside cabinet;

  • confirmation cabinet is level.

Customer guidance

English

Many vanity doors and drawers can be adjusted using the hinge or runner adjustment points. We can provide the adjustment guide or video. Before adjustment, please confirm the vanity is level and securely installed. If the drawer is hitting plumbing or the cabinet has been modified, please ask your installer to check before adjusting.

Likely next steps

Send guide/video when:

  • issue is normal hinge/drawer alignment;

  • no damage is visible;

  • cabinet appears level;

  • adjustment point is identifiable.

Send replacement part when:

  • hinge, runner or soft-close component is damaged;

  • missing part is confirmed;

  • photo shows part failure.

Refer to installer when:

  • cabinet is not level;

  • wall/floor is uneven;

  • drawer hits pipework;

  • cabinet has been cut or modified;

  • vanity is loose.


When to Replace Parts vs When to Send a Tradie

The most important after-sales decision is choosing the right remedy.

Sending parts too quickly can waste time if the problem is installation-related. Sending a tradie too quickly can be expensive if the issue is a simple missing component or adjustment. Asking the customer to keep troubleshooting can be unsafe if water or electricity is involved.

Use a simple decision rule.

Replace parts when:

  • the issue is clearly linked to a specific replaceable component;

  • the customer has provided photos or video;

  • installation appears correct;

  • no immediate safety or water-damage risk exists;

  • the product is within warranty or goodwill policy;

  • the replacement part is likely to solve the issue.

Examples:

  • missing hinge cap;

  • damaged aerator;

  • faulty remote;

  • broken soft-close hinge;

  • missing mounting screw pack;

  • damaged seal strip;

  • replacement cartridge after plumber confirms tap body is correctly installed.

Refer to tradie when:

  • the issue involves active leaking;

  • water may be entering cabinetry, walls or flooring;

  • fixed electrical work is involved;

  • hard-wired product is not working;

  • toilet rocks, smells or leaks;

  • shower screen leaks due to alignment or sealing;

  • drainage is slow or blocked;

  • product modification is needed;

  • wall support is uncertain;

  • plumbing, electrical, gas, drainage or waterproofing is involved.

Send or arrange a tradie when NZHomeware is responsible and site attendance is necessary:

This may apply when:

  • product fault is confirmed but cannot be resolved by sending a part;

  • installation was arranged by NZHomeware;

  • warranty terms require inspection;

  • a safety issue needs urgent assessment;

  • repeated part replacement has failed;

  • evidence strongly suggests product failure.

The guiding principle is:

Parts solve product-component problems.
Tradies solve site, installation, plumbing, electrical and safety problems.


After-Sales Troubleshooting Intake Form

Field

Customer response

Customer name

Order number

Product SKU / model

Date delivered

Date installed

Installed by customer / handyman / licensed tradie / unknown

Issue category

leak / low pressure / rocking / power / adjustment / missing part / other

When did issue start?

Is the issue getting worse?

Any active leaking or safety risk?

Photos received?

Video received?

Installer comments received?

Product manual checked?

Likely cause

product / installation / site / use / unknown

Recommended action

send part / send guide / refer tradie / escalate / request more info

Follow-up date

Case owner


Chapter Summary

After-sales troubleshooting should begin with acknowledgement and evidence collection, not blame. Most issues fall into four categories: product fault, installation issue, site compatibility issue or use and maintenance issue. Tap leaking, low water pressure, toilet rocking, smart toilet power failure, LED mirror failure and vanity door adjustment each require different evidence and different next steps. Water and electrical issues should be treated carefully, with active leaks and hard-wired products referred to the appropriate tradie. Replacement parts are suitable when the fault is clearly linked to a replaceable component and installation appears correct. Tradie involvement is needed when the issue involves site conditions, plumbing, electrical work, drainage, waterproofing, safety or property damage risk.

Appendices

Appendix A. DIY traffic-light checklist

Appendix A

DIY Traffic-Light Checklist

Use this checklist before deciding whether to do a task yourself.

Green Light — Usually suitable for confident DIY

Task

Check before starting

Replacing cabinet handles

Confirm screw spacing and door thickness

Installing freestanding storage

Check floor level and anti-tip needs

Painting dry interior surfaces

Check surface preparation and ventilation

Replacing simple accessories

Avoid drilling into wet-area waterproofing without advice

Cleaning tap aerators

Turn off water if required; keep small parts safe

Adjusting cabinet hinges

Follow product guide; do not force hardware

Replacing removable shelves

Check weight limit and fixing method

Basic silicone maintenance outside critical wet areas

Remove old silicone properly and use compatible sealant

Yellow Light — Possible, but check first

Task

Why caution is needed

Installing mirrors

Weight, wall fixing and glass safety matter

Drilling bathroom tiles

May affect waterproofing or hidden services

Replacing tapware like-for-like

Plumbing connections, pressure and leaks matter

Installing vanity units

Pipe clearance, wall support and water sealing matter

Replacing shower rails

Wet-area fixing points must be sealed correctly

Installing extractor fan grille or cover

Electrical and ducting issues may be involved

Fitting laundry cabinets

Water exposure and washing machine connections matter

Minor splashback work

Adhesion, waterproofing and edge sealing matter

Red Light — Refer to licensed or qualified help

Task

Who should be involved

Moving plumbing or waste pipes

Licensed plumber / drainlayer

Gas appliance connection

Authorised gasfitter

Fixed electrical wiring

Registered electrician

Hard-wired LED mirror or heated towel rail

Registered electrician

Waterproofing showers or wet areas

Qualified waterproofer / builder as applicable

Structural wall or floor changes

Builder / LBP / engineer where required

Work involving building consent

Council / designer / qualified professional

Suspected asbestos or lead paint removal

Qualified specialist

Drainage alterations

Licensed drainlayer / plumber

Restricted Building Work

Licensed Building Practitioner where required

Rule:
If the task touches water, electricity, gas, drainage, structure, waterproofing or consent, pause before DIY.

Appendix B. Pre-renovation home inspection checklist

Appendix B

Pre-Renovation Home Inspection Checklist

Use this before asking for quotes.

Area

What to check

Notes

House age

Pre-1940s / 1940s–1970s / 1980s–1990s / post-2000

Construction type

Timber floor / concrete slab / apartment / townhouse

Previous renovations

Any unconsented or undocumented work?

Moisture signs

Mould, musty smell, stains, swollen skirting

Bathroom floor

Soft spots, cracking grout, loose tiles

Kitchen/laundry cabinetry

Swelling, water staining, odour

Plumbing

Low pressure, old pipes, corrosion, leaks

Drainage

Slow drains, smells, gurgling

Electrical

Old switchboard, no RCD, limited power points

Ventilation

Existing fan, window, ducting to outside

Asbestos risk

Pre-2000 materials, textured ceilings, vinyl, old linings

Lead paint risk

Older painted timber surfaces

Wall framing

Needed for wall-hung vanity, mirror, towel rail

Floor level

Uneven floors or sloping wet areas

Access

Space for delivery, demolition, rubbish removal

Council/consent

Any layout, structure or wet-area changes?

Body corporate

Apartment or townhouse approval needed?

Budget risk

Add higher contingency for old or unknown conditions

Stop-work triggers:
Stop and seek professional advice if you discover suspected asbestos, active leaks, rotten framing, unsafe wiring, gas smell, major structural movement or unexpected drainage problems.

Appendix C. Bathroom measurement sheet

Appendix C

Bathroom Measurement Sheet

Room measurements

Measurement

Value

Room length

Room width

Ceiling height

Door width

Door swing direction

Window size and position

Floor type

Wall type if known

Existing fan location

Existing power point / switch locations

Toilet measurements

Measurement

Value

Existing toilet type: S-trap / P-trap / unsure

Finished wall to floor waste centre

Floor to wall outlet centre for P-trap

Water inlet position

Available width around toilet

Front clearance

Distance to vanity / shower / wall

Vanity and basin measurements

Measurement

Value

Available vanity wall width

Maximum depth allowed

Preferred vanity width

Existing waste height from floor

Existing waste distance from side wall

Hot/cold water positions

Wall-hung support confirmed?

Door or drawer clearance issue?

Desired basin type

Tap hole location

Shower measurements

Measurement

Value

Shower width

Shower depth

Screen opening width

Door swing or sliding direction

Floor waste location

Mixer position

Shower rail position

Niche or shelf required?

Towel reach after shower

Mirror and towel rail measurements

Measurement

Value

Vanity top to ceiling

Desired mirror width

Desired mirror height

Existing cable/power location

Wall support confirmed?

Heated towel rail width

Heated towel rail power location

Distance from shower/bath

Photos to attach:
Whole bathroom, toilet side view, vanity interior, shower area, floor waste, mirror wall, power points, fan and ceiling.

Appendix D. Kitchen sink and tapware measurement sheet

Appendix D

Kitchen Sink and Tapware Measurement Sheet

Kitchen sink measurements

Measurement

Value

Cabinet internal width

Cabinet internal depth

Benchtop depth

Existing cut-out length

Existing cut-out width

Existing sink bowl size

Waste position

Tap hole position

Benchtop material

Preferred sink type: top-mount / under-mount / flush-mount

Dishwasher connection nearby?

Water filter installed?

Waste disposal unit installed?

Under-sink free space

Tapware measurements

Measurement

Value

Tap hole diameter

Benchtop thickness

Distance from tap hole to wall/splashback

Sink bowl depth

Desired mixer height

Desired spout reach

Pull-out hose space available?

Hot/cold inlet positions

Water pressure known?

WELS rating checked where applicable?

Laundry tub measurements

Measurement

Value

Available laundry width

Available depth

Existing waste position

Hot/cold water positions

Washing machine location

Washing machine drains to tub or standpipe?

Floor level

Cabinet moisture exposure

Photos to attach:
Whole sink area, top view of existing sink, inside sink cabinet, waste pipe, tap connection, dishwasher hose, water filter, benchtop, laundry connections.

Appendix E. Quote comparison template

Appendix E

Quote Comparison Template

Item

Quote A

Quote B

Quote C

Company / tradie name

Contact person

GST included?

Quote or estimate?

Fixed price or charge-up?

Written scope attached?

Demolition included?

Rubbish removal included?

Products supplied by whom?

Plumbing included?

Electrical included?

Waterproofing included?

Tiling included?

Painting included?

Ventilation included?

Consent/council costs included?

PS3 / certificates / records included?

Product allowances stated?

Start date

Estimated duration

Payment schedule

Variation process

Warranty terms

Insurance evidence provided?

Licence/registration checked?

Similar past work shown?

Main exclusions

Main risks

Final total

Decision rule:
Do not choose only by total price. Choose by scope clarity, risk control, documentation, communication and suitability.

Appendix F. Tradie interview questions

Appendix F

Tradie Interview Questions

Identity and qualification

Question

Answer

What is your full name and company name?

Who will actually do the work?

Are you licensed, registered or qualified for this work?

Can I check your licence or registration?

Which licence class applies?

Will subcontractors be used?

Who supervises the work?

Experience

Question

Answer

Have you completed similar bathroom/kitchen projects?

Can you show similar past work?

Have you worked on old NZ homes before?

How do you handle hidden damage?

How do you manage waterproofing/electrical/plumbing records?

Quote and scope

Question

Answer

What exactly is included?

What is excluded?

Who supplies products?

Who checks compatibility?

What happens if products do not fit?

How are variations priced?

Will variations be written before work continues?

Insurance and documentation

Question

Answer

Do you have public liability insurance?

Can you provide evidence of insurance?

What documents will I receive at handover?

Will you provide photos of hidden work?

Will certificates or PS3 records be provided where applicable?

Timing and communication

Question

Answer

When can you start?

How long will it take?

What could delay the job?

How often will you update me?

Who is my main contact?

How will defects be handled?

Red flag:
If a tradie becomes angry or dismissive when asked reasonable questions, pause before accepting the quote.

Appendix G. Handover document checklist

Appendix G

Handover Document Checklist

Collect before final payment where possible.

Document

Received?

Notes

Final quote / contract

Final scope of work

Approved variations

Invoices and receipts

Product manuals

Warranty terms

Product model and serial numbers

WaterMark information where relevant

WELS information where relevant

Electrical CoC / ESC where applicable

Plumbing / gas records where applicable

Waterproofing PS3 or completion record where applicable

Waterproofing product data

Waterproofing photos before tiling

LBP Record of Work where applicable

Council inspection / CCC records where applicable

Before photos

Hidden-work photos

Final completion photos

Defect list

Final water test record

Appliance test record

Ventilation test record

Maintenance instructions

Tradie and supplier contacts

Appendix H. Maintenance calendar

Appendix H

Maintenance Calendar

Monthly

Task

Done

Check under vanity and sink for leaks

Check tap bases and hose connections

Check toilet base for movement, leaks or odour

Clean bathroom fan grille

Check shower screen seals

Wipe shower glass and wet corners

Check silicone near shower, basin and sink

Check cabinet edges for swelling

Clean tap aerators if flow is reduced

Check mould returning in corners

Every 3–6 months

Task

Done

Check exterior vent outlets are clear

Check fan performance

Check heated towel rail operation

Check dishwasher hose and waste connection

Check washing machine hoses

Inspect grout lines in wet areas

Check shower drainage speed

Clean filters where applicable

Review cleaning products used on tapware and sinks

Annually

Task

Done

Review product warranties

Review maintenance instructions

Inspect silicone condition

Check for moisture in adjacent rooms

Check ceiling below upstairs bathroom

Service appliances if required

Update renovation document folder

Review insurance records

Maintenance rule:
Small leaks, odours, swelling, persistent mould and electrical irregularities should be investigated early.

Appendix I. Customer service scripts

Appendix I

Customer Service Scripts

Note: These scripts are designed to guide professional, responsible, and compliant customer communication. Always ensure that site-specific advice adheres to the New Zealand Building Code and relevant safety regulations.

1. Before purchase compatibility check

Thanks for checking before ordering. To help us assess general suitability, please send clear photos of the current area and the key measurements listed below. We can help compare product dimensions and obvious compatibility risks, but final installation suitability should be confirmed by your licensed installer.

Tip: To make this process efficient, refer the customer to your Existing Home Inspection Notes to help them capture the necessary site information.

2. Insufficient information

At this stage, we do not have enough information to confirm whether this product is likely to suit your site. Please provide the missing measurements and photos below. Without them, we recommend confirming with your installer before purchase.

3. Possible incompatibility

Based on your photos, this may not be a straightforward replacement. The existing pipe/waste/power position appears different from the product requirements. We recommend checking with a licensed plumber, electrician or installer before ordering.

4. Installation boundary

We can provide product dimensions, manuals and general product guidance. However, we cannot confirm site-specific installation suitability from photos alone. Please ask your licensed installer to confirm before installation.

5. Hard-wired electrical product

This product requires electrical consideration. If it is hard-wired, please have it installed or checked by a registered electrician. We can provide the product manual and cable position information, but we cannot advise customers to complete fixed electrical work themselves.

6. Plumbing issue

Because this issue involves plumbing connection, water pressure, leakage or waste position, please ask your licensed plumber to inspect the site. We can review product specifications and provide replacement parts if a product fault is confirmed.

7. Missing part

Sorry about the inconvenience. Please send your order number and a clear photo of all parts laid out, plus the manual page showing the missing item. Once confirmed, we will help arrange the correct replacement part.

8. Leak report

Please stop using the product if water is entering the cabinet, wall or floor area. If safe, turn off the isolation valve and send a short video showing the leak location, plus photos of the connections. If the leak is active or worsening, please contact your plumber immediately to prevent water damage.

9. Defect or damage on arrival

We are sorry the product arrived with an issue. Please send photos of the packaging, product label, full product and close-up of the damage. Please keep the packaging until the claim is reviewed.

10. Closing a support case

Thank you for confirming the issue has been resolved. We will close this support case now. Please keep the manual, warranty information and our email thread for your records.

Tip: Remind the customer to attach these resolved records to their Handover and Maintenance Planning Calendar for future warranty and service reference.

Appendix J

Official Reference Links

Use official sources for current requirements, registers and consumer processes. Requirements can change, so readers should check the source directly before making decisions.

Building, consent and homeowner responsibilities

Topic

Official source

Building Performance homepage

MBIE Building Performance helps explain rights and responsibilities in New Zealand’s building sector.

Building consent self-check tool

Can I Build It is an interactive tool for homeowners to help check whether building work may need building consent.

Restricted Building Work

MBIE states that an LBP must design or carry out restricted building work, or supervise it.

LBP register

The public LBP register can be used to check licence status and licence class.

Plumbing, electrical and licensed trades

Topic

Official source

Electrical Workers Registration Board

EWRB promotes safety by ensuring the competence of electrical workers.

Electrical worker public register

The register can be used to check whether an electrical worker is registered and licensed.

Electrical consumer guidance

EWRB explains checking electrical workers and documentation from electricians.

LBP licence classes

MBIE guidance explains that licence class should match the work being done.

Product compliance and water efficiency

Topic

Official source

WELS consumer information

Commerce Commission explains that covered water-using products must have WELS labels at the point of sale.

WELS business obligations

Commerce Commission lists product categories including washing machines, dishwashers, lavatories, showers, taps and urinals.

WELS supplier guide

Ministry for the Environment guidance explains that WELS provides clear information on water consumption and water efficiency.

Ventilation and healthy homes

Topic

Official source

Healthy Homes ventilation standard

Tenancy Services states bathroom fans installed after 1 July 2019 must meet diameter or exhaust capacity requirements.

Healthy Homes ventilation PDF

Tenancy Services guidance states bathroom fans must vent extracted air outdoors and ducting must be connected and unobstructed.

Quotes, contracts and disputes

Topic

Official source

Quotes and estimates

Consumer Protection explains estimates are rough costs while quotes are generally confirmed maximum prices.

Reliable quotes and estimates

Commerce Commission says traders must not mislead customers when giving quotes and estimates.

Disputes Tribunal

The official Disputes Tribunal site states it is quicker, cheaper and less formal than court and can handle claims up to $60,000.

What the Tribunal can help with

The Tribunal describes itself as handling small claims up to $60,000 and legally binding decisions.

Forms and fees

The Tribunal publishes current filing fees, including the fee for claims between $30,001 and $60,000.


If these official resources identify specific risks for your property, record these in your Existing Home Inspection Notes. For managing the project costs associated with these requirements, refer to your Quote and Scope Comparison Sheet.

Final Note

This guide is designed to help New Zealand homeowners make better renovation decisions before, during and after kitchen and bathroom projects.

The central message is simple:

Renovation risk is easiest to reduce before work begins.

Measure before ordering.
Check before paying.
Ask before assuming.
Photograph before covering.
Document before forgetting.
Maintain before damage appears.

A beautiful renovation is valuable.
A well-planned, compliant, documented and maintainable renovation is better. Start that journey by completing your Homeowner Design Brief Template and setting up your project records as outlined in Appendix D: Homeowner Project Folder Structure.

Found this useful?

Browse more free guides in our library or explore the latest articles.

Browse Library → Latest Articles